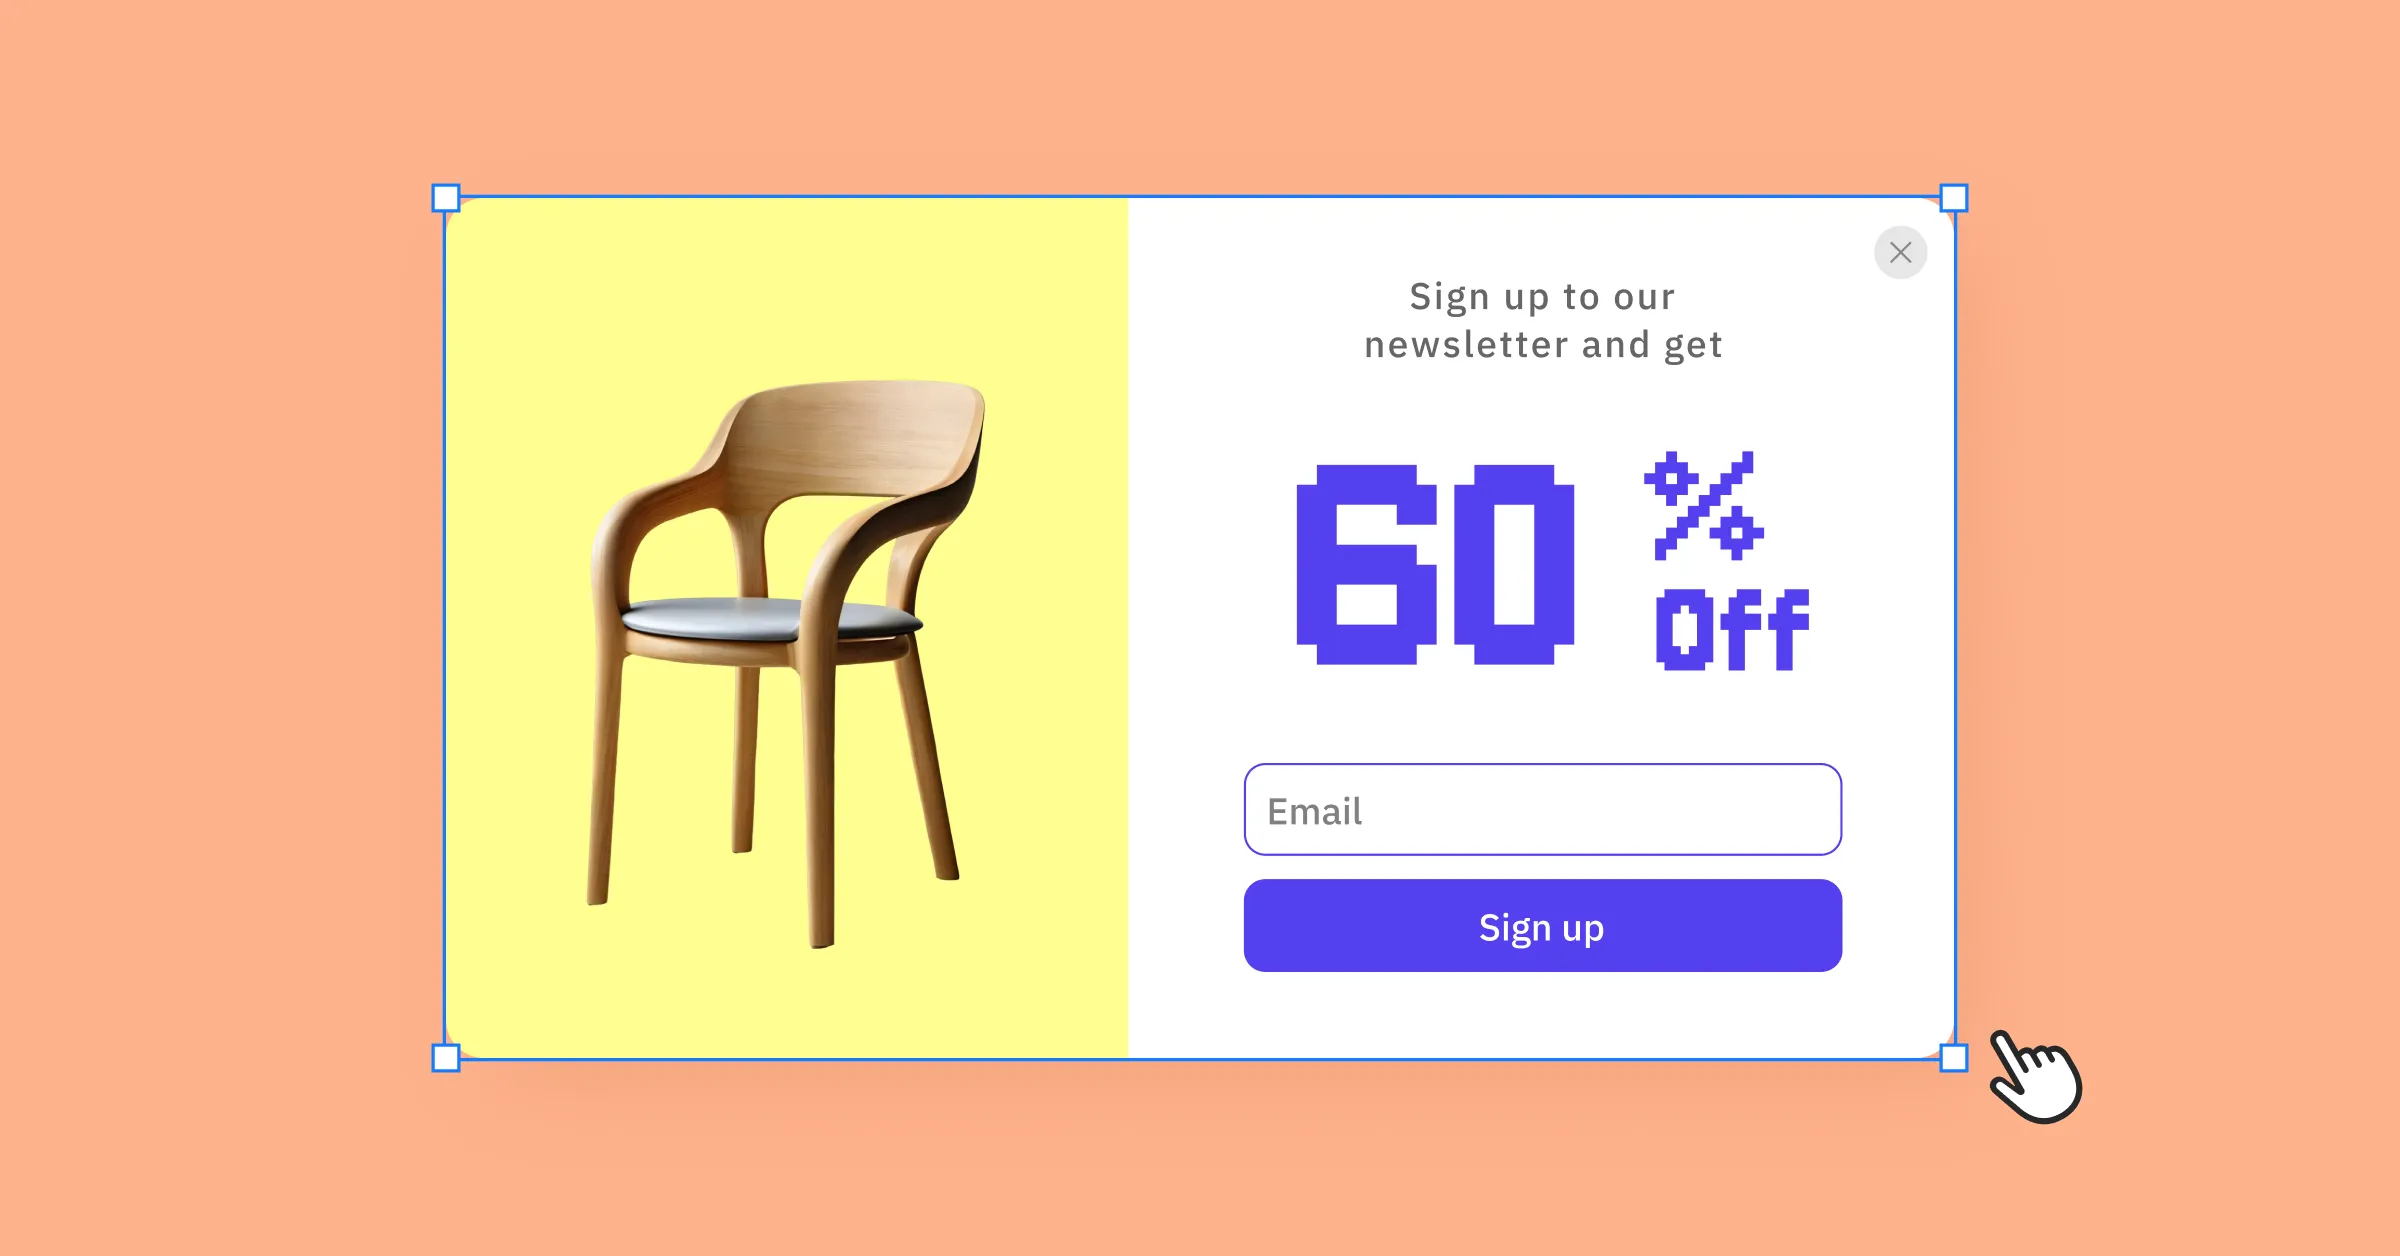
Popups get a bad reputation because most of them are badly built – timed wrong, occur too frequently, impossible to close, or shown to people already converted. But none of that is a popup problem; it’s a setup problem.
Today we’ll walk you through Kirki’s Popup Builder, which gives you controls to fix all three, and you can build it visually just like any page – no code or extra plugins required.
What Are Popups
A popup is an overlay that appears on top of a page to grab attention for one specific action – claiming an offer, joining a list, seeing a notice before they leave, you name it.
Used badly, it can drive bounces. Used well, it can be the difference between a visitor and a lead.
What are Popups in Kirki
In Kirki, a popup is an entity just like a page, not a regular element. Once created, it lives in the Pages panel, alongside your regular Pages, Dynamic pages, and Utility pages, but renders as an overlay across your site based on the display logic you set.
That separation means you can build, style, and manage a popup independently of the page it appears on.
What Are Popups Used For
You know what a popup is, but you might wonder whether it’s worth building one. Here’s how a popup can benefit you:
Grab Attention When Page Content Can’t: Unlike a banner or section built into the page, a popup sits on top of the content – so it can’t be scrolled past unnoticed the way in-page elements can.
Show Up at the Right Moment: A popup can appear exactly when it matters – using the rules you set – instead of waiting for a visitor to find that information on their own.
Personalize the Message by Audience: Not every visitor needs the same message. Popups let you tailor what’s shown to specific audiences, instead of running one generic banner for everyone.
Capture Leads Without a Separate Landing Page: A popup form collects an email address or signup right on the page a visitor is already reading, instead of routing them somewhere else and risking drop-off along the way.
Types of Popups
Popups can serve a range of purposes. Here are a few common ones you’ll likely build, and what each is good for.
Lead Capture Popup: Collects an email address using a Form Block with an email field and a Submit button. Works whether you’re offering a newsletter signup, a giveaway entry, or any other scenario where a visitor would hand over their email, helping you build your mailing list.
Announcement or Notice Popup: Shares a simple message with no form. Useful for sharing site-wide notices, promotions, policy updates, etc.
Exit-Intent Popup: Fired at visitors who are about to leave. Often used for last-chance offers or feedback requests.
Role-Based Popup: Shown or hidden based on who’s logged in – for example, hiding a signup offer from visitors who already have an account, or blocking access to a page for visitors who don’t.
How to Create Popups in Kirki
Before you start, make sure you have an active Kirki project on a WordPress site. The Popup Builder is built directly into Kirki, so there’s nothing extra to install.
With that in place, here’s how to build one, step by step:
Step 1: Create a Popup
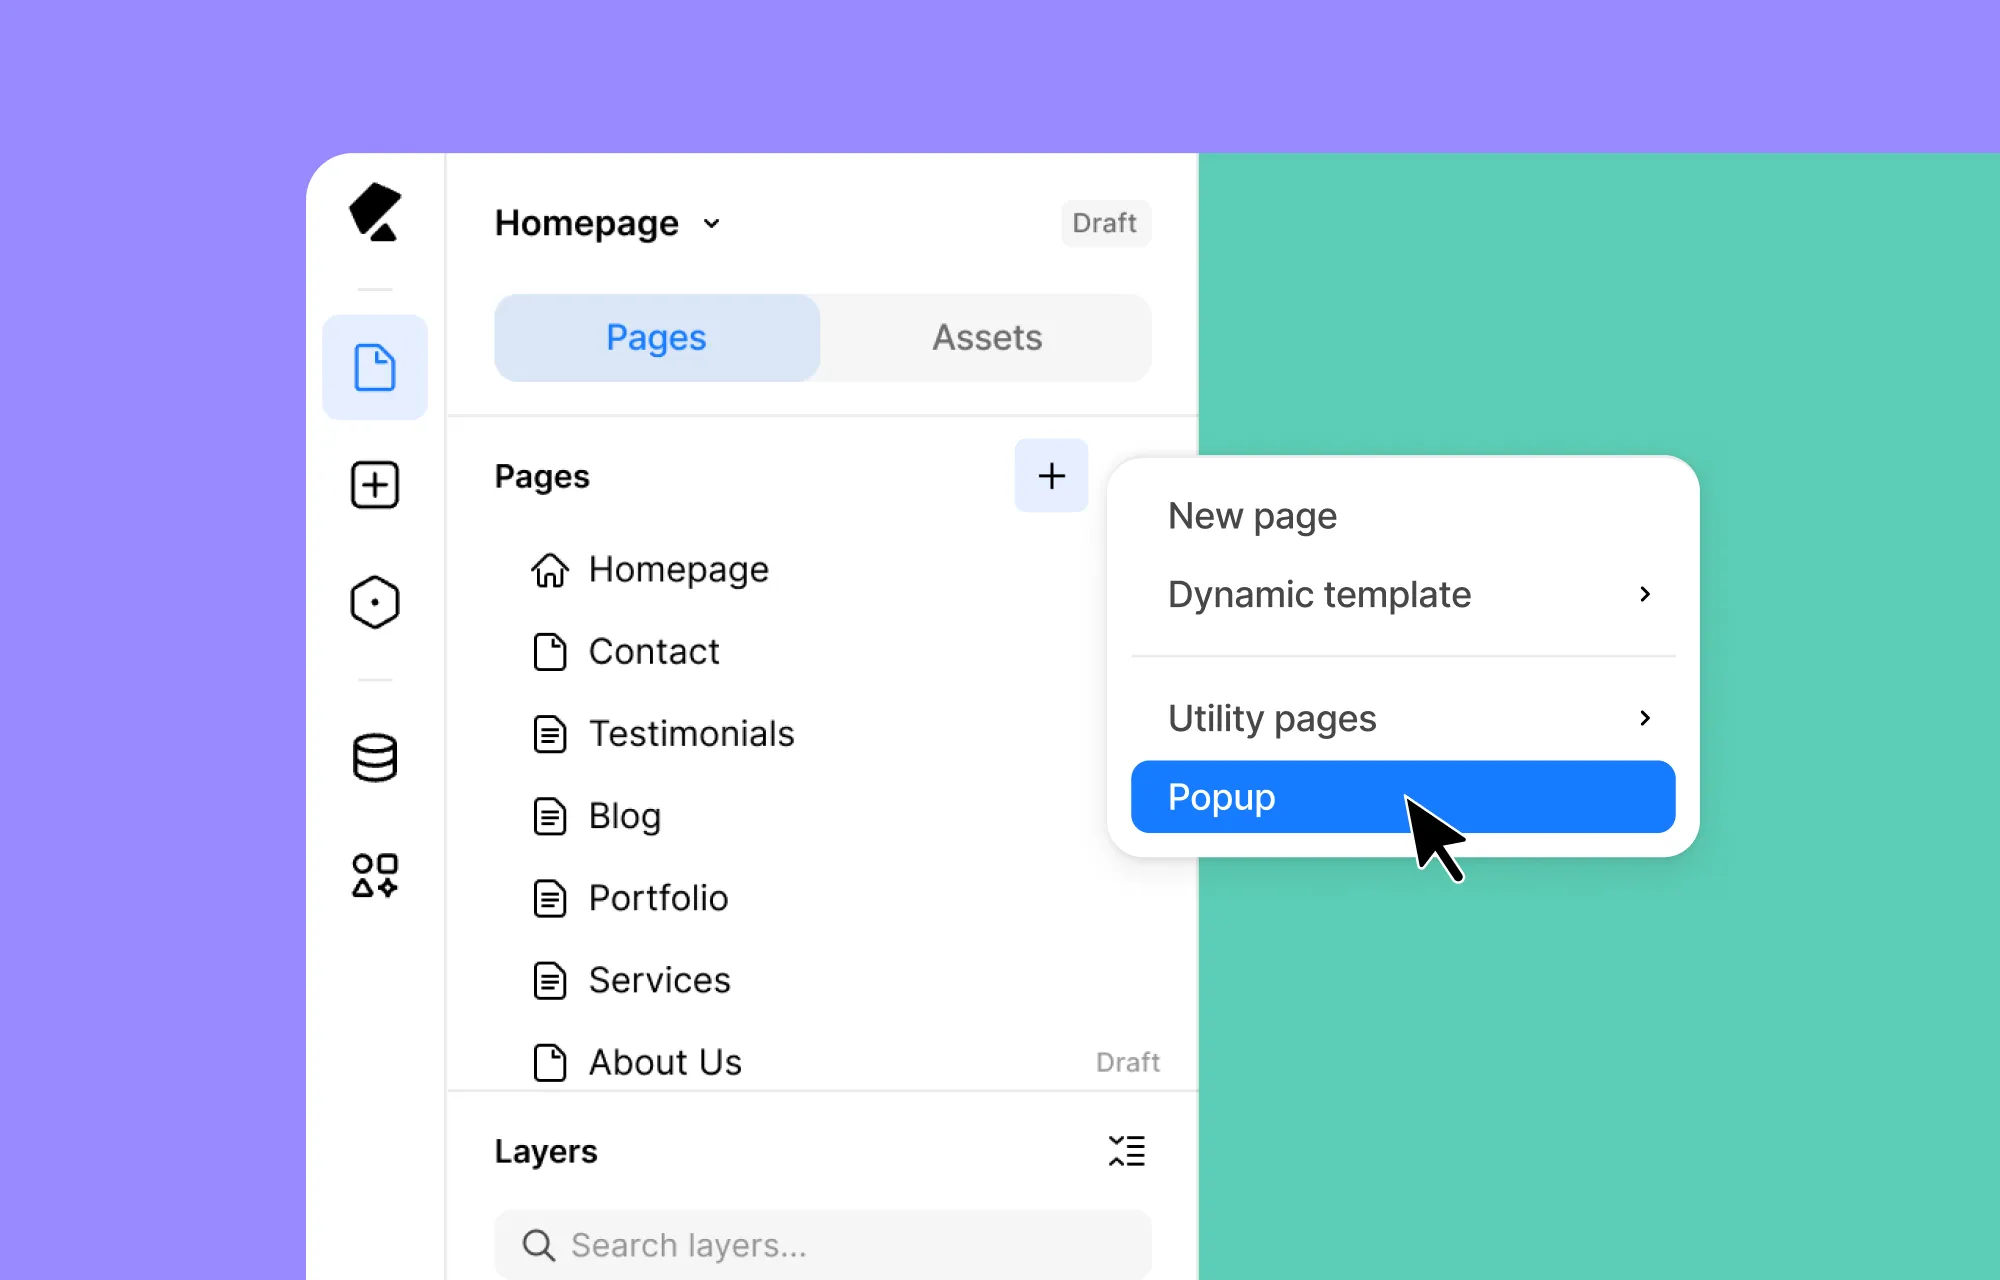
- Go to the Pages panel and click the plus (+) icon at the top.
- From the menu, select Popup. This creates the popup and drops you straight into the builder.
- Once in the builder, give it a Name from the Popup Settings in the Right Panel.
From here, you’ll be working in two places: the Page, where you design the popup, and the Popup settings in the Right Panel, where you control when and how it shows up.
Step 2: Design and Add Content
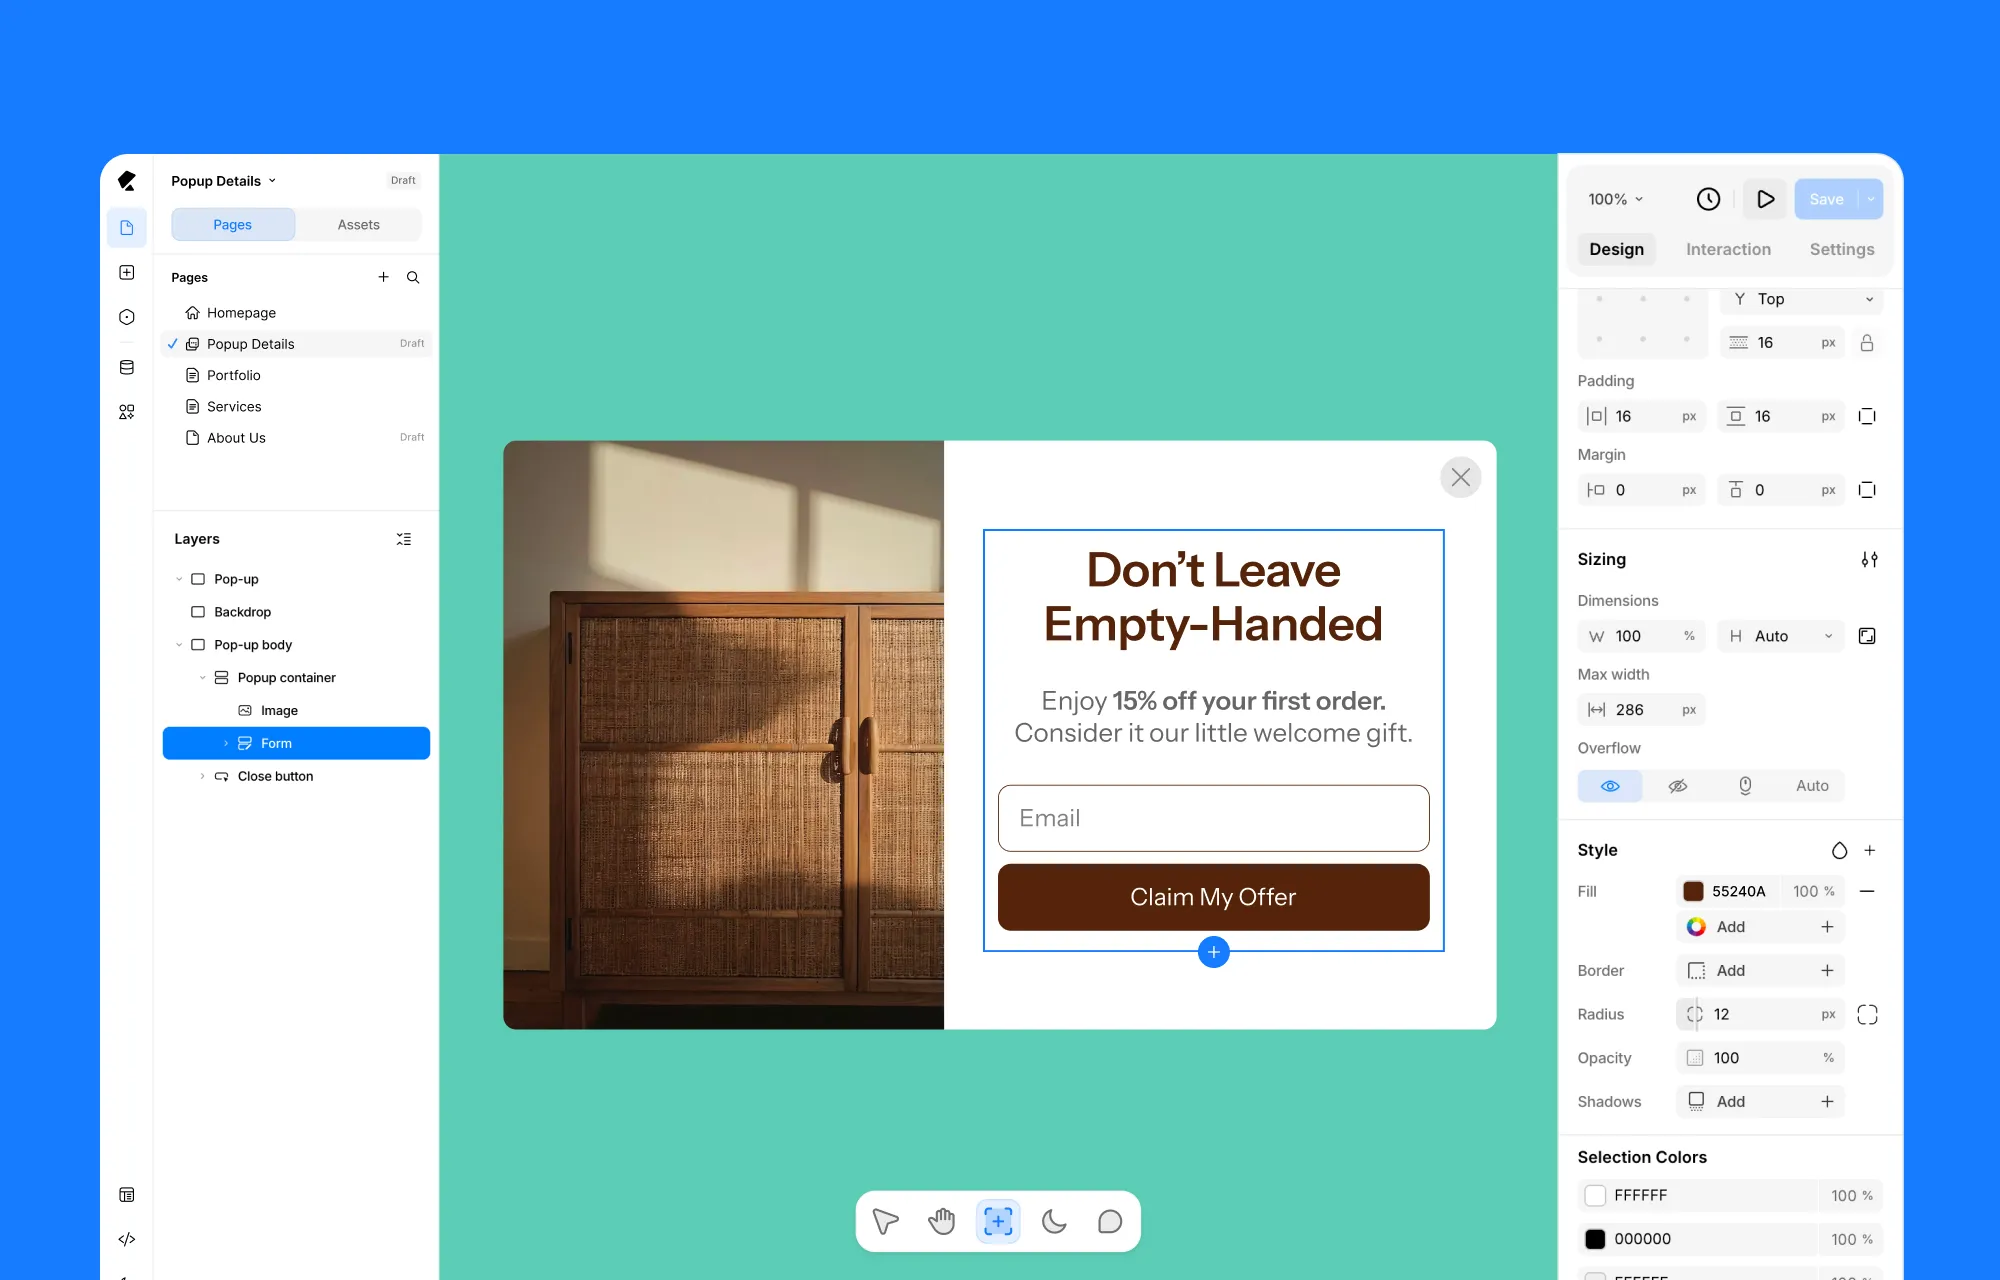
Next, design the popup and add content. You can do this the same way you’d design a page – by adding premade blocks or elements:
- Build your structure using premade blocks or elements from the Insert Panel.
- Replace placeholder text and media with your content.
- Style your elements using the Design tab in the Right Panel.
You can also select the Popup Container and use the same options to style the popup window itself – change the layout, add a background fill, round the corners, and so on.
The Backdrop works the same way. Select it from Layers and adjust its Fill to match your brand colors.
Step 3: Set the Trigger
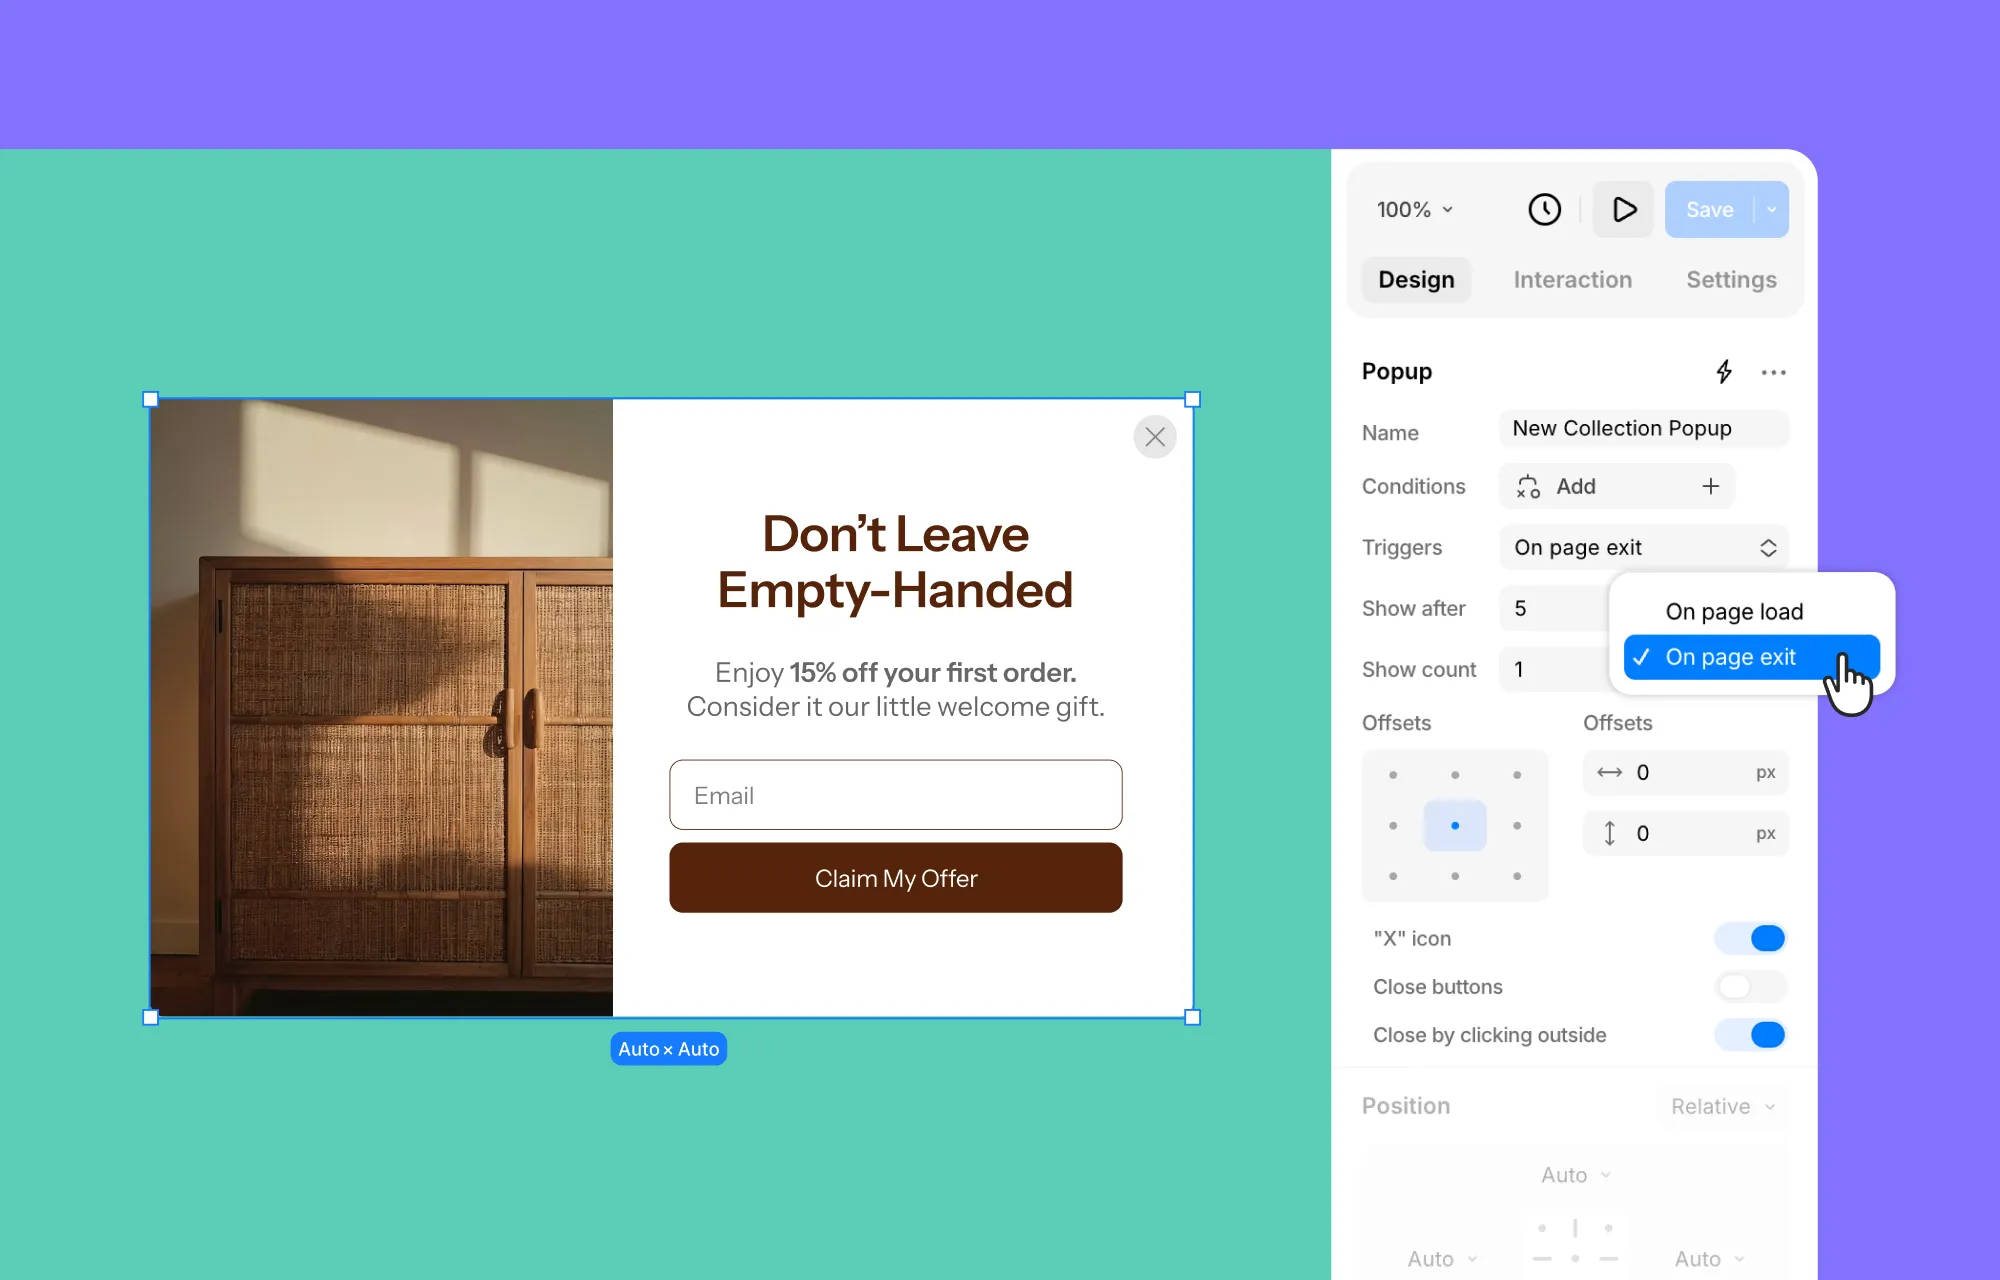
Triggers decide when the popup fires. Here’s how to set it in Kirki:
- From the Popup settings in the Right Panel, click the Trigger dropdown.
- Choose between On Page Load or On Page Exit.
- In Show After, set a delay in seconds before the popup appears. Useful if you don’t want to bombard someone the second they land.
- Finally, from Show Count, set how many times the popup displays per visitor.
Step 4: Configure Display Rules
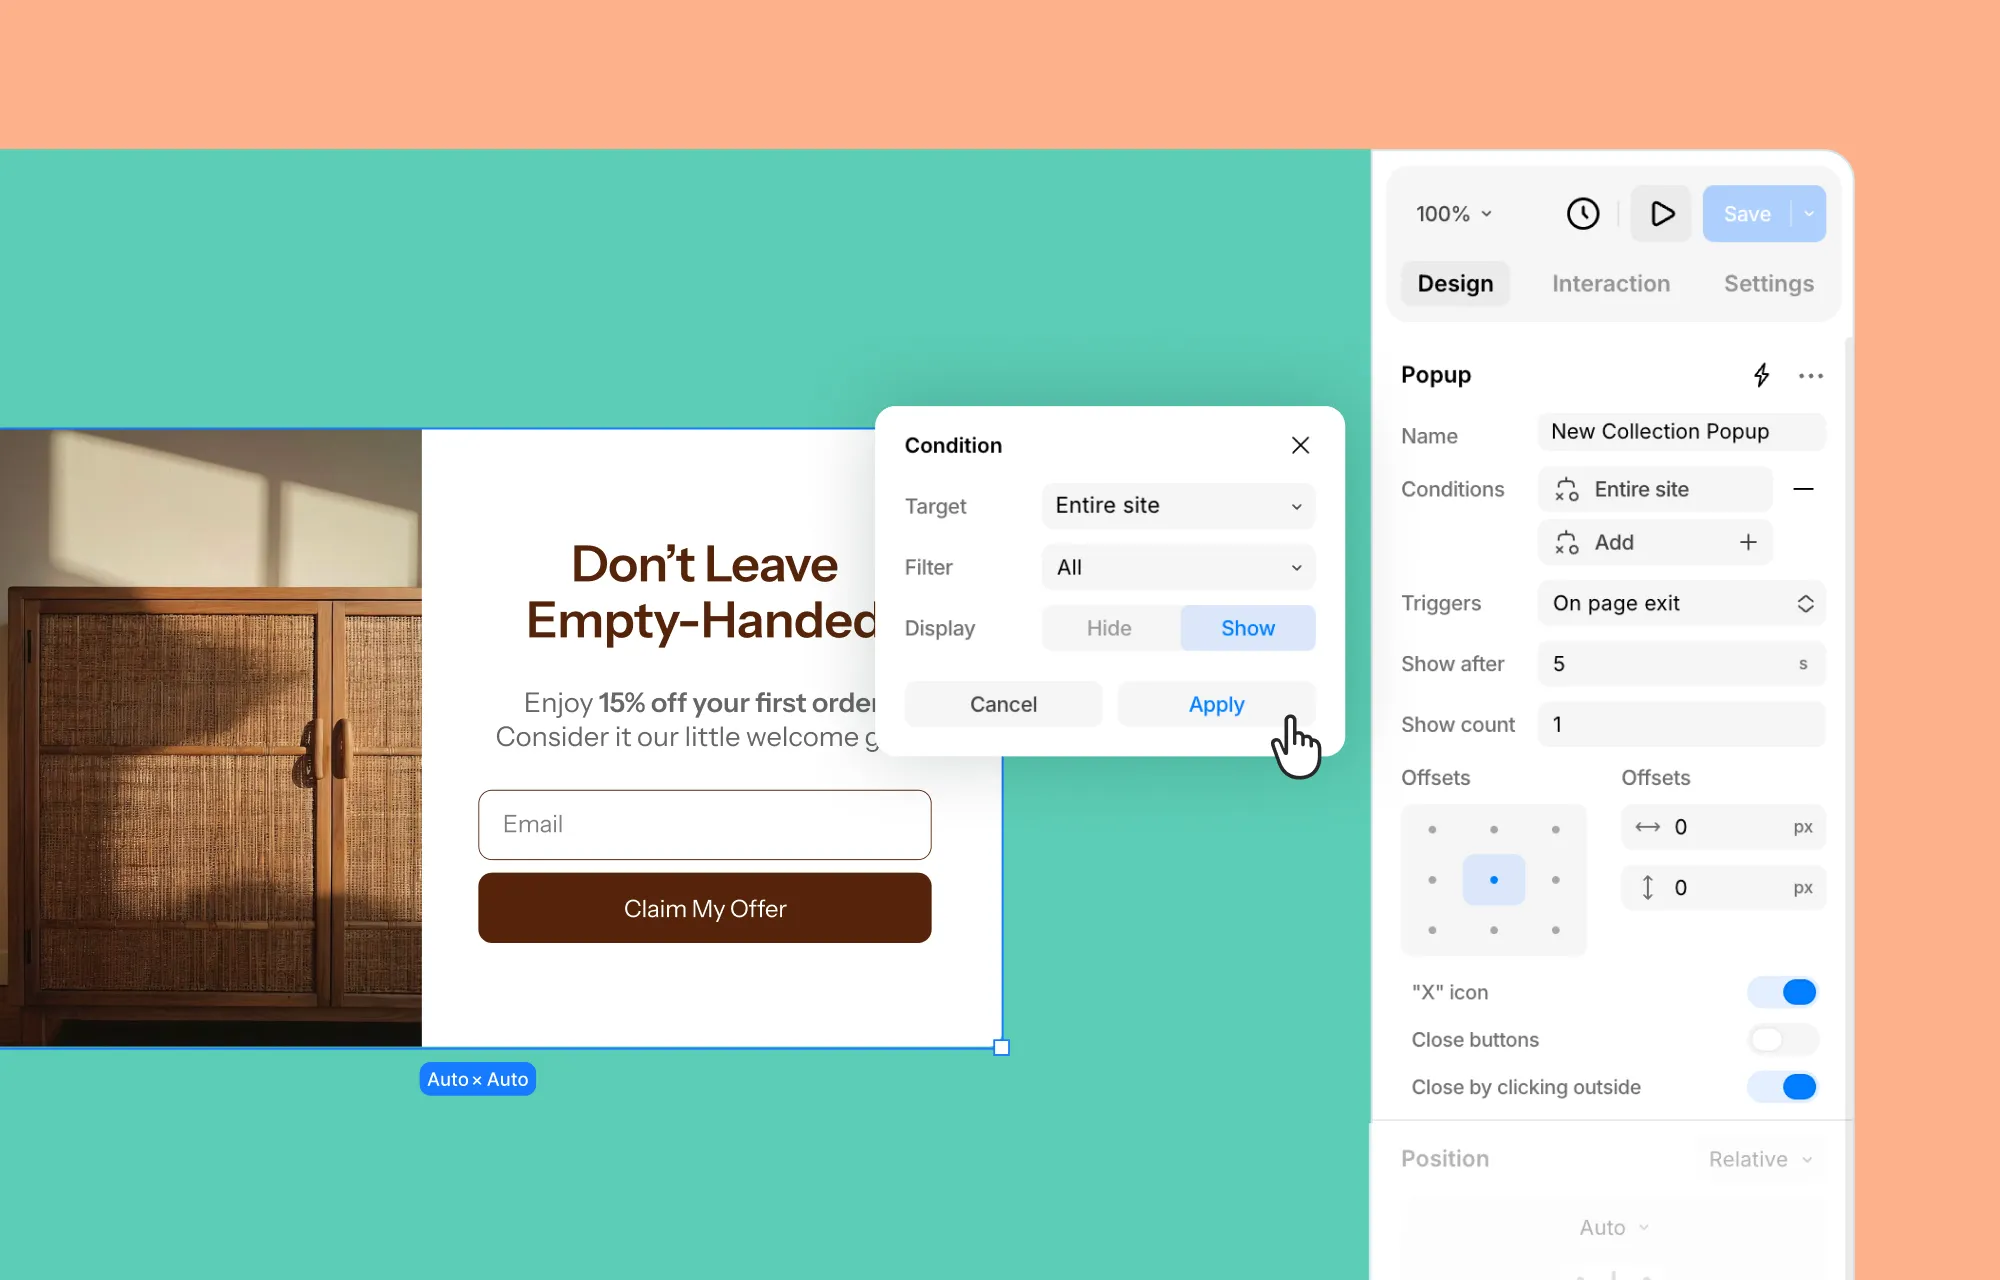
Not every popup belongs on every page. Display rules are how you control that.
- Click Add next to Conditions to create a new one. It defaults to Entire Site.
- Select it to open its settings, then set Target to decide who or what the rule applies to:
- Entire Site
- User
- or a specific content type like Posts, Pages, or even your custom Dynamic Content Types.
- Unless you picked Entire Site, the Filter field lets you narrow things down further – what it offers depends on the Target you chose.
- Set Display to Show or Hide, then click Apply to save the rule.
Like this, you can stack multiple rules based on your needs.
For instance, say you want to run a giveaway aimed at casual visitors – people converting for the first time – rather than people who already have an account on your site.
Set a base rule targeting Entire Site with Display set to Show, then stack a second rule targeting User, Filter set to All, with Display set to Hide.
The popup shows to anonymous visitors and stays hidden from anyone logged in, no matter their role.
Step 5: Fine-Tune Popup Placement
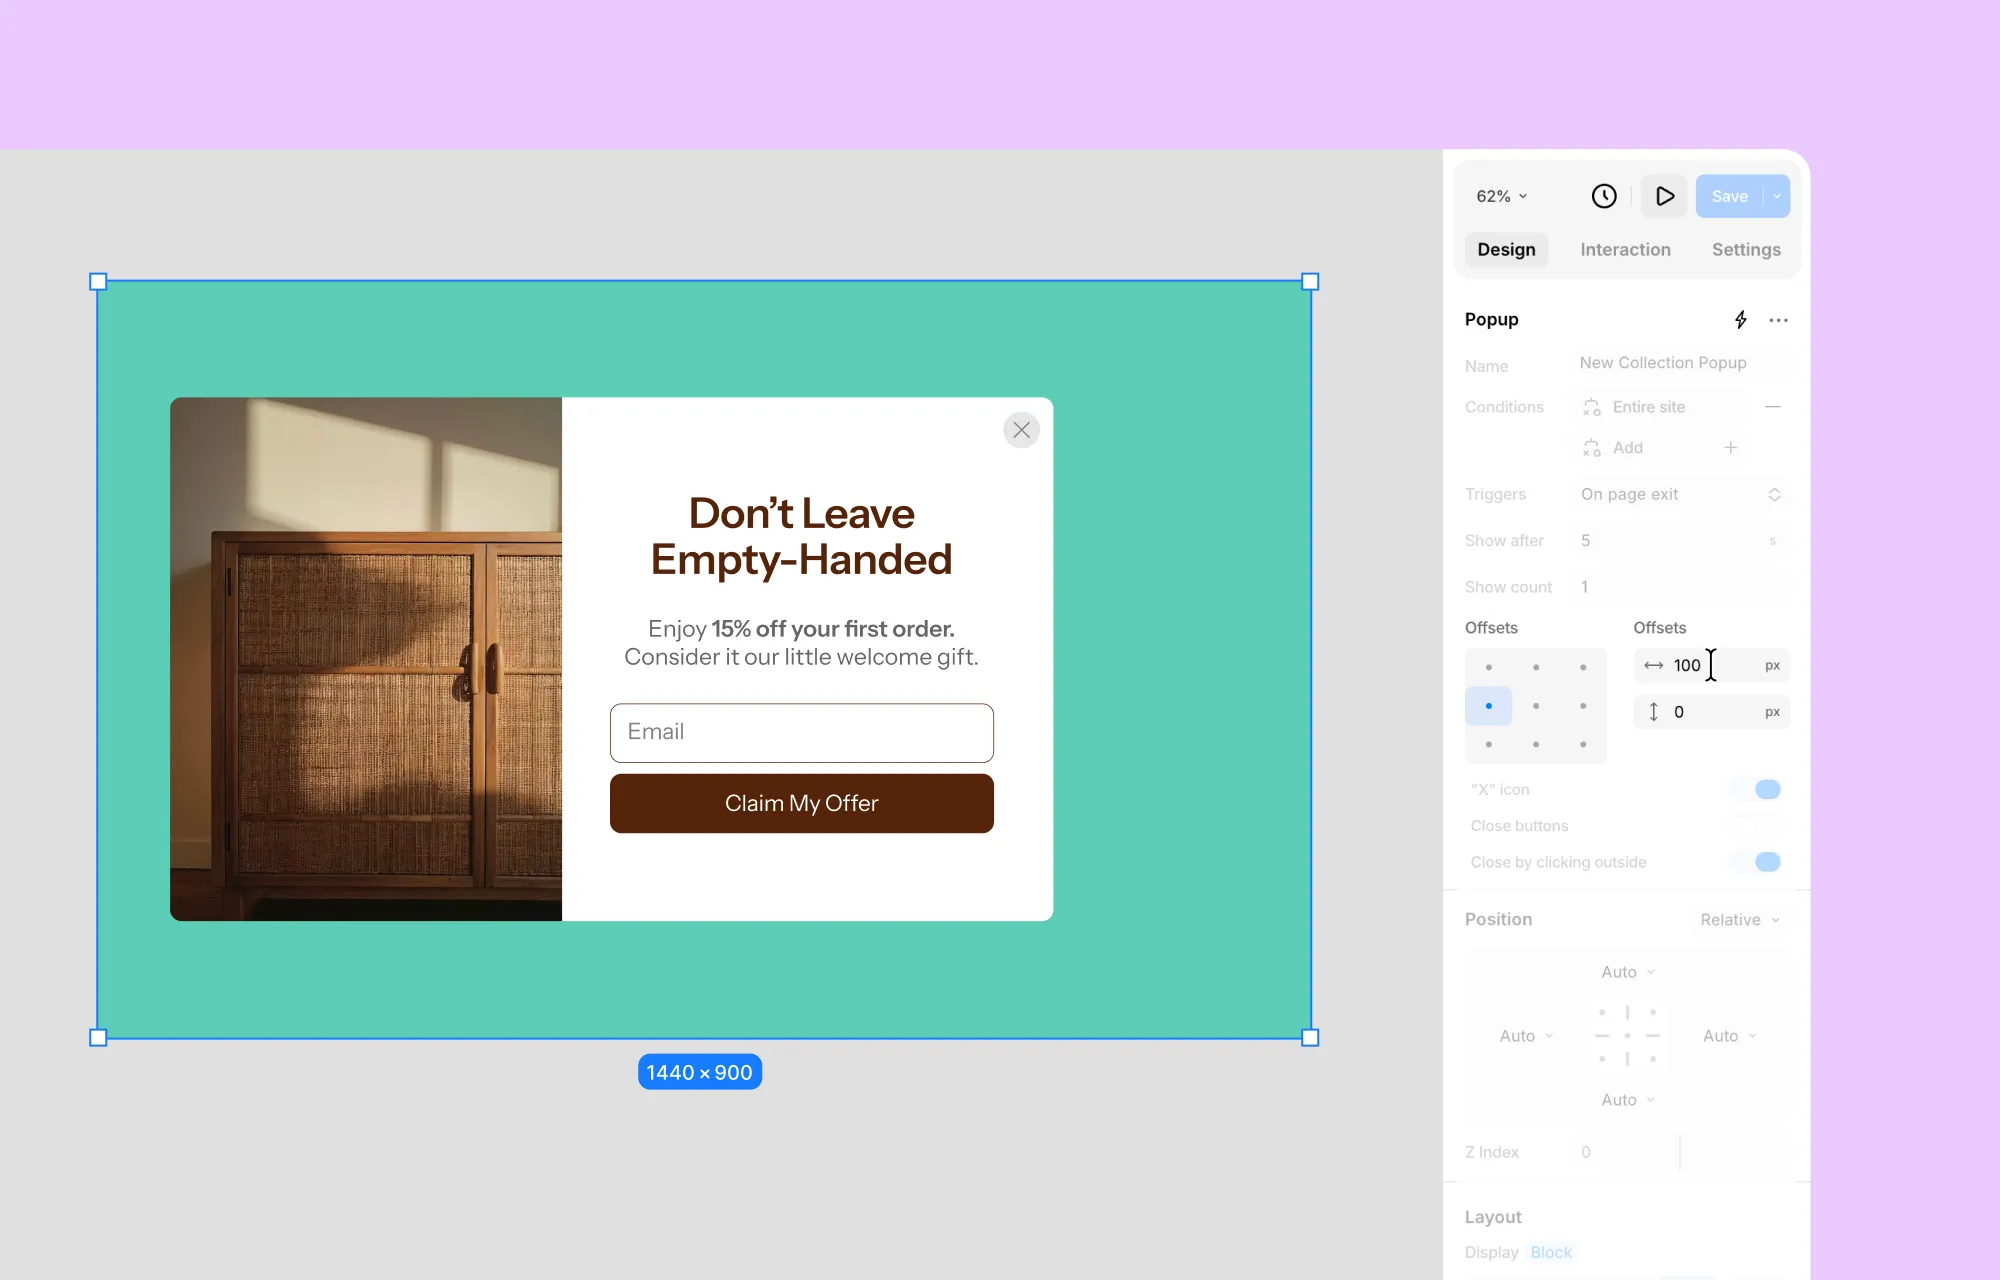
The Popup settings also include Offset, which controls exactly where the popup sits on the screen.
Click a dot on the 3×3 grid to set the anchor point – top-left, center-center, bottom-right, or any of the nine positions. Then use the offset fields to nudge it further from that anchor.
Step 6: Set Up Close Action
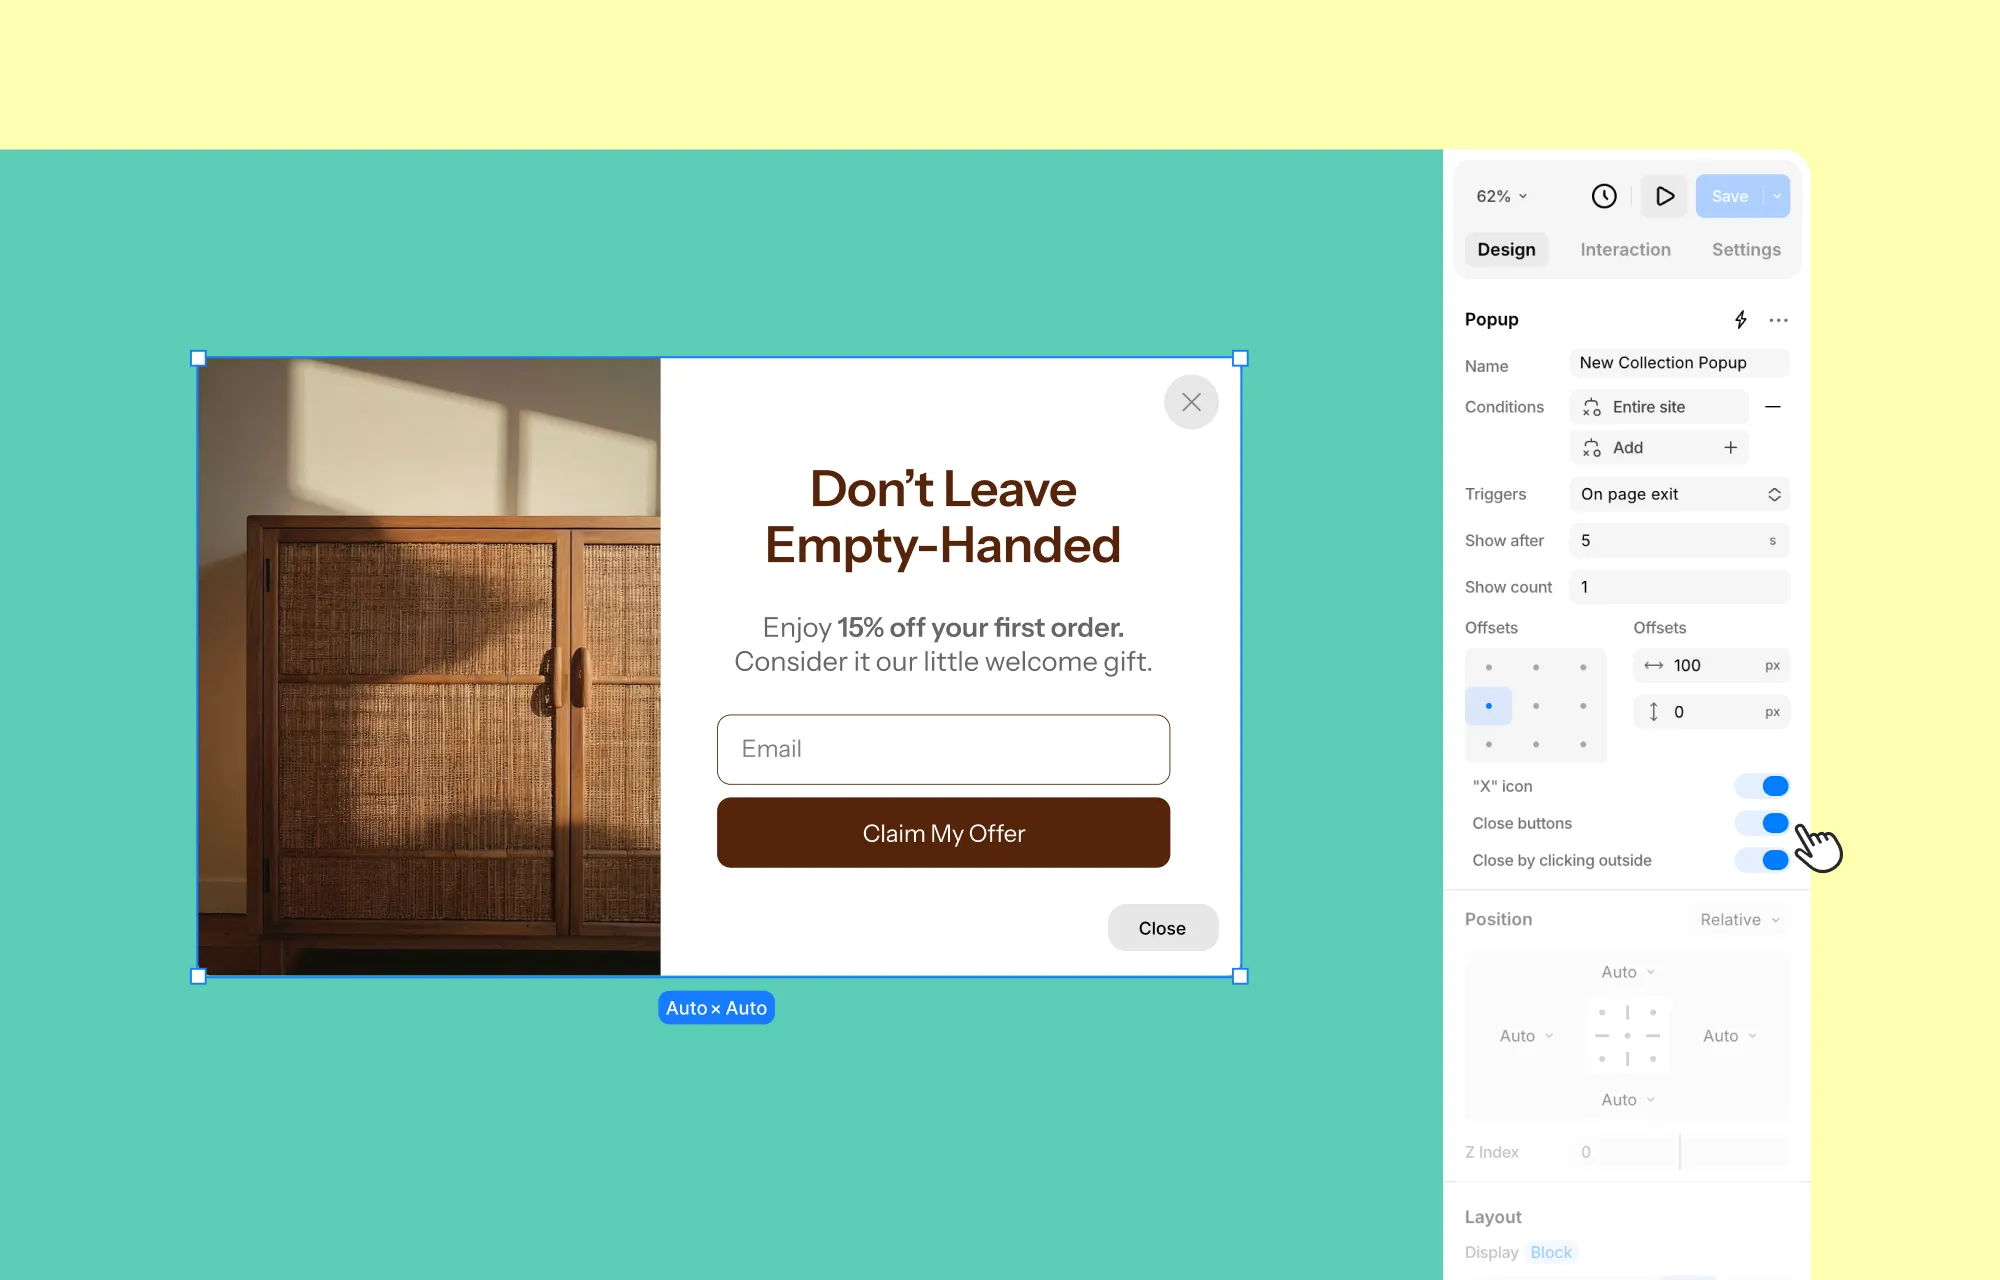
You can also set up how a visitor will dismiss the popup:
- X Icon – Shows or hides the Close Icon in the corner of the popup.
- Close Button – Shows or hides the Close Button added to the popup’s content.
- Close By Clicking Outside – Lets visitors dismiss the popup by clicking the backdrop behind it.
Turn off all three and the popup traps the visitor until they complete an action – sometimes intentional (a required signup step), sometimes a mistake (an accidental dead end).
Know which one you’re building before you publish.
Step 7: Animate the Popup
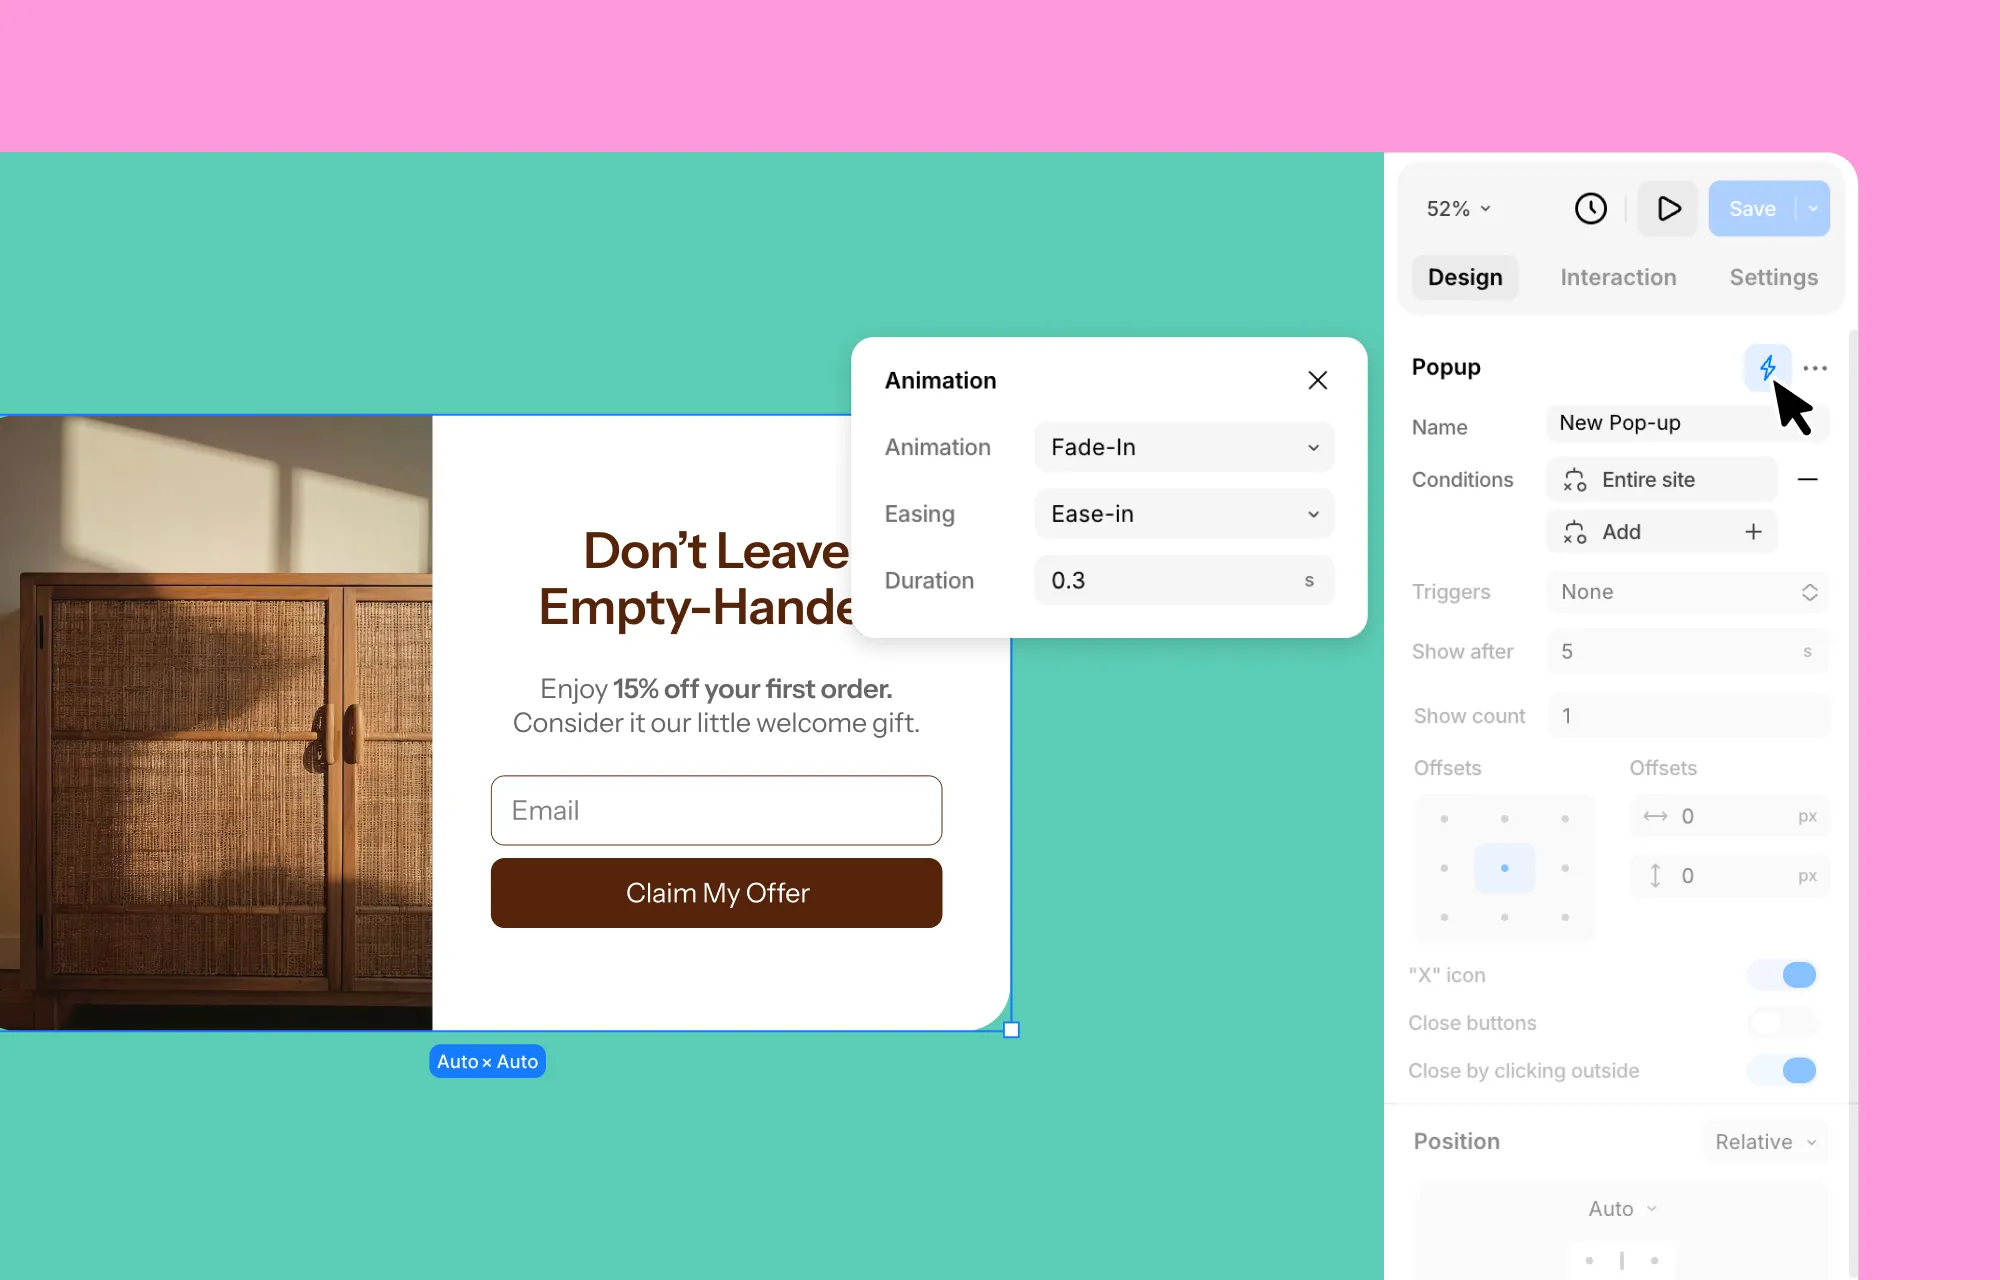
Kirki also lets you customize the entrance animation to your popup, controlled from Popup Settings in the Right Panel:
- Click the lightning bolt icon at the top right of Popup Settings to open the Animation settings.
- Select the Animation you want. Fade-In is set by default, with more options available in the dropdown.
- Set Easing to control how the animation speeds up or slows down. Ease is the default.
- Set Duration, in seconds, to control how long the animation takes to play.
Step 8: Save and Preview
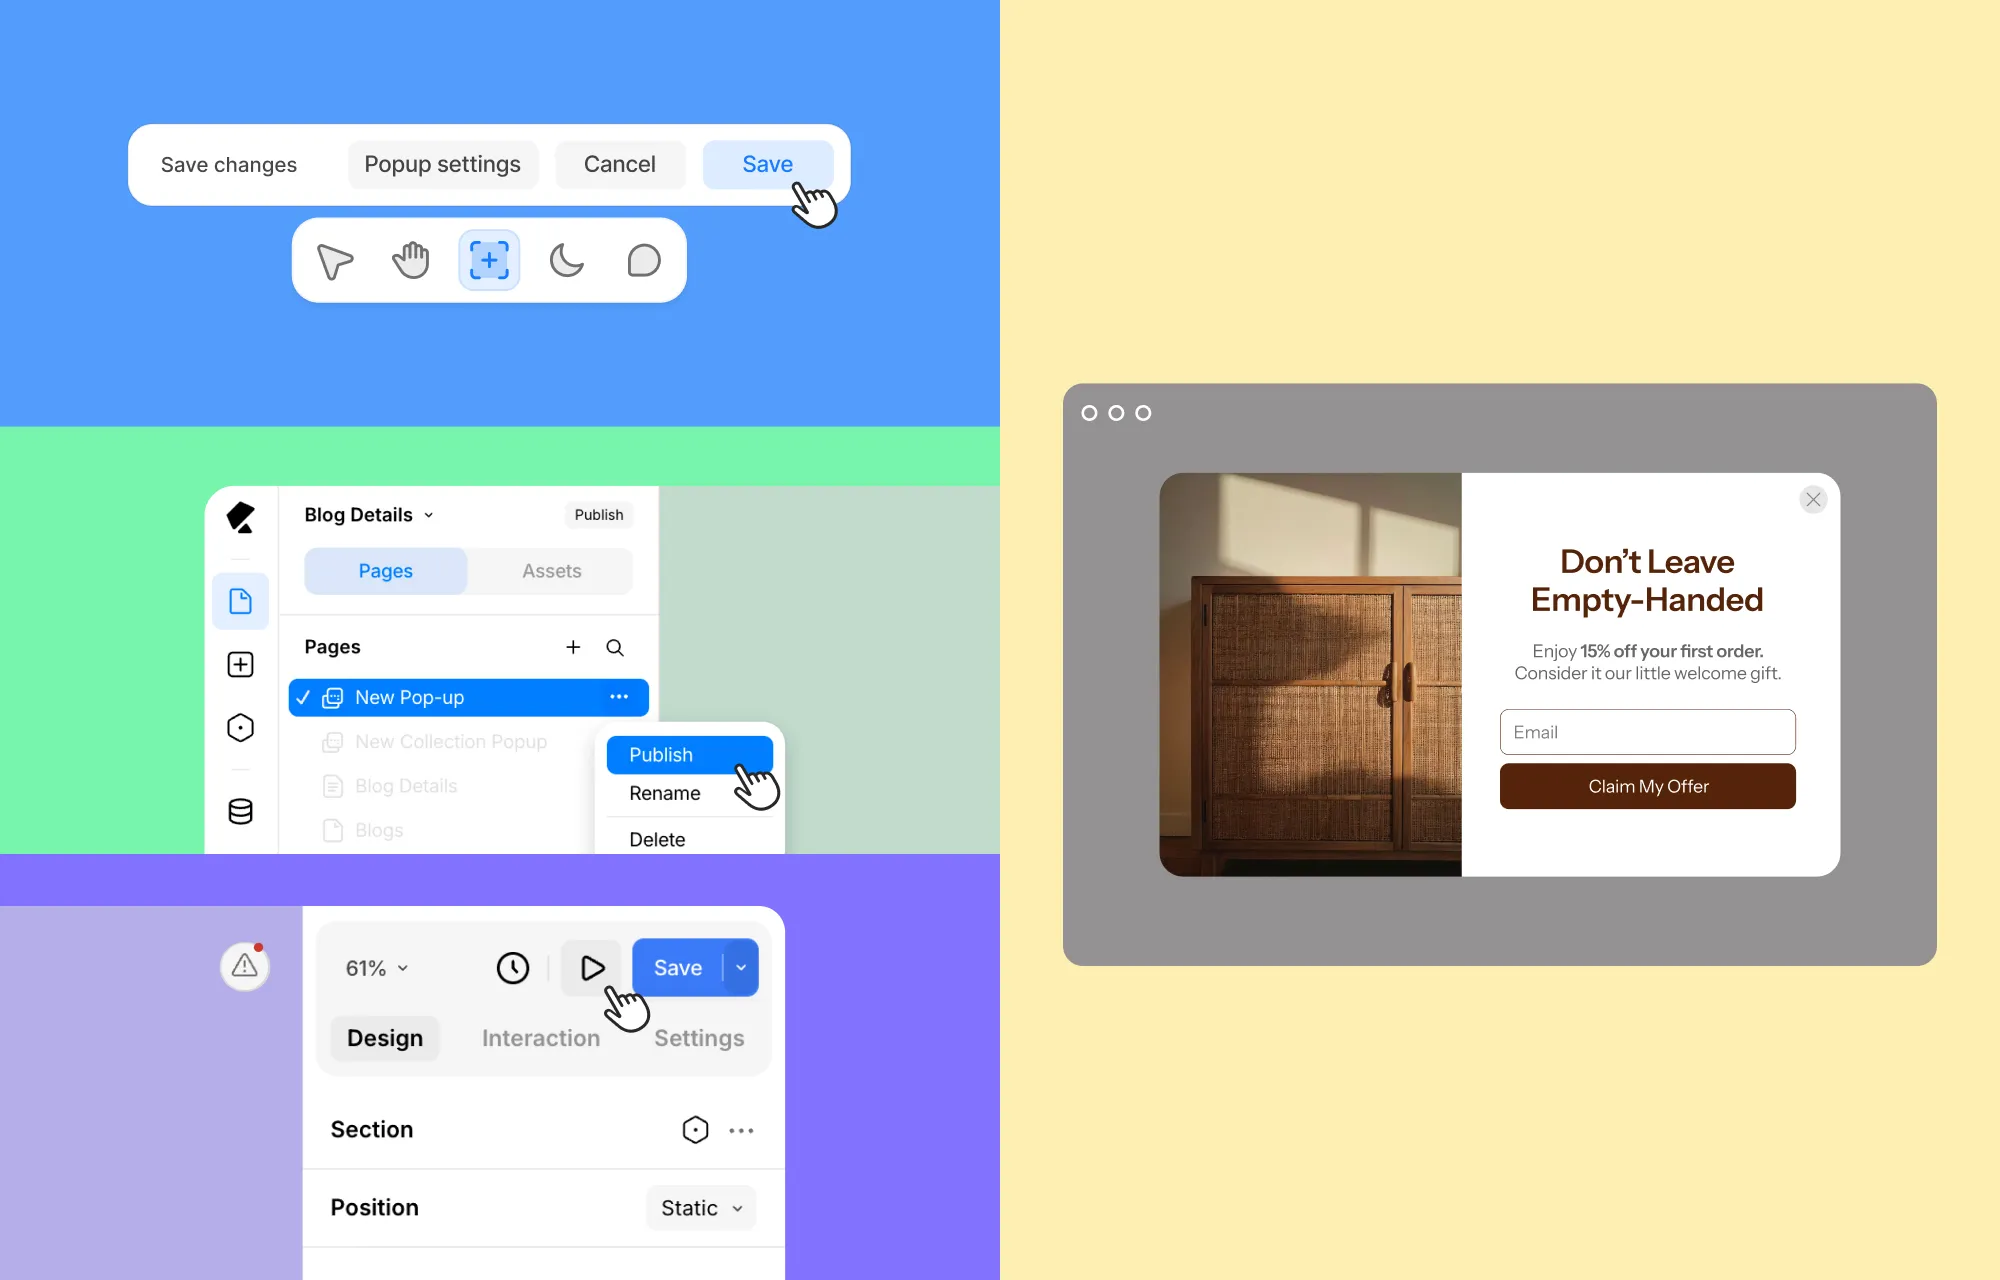
Once everything’s set, it’s time to save your work and see it live. From the bottom panel of the popup builder:
- Click Popup Settings to review your trigger, display rules, and close actions one more time.
- Click Save to save your changes and exit. This takes you back to the page you started from.
- From the Pages panel, click the ellipsis (…) icon next to the popup and select Publish.
- Use Kirki’s Preview feature to test the popup live. Check it across multiple pages and environments to confirm your display rules are working as expected.
That’s it – your popup is live and doing its job. From here, keep an eye on how it performs, and don’t be afraid to revisit the trigger or display rules if something feels off.
Examples of Popups You Can Create With Kirki
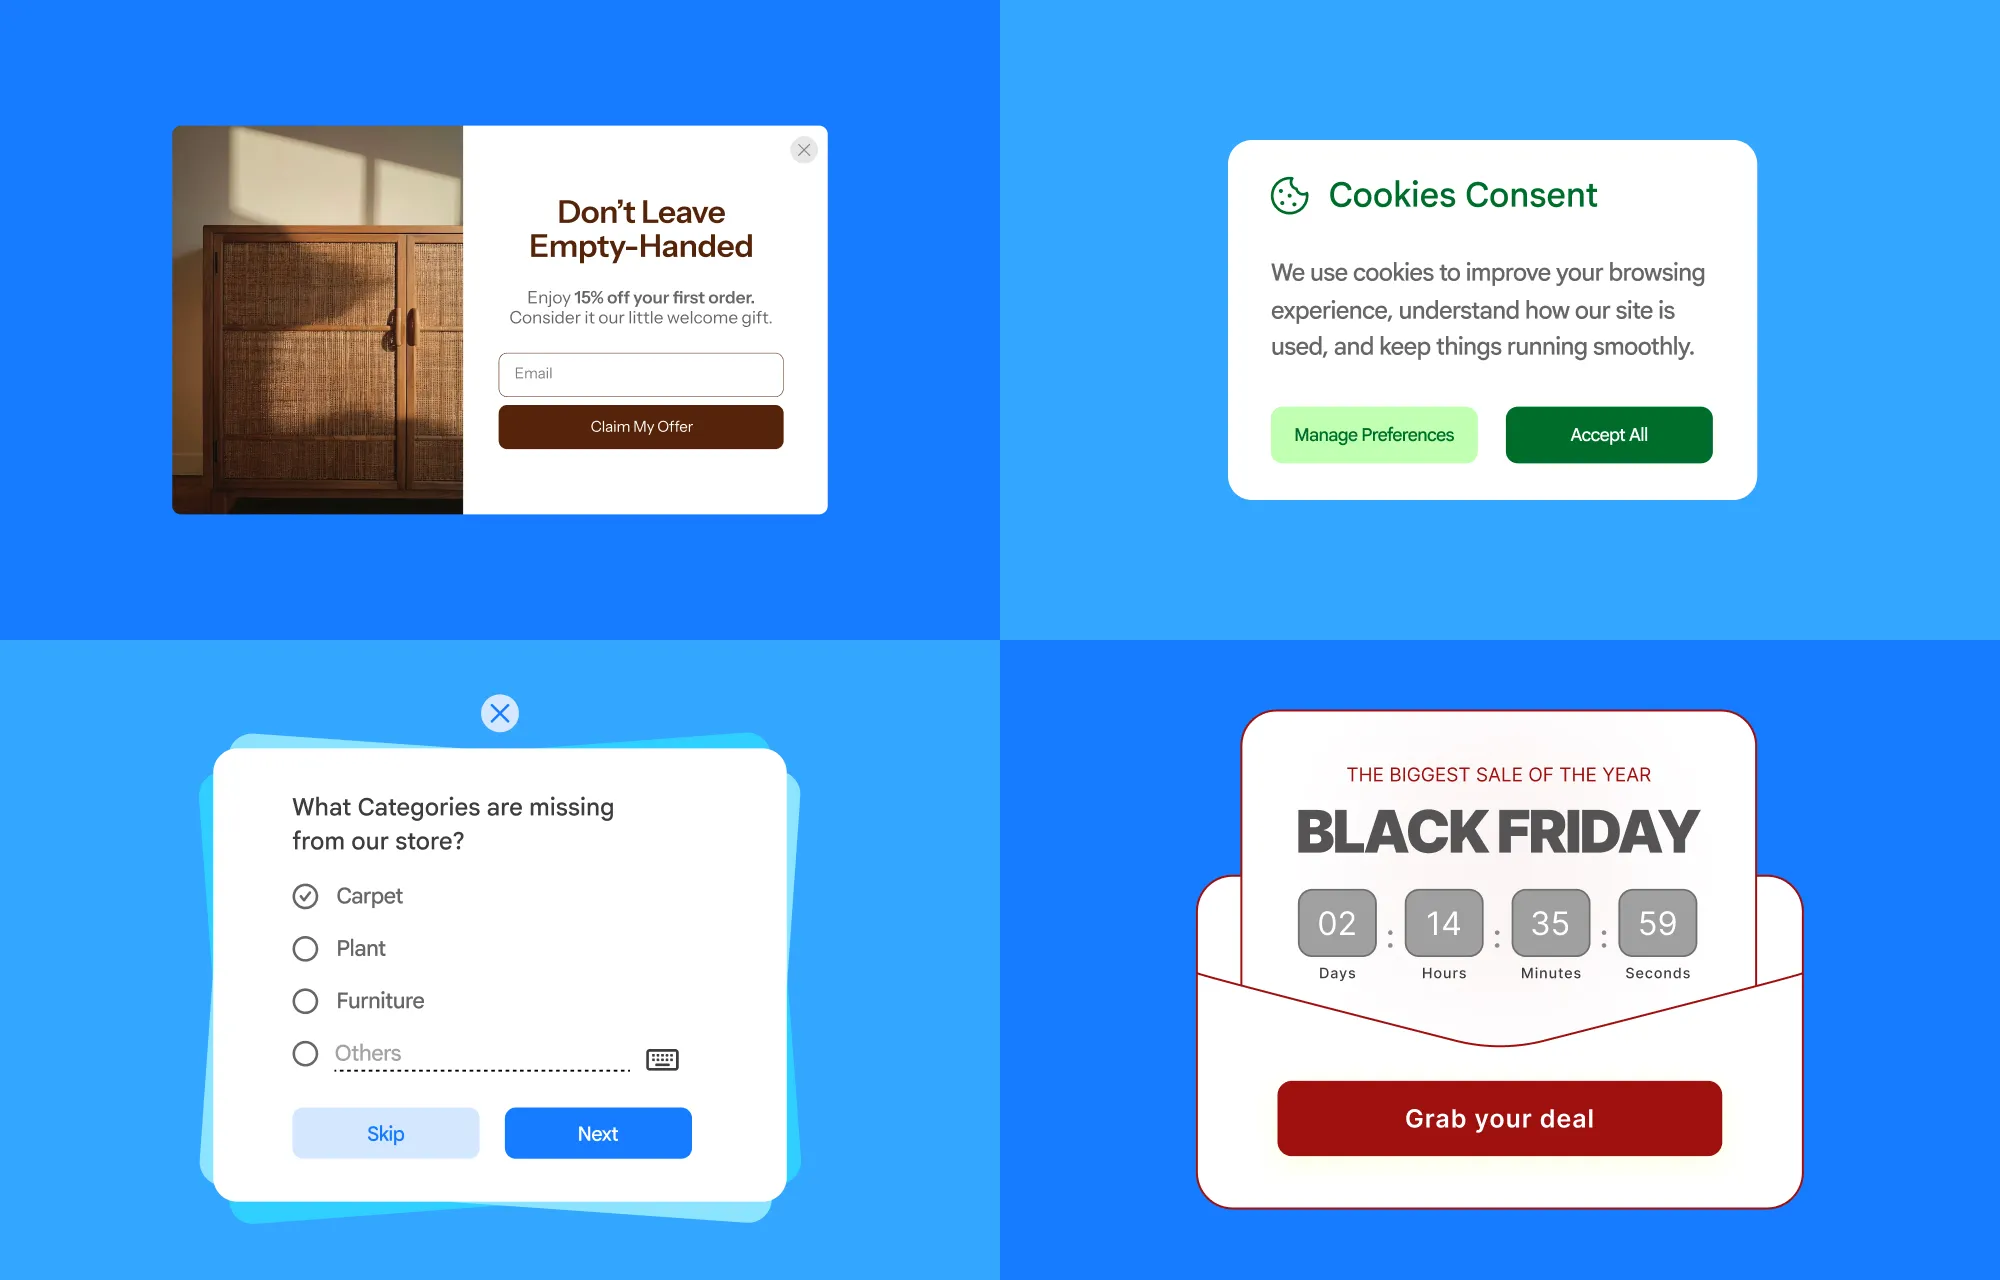
Here’s what a few real popups look like when built with Kirki – a discount offer for newsletter subscribers, a cookie consent notice, a quick survey, a sale countdown, and more. With a powerful visual builder like Kirki, the possibilities are endless.
Common Popup Mistakes to Avoid
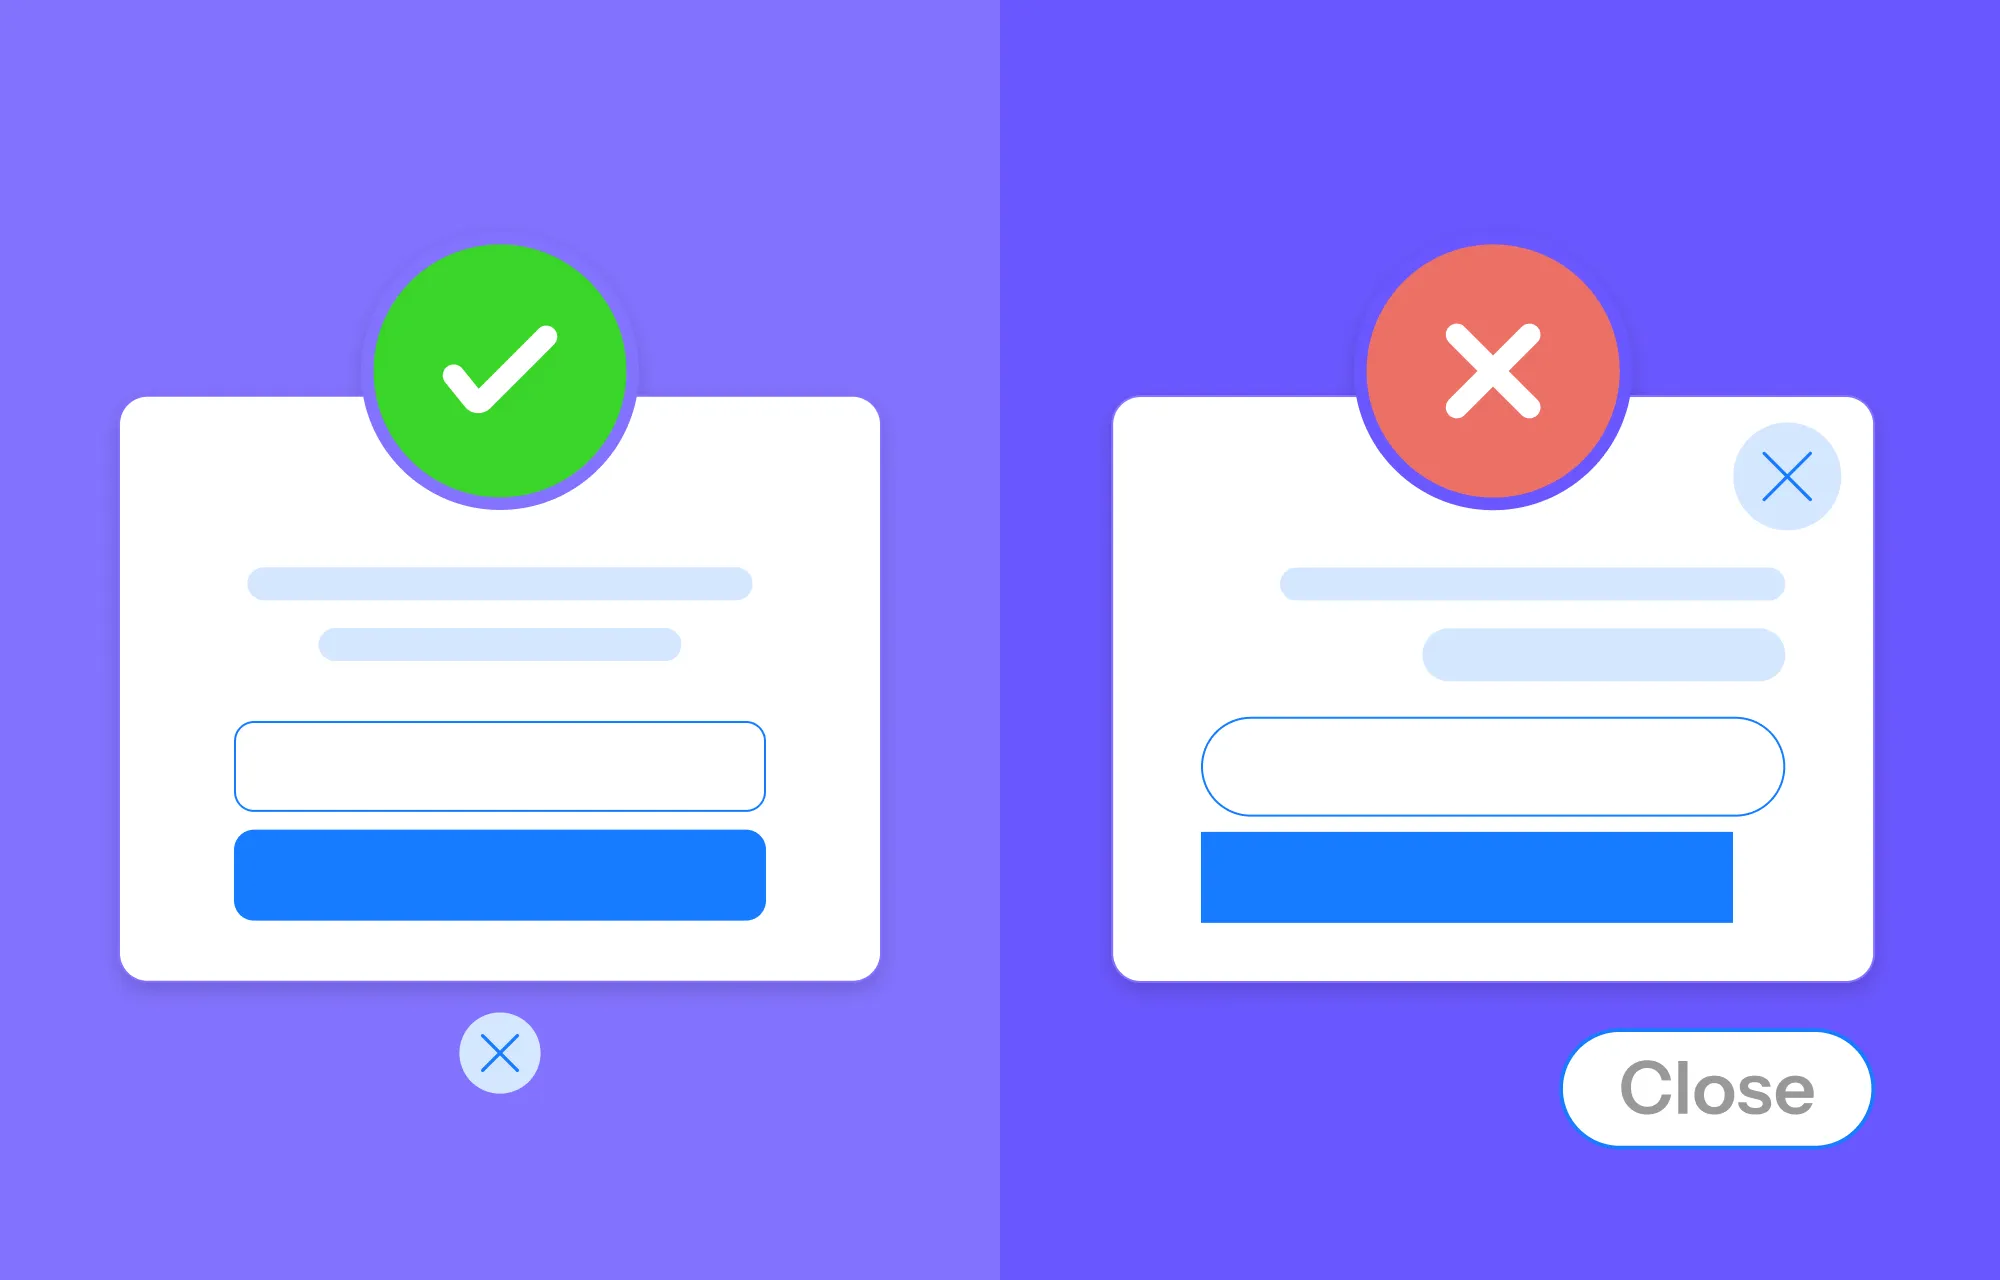
You know how to build a popup in Kirki. Knowing how to build a good one is different – here’s where people usually go wrong:
- Setting Show Count too high, so the same visitor sees it on every single visit, multiple times.
- Targeting the Entire Site when you really need to target one area, which shows the popup where it doesn’t belong.
- Turning on or off all three close options without meaning to – double-check this before publishing.
- Stacking display rules that contradict each other, like Show for Entire site and Hide for the same target.
Frequently Asked Questions
Yes. Since popups are created independently, you can set each one’s target to the same page.
No, not on their own – it depends on what’s inside. A simple form loads fast, but heavy images or content will slow things down, just like anywhere else on the page.
Yes. Set the display rule’s Target to User, Filter to Role, select the role you want (Administrator, Editor, Author, Contributor, Subscriber), and set Display to Show. If you need to target more than one role, add a separate display rule for each one.
Yes. In the Popup panel, set Triggers to On Page Exit instead of On Page Load.
Yes. Use the Show After field to set a delay in seconds.
The popup can only be dismissed by completing its action – there’s no X icon, close button, or click-outside dismissal. Do this cautiously.
Final Thoughts
A popup can be the reason someone converts, or the reason they leave – and the difference almost always comes down to setup, not the popup itself.
Kirki gives you the interface and the flexibility to build one that works. The rest is up to you.

