
Forms are an integral part of any website, from collecting data to capturing leads and more. But implementing this powerful tool can often mean wrestling with complex code or relying on clunky third-party plugins.
Well, not anymore! Today, we’re giving you a complete breakdown of how to create forms in WordPress and manage data without extra plugins and without writing a single line of code!
Types of Website Forms and Why You Need One
Forms come in all shapes and sizes, from collecting user information to lead generation and more. Before we learn how to create them, let’s take a look at the different types and why you need them:
Registration Forms
Used to allow new users to sign up for an account or event, Registration Forms help you gather key information like names, emails, and passwords. Through user profiles, you can control and customize the level of access users have on your website and fortify its security.
Contact Forms
Contact Forms let users reach out without exposing your email address, reducing spam risk. They simplify the process for users and, by being directly on the website, encourage more inquiries.
Lead Generation Forms
Never miss an opportunity to convert visitors into leads! Often found on landing pages or pop-ups, Lead Generation Forms capture crucial details like email addresses in exchange for valuable incentives, perfect for growing your mailing list.
Customer Feedback / Survey Forms
Want to know what your audience is thinking? Customer Feedback and Survey Forms help you gather insight into user opinions and satisfaction so you can make informed improvements to your brand and offerings.
Consent Forms
Obtain explicit permission from users with Consent Forms, whether for collecting data, sending marketing emails, or other purposes. This builds trust with your audience and ensures your website is GDPR compliant.
Choosing the Right Form Builder Tool
So how can you create these powerful forms without relying on complex code or third-party plugins? It comes down to choosing the right tool.
Look for these key capabilities:
- Ease of Use: Crafting forms should be a breeze with a user-friendly, drag-and-drop interface.
- Variety of Form Fields: You should have a diverse range of field options at your disposal.
- Customizability: Full control to style your forms to perfectly fit your website’s branding.
- Integration Capabilities: Seamless integration with powerful platforms for lead management.
- Responsiveness: Forms must be fully responsive across all devices.
- Security: Built-in spam protection to safeguard your data and website.
Kirki – a freeform no-code website builder for WordPress checks all of these boxes! With its built-in form builder, there’s no need to install any extra plugins.
How to Create Forms in WordPress With Kirki
So, we’ve reached the crux of the matter – how to create responsive forms in WordPress!
With the Kirki WordPress website builder’s native form builder, there’s no need to install any extra plugins.
Instead, you can dive straight into creating your form right away by following the steps discussed below!
Step 1: Build Your Form Structure
The first step is building your form’s structure using Kirki’s built-in form elements.
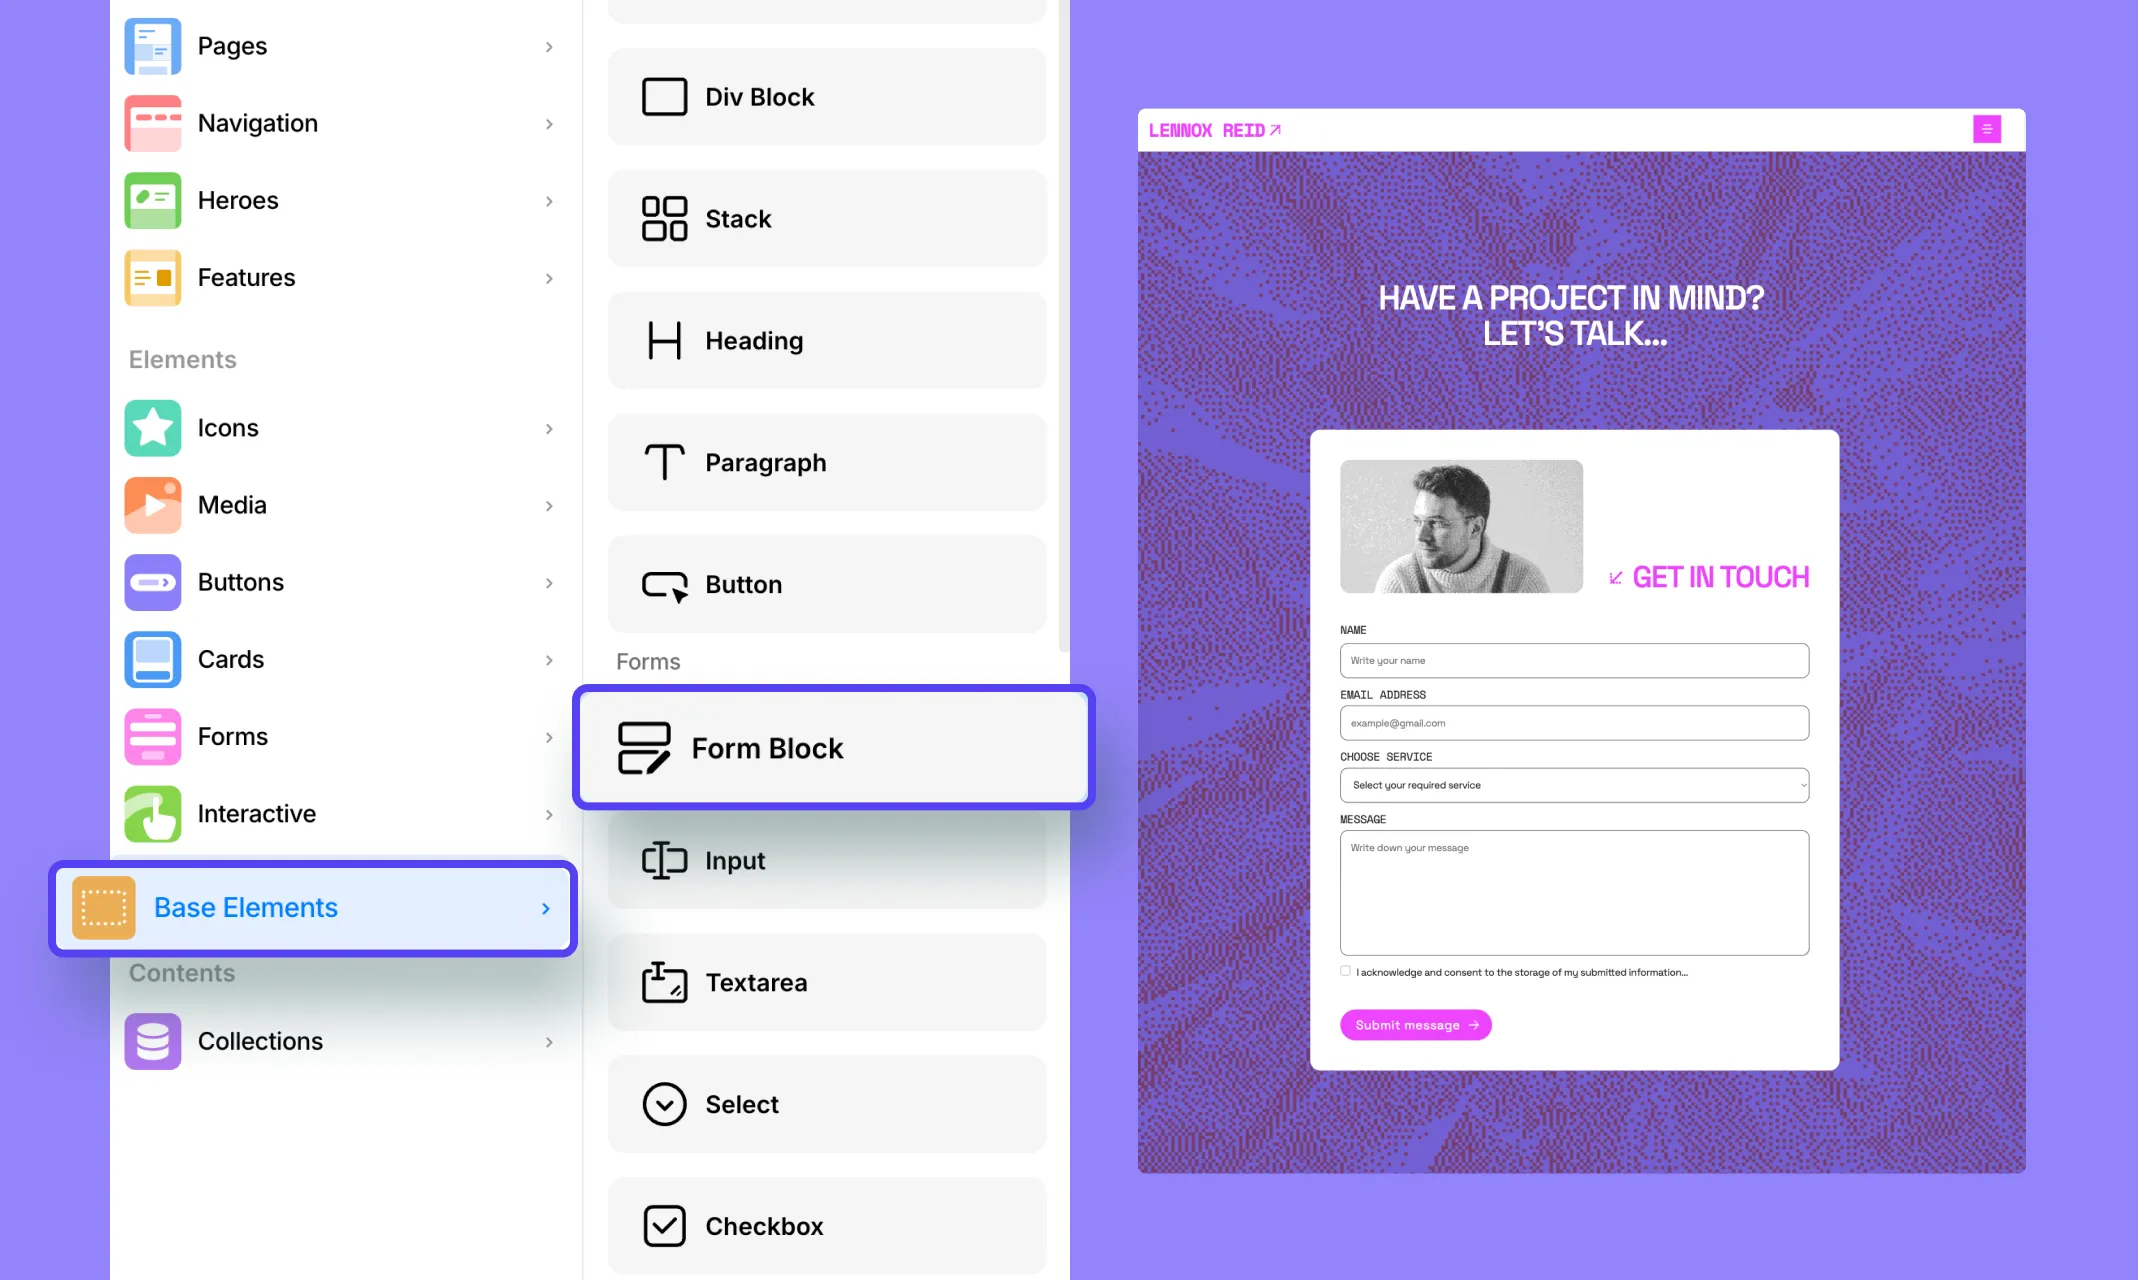
Open the Insert panel from the left sidebar and navigate to Base Elements > Forms. Here you’ll find all the form elements available in Kirki:
- Form Block: The foundational container that holds all other form elements. All form elements must be placed inside a Form Block.
- Input: A single-line field for shorter responses, configurable to collect text, email, password, date, date-time, or number.
- Textarea: A multi-line field for longer responses like comments or messages.
- Select: A dropdown menu for users to choose from a pre-defined list of options.
- Checkbox: Small squares users can tick to choose one or multiple options.
- Radio: Circular buttons for selecting a single option — ideal for exclusive choices.
- Submit: The button that submits the form data and triggers the after-action.
Start by dragging the Form Block onto your canvas. It comes with a preset form structure ready to customize. Then add any additional form elements inside it to build out your specific form type — contact form, lead generation form, consent form, or anything else you need.
Tip: Want a head start? Browse the Insert panel’s pre-built form blocks for beautifully pre-designed form layouts you can drop straight onto your canvas!
Step 2: Configure Form Element Settings

Once your form structure is in place, configure each element’s settings. Select any form element on the canvas, and its settings will appear directly in the Design tab on the right panel.
For an Input element, for example, you’ll see:
- Type — set to Text, Email, Password, Date, etc.
- Name — the field identifier
- Placeholder — the hint text shown inside the field
- Text color — style the input text color
- Required — toggle on to make the field mandatory
Settings vary per element type, so each one shows only the options relevant to it.
Step 3: Configure Form Settings & After-Submit Actions

Select the Form element in the Layers panel. In the Design tab, you’ll see the Form settings section showing:
- Name — give your form a unique identifier
- Actions — click Add actions + to set up Email notifications or Webhooks to send form data to external services
- After action — choose what happens after a successful submission from the dropdown: None, Show notification, Show popup, Show page, or External URL
For additional options, click More Options to open the Form Options panel where you can set:
- Max IP entries — limit submissions per IP address
- Response Limit — cap the total number of submissions
- Store form data — toggle on to save submissions to your Kirki dashboard
Step 4: Ensure Responsive Forms Across All Breakpoints
One of Kirki’s most powerful features is its infinite canvas, which shows all your breakpoints — Desktop, Tablet, Landscape, and Mobile, side by side simultaneously.
As you build and style your form, you can instantly see how it looks across every screen size at once and make adjustments for each breakpoint directly on the canvas — no switching modes required.
How to Manage Form Submissions
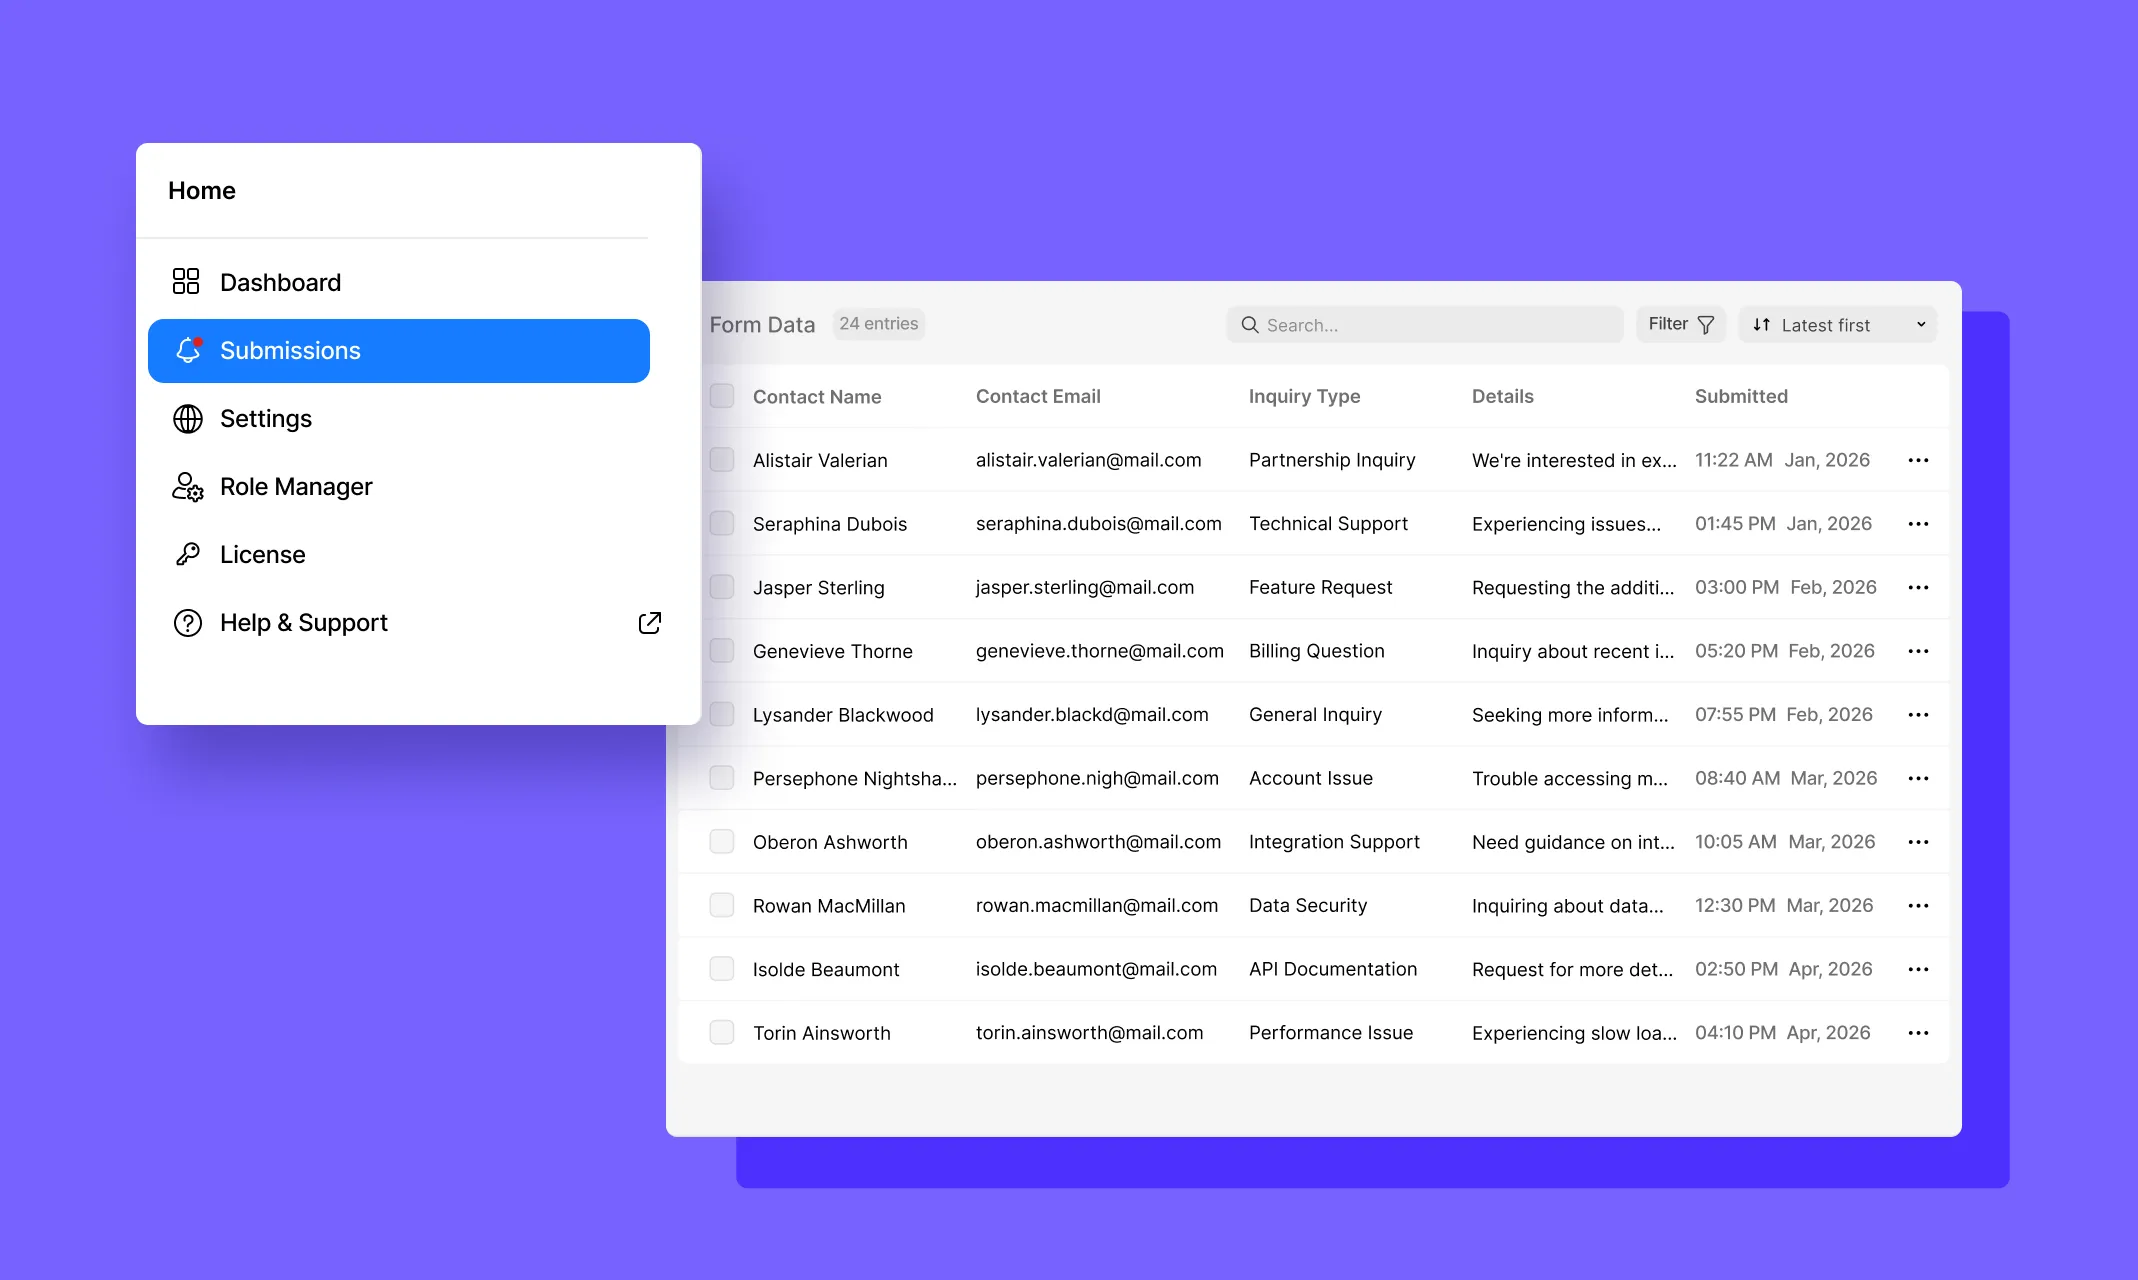
Once your forms are live and submissions start coming in, Kirki makes managing them simple through the built-in Submissions panel.
From the Kirki dashboard (outside the editor), navigate to Submissions in the left sidebar. Here you’ll find all form data collected across your website in one central hub – Form data, where you can view and manage all your entries.
Wrapping Up
Now you know how to create forms in WordPress with no code! With Kirki’s native form builder, crafting powerful, responsive forms has never been easier.
From contact forms to lead generation forms, Kirki equips you with everything you need, no coding or extra plugins required. And with the built-in Submissions panel, managing the data collected through your forms is just as effortless.

