


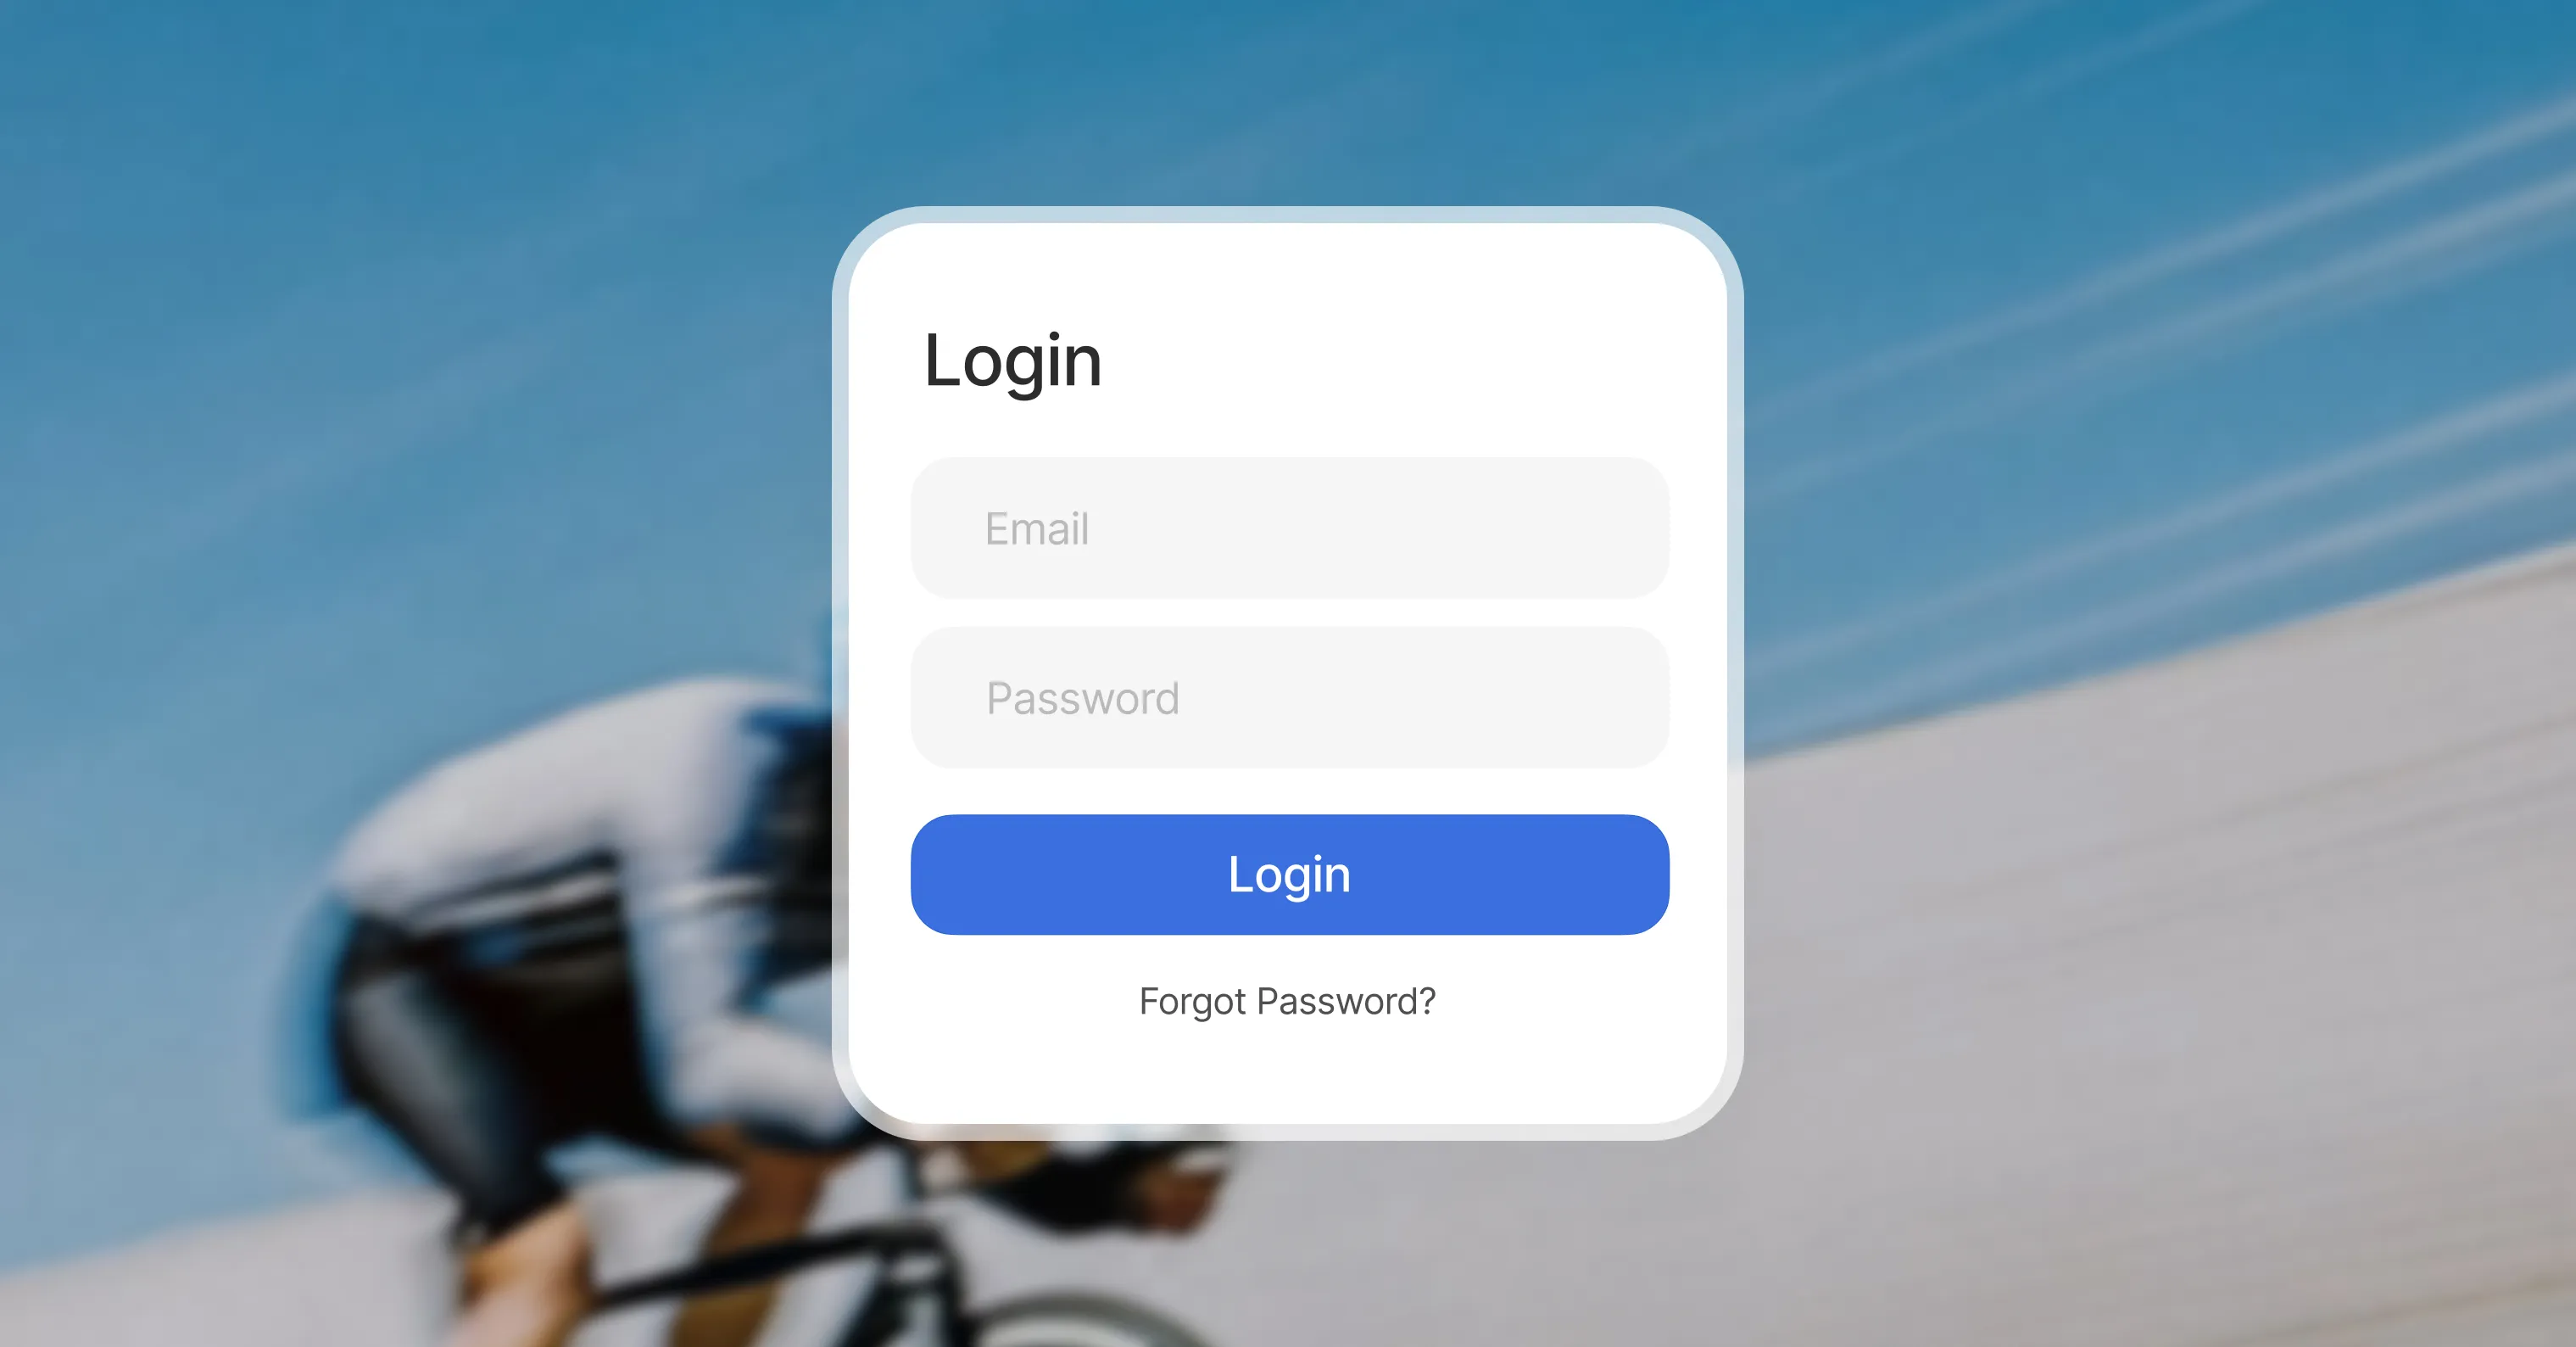
The default WordPress login & registration pages carry WordPress’ branding, not yours.
So if a visitor goes from browsing your site to a WordPress login or registration screen, it’s bound to be jarring and confusing for someone who has nothing to do with the platform or what happens behind the scenes.
To avoid this mess and keep the experience entirely on-brand, we’ll show you how to create a custom login and registration page in WordPress with Kirki.
Why Build Custom Login and Registration Pages
Most websites don’t require an account to simply visit. Accounts unlock extras, like members-only content on a blog, a client portal on a service site, or order history and saved addresses in an online store.
That makes signing in or registering an optional step for visitors. If that step lands on a generic WordPress form that looks nothing like your site, it feels disconnected and unprofessional. And trust drops fast.
Building your own login and registration pages lets you:
- Match the pages to your brand and keep them consistent with the rest of your site.
- Control where users go after they sign in or register.
- Use a clean, memorable URL instead of the WordPress default.
What You Need
You don’t need much to create login and registration pages in WordPress with Kirki. Just two things:
- A WordPress site with Kirki installed
- Admin access to your WordPress dashboard
How to Create a Registration Page in WordPress
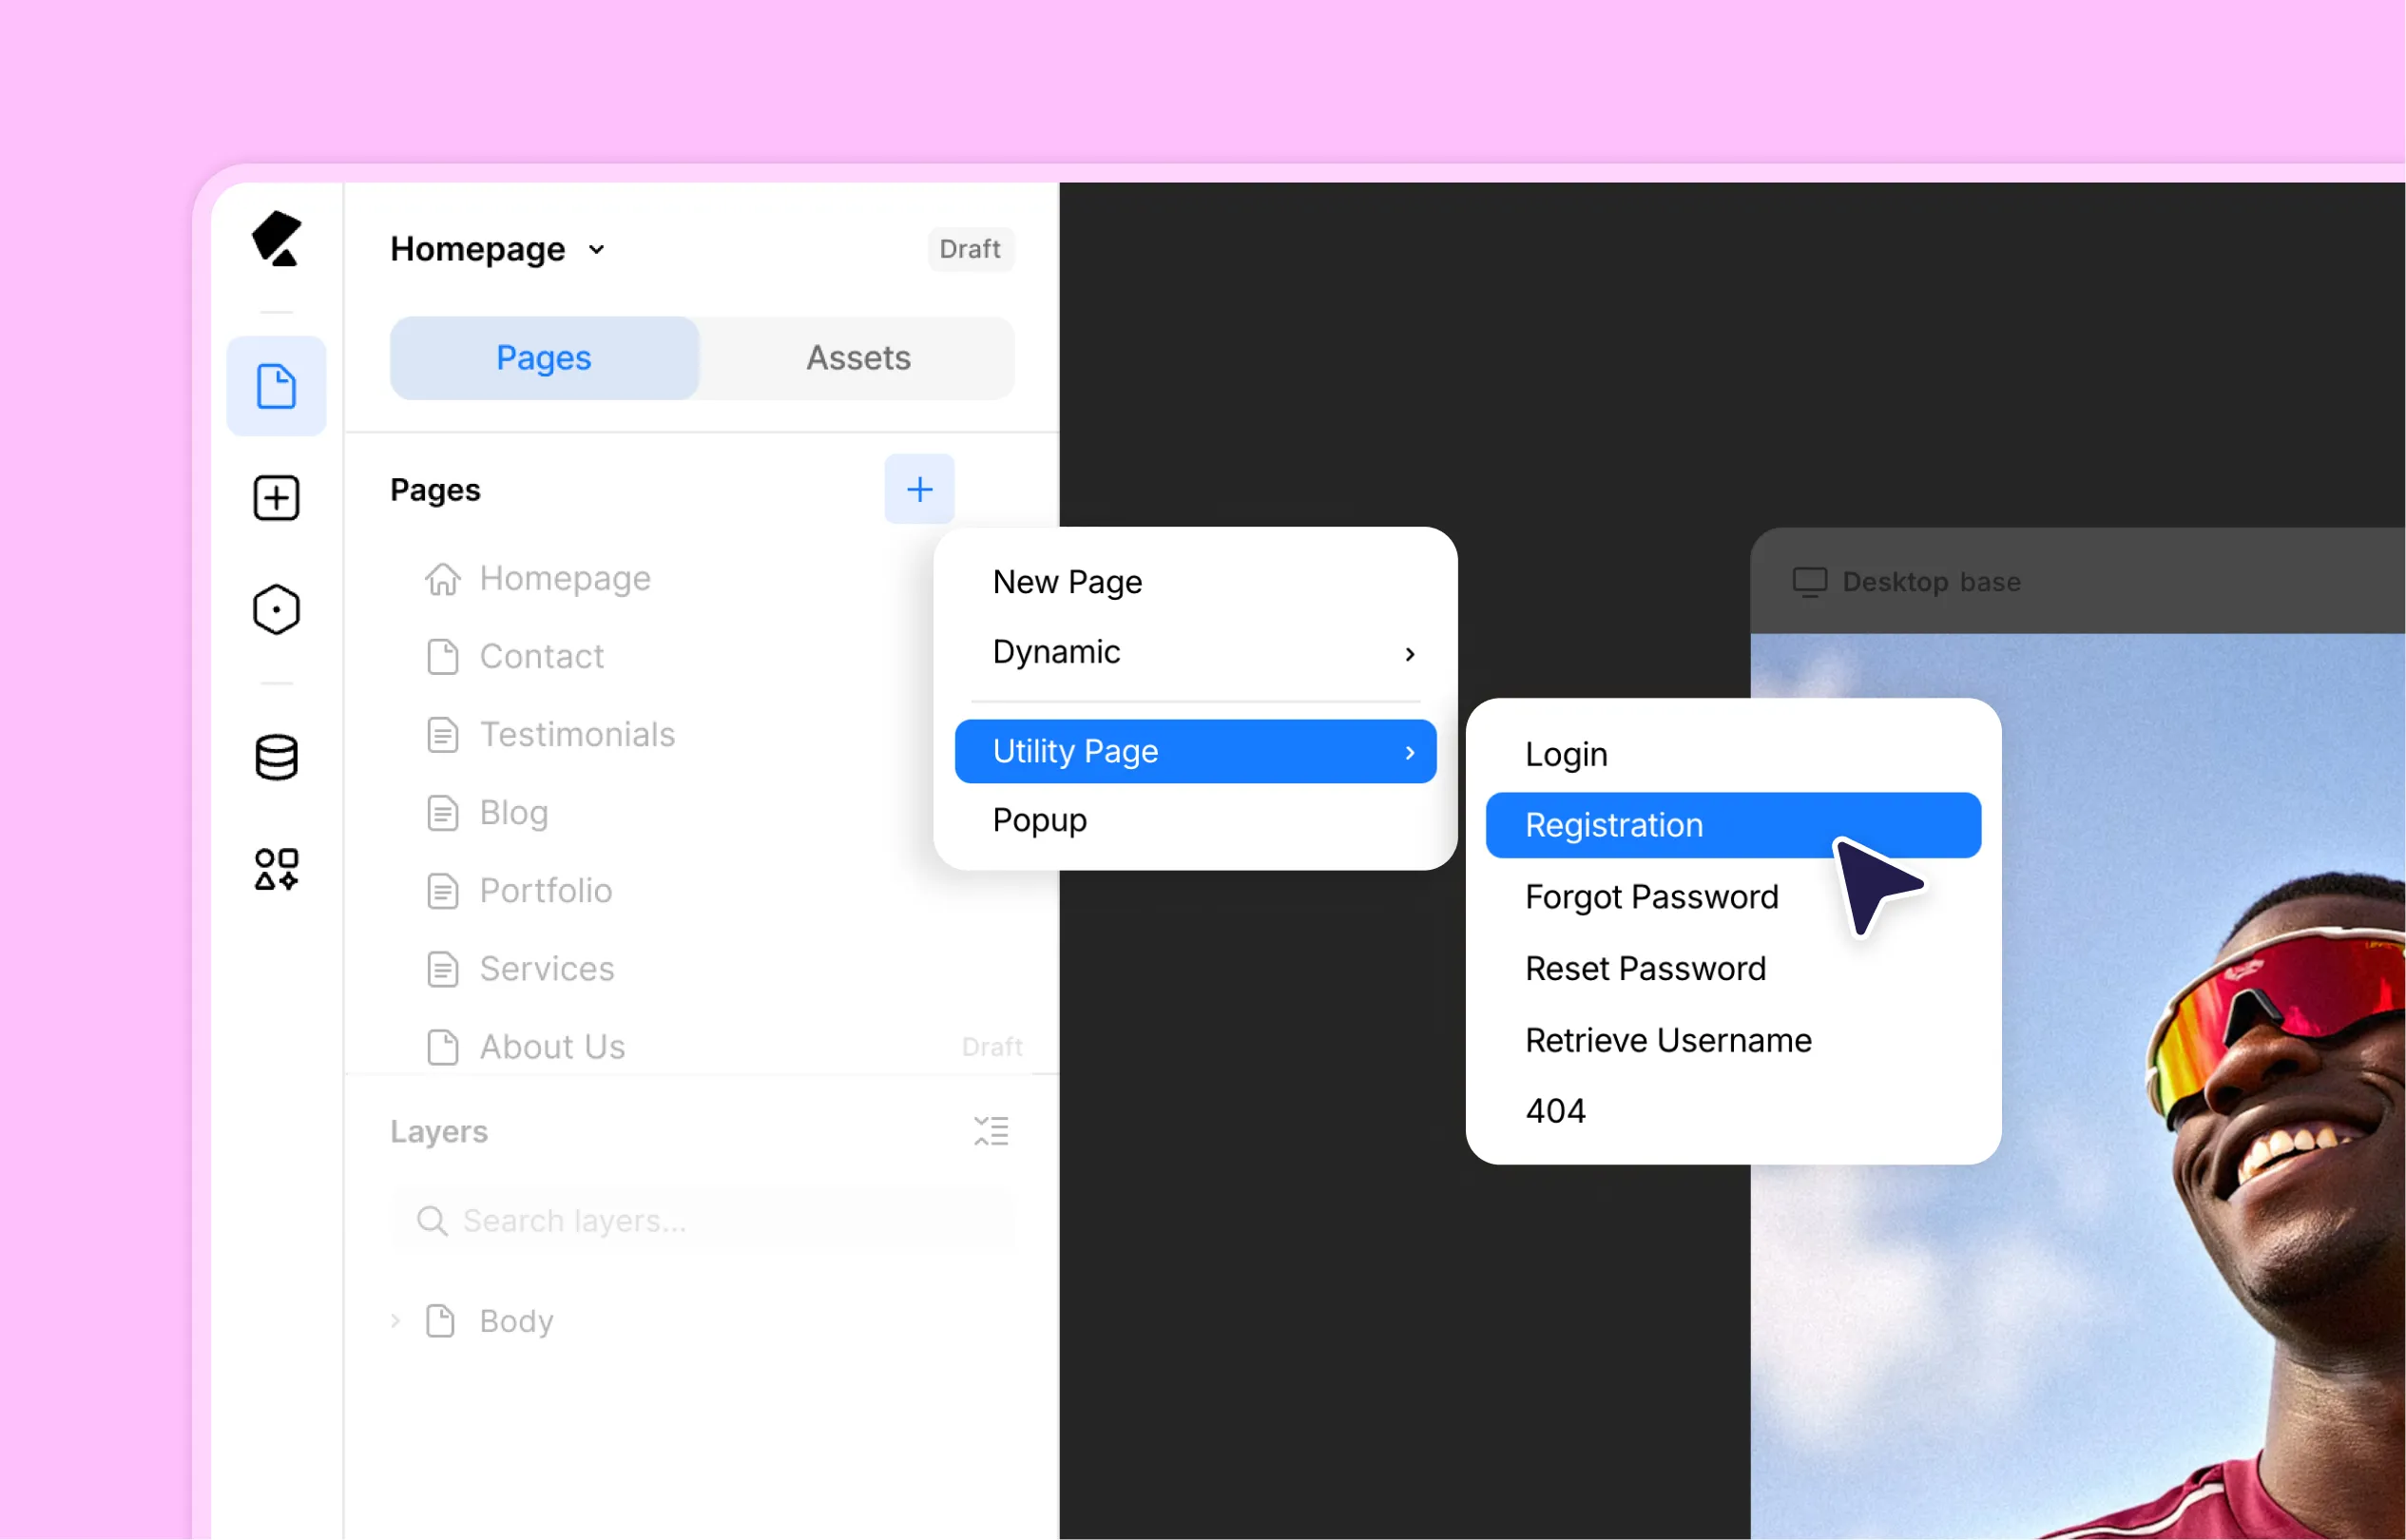
The registration page is where a visitor becomes a user, so let’s start there.
To create a custom registration page in WordPress with Kirki, you don’t have to build it from scratch. Kirki includes a ready-made registration page in its Utility Pages. To add it:
- Open the Kirki editor.
- From the Pages panel on the left sidebar, click the plus (+) icon at the top.
- Hover over the Utility Page option and select Registration.
Kirki opens the new page straight away. It comes with a working sign-up form: email and password fields, a Sign up button, and a “Sign in instead?” link.
The form works out of the box, but you can make it yours. Add extra fields, build around the form, and choose where new users go next.
Learn more about the Registration utility page.
Enable Registration in WordPress
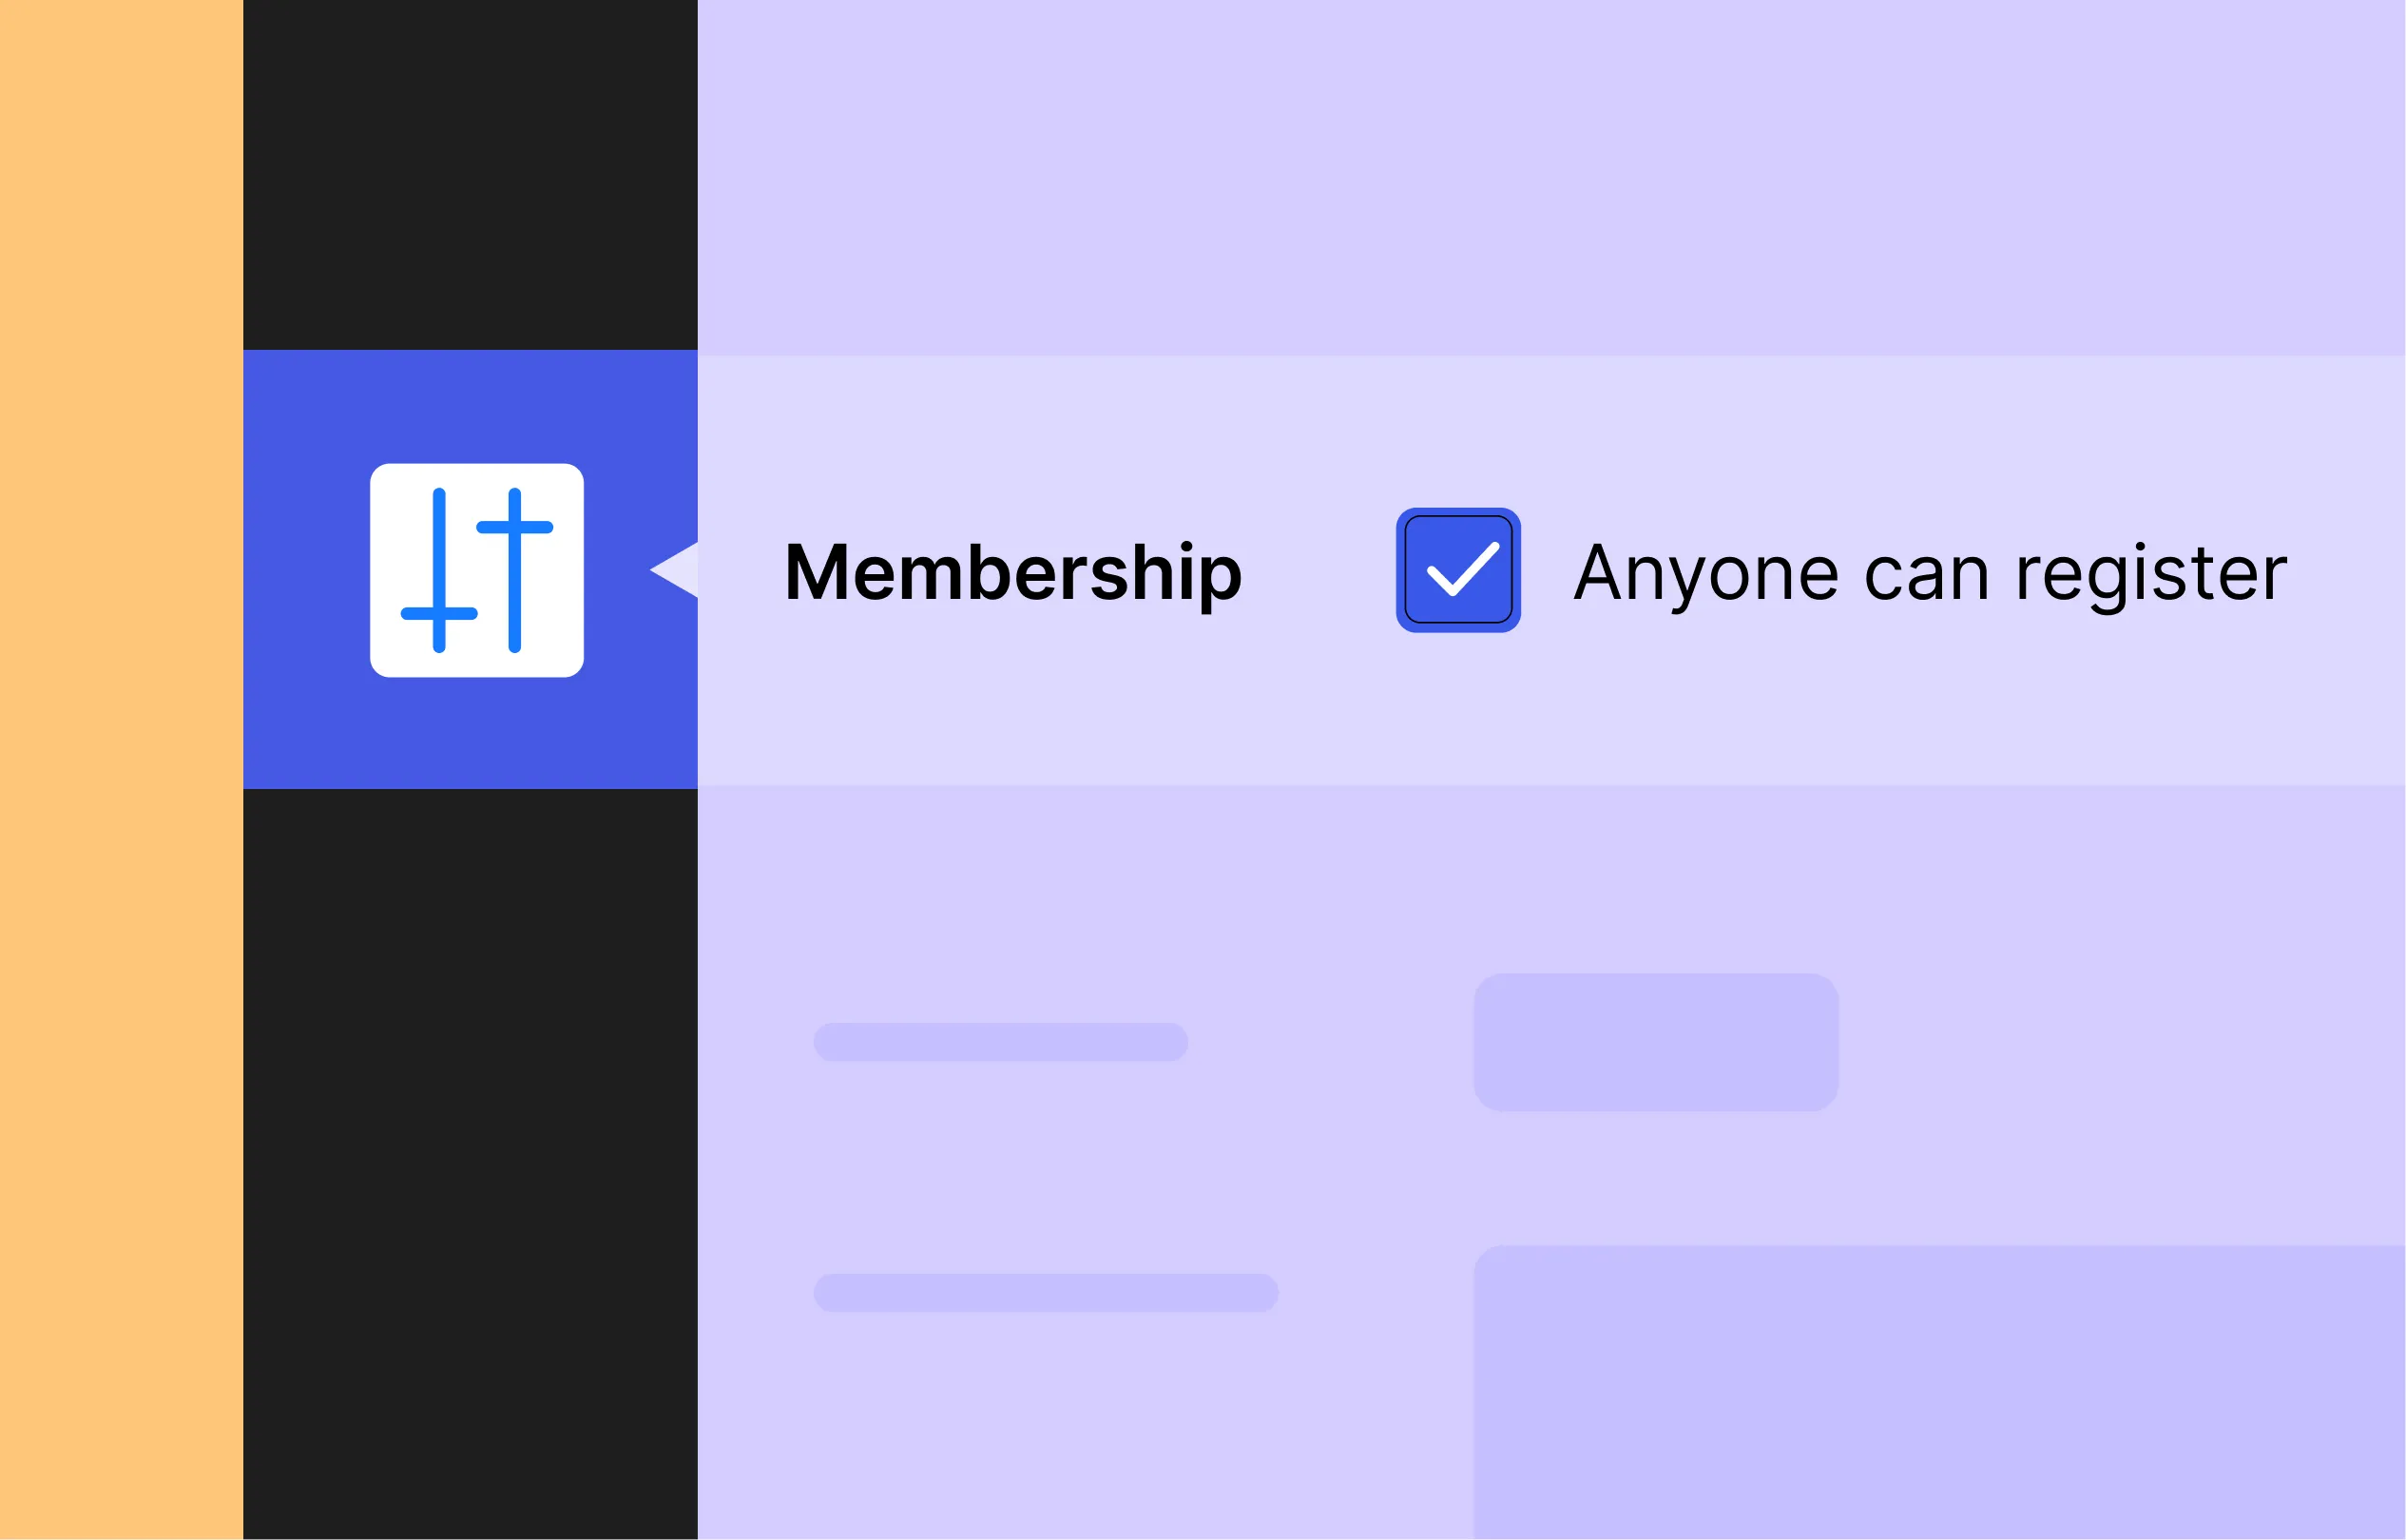
Your registration page is ready, but it won’t work until you turn registration on in WordPress.
To enable it:
- Go to Settings from your WordPress Admin Dashboard.
- Find Membership and check Anyone can register.
- Save your changes.
How to Create a Login Page in WordPress
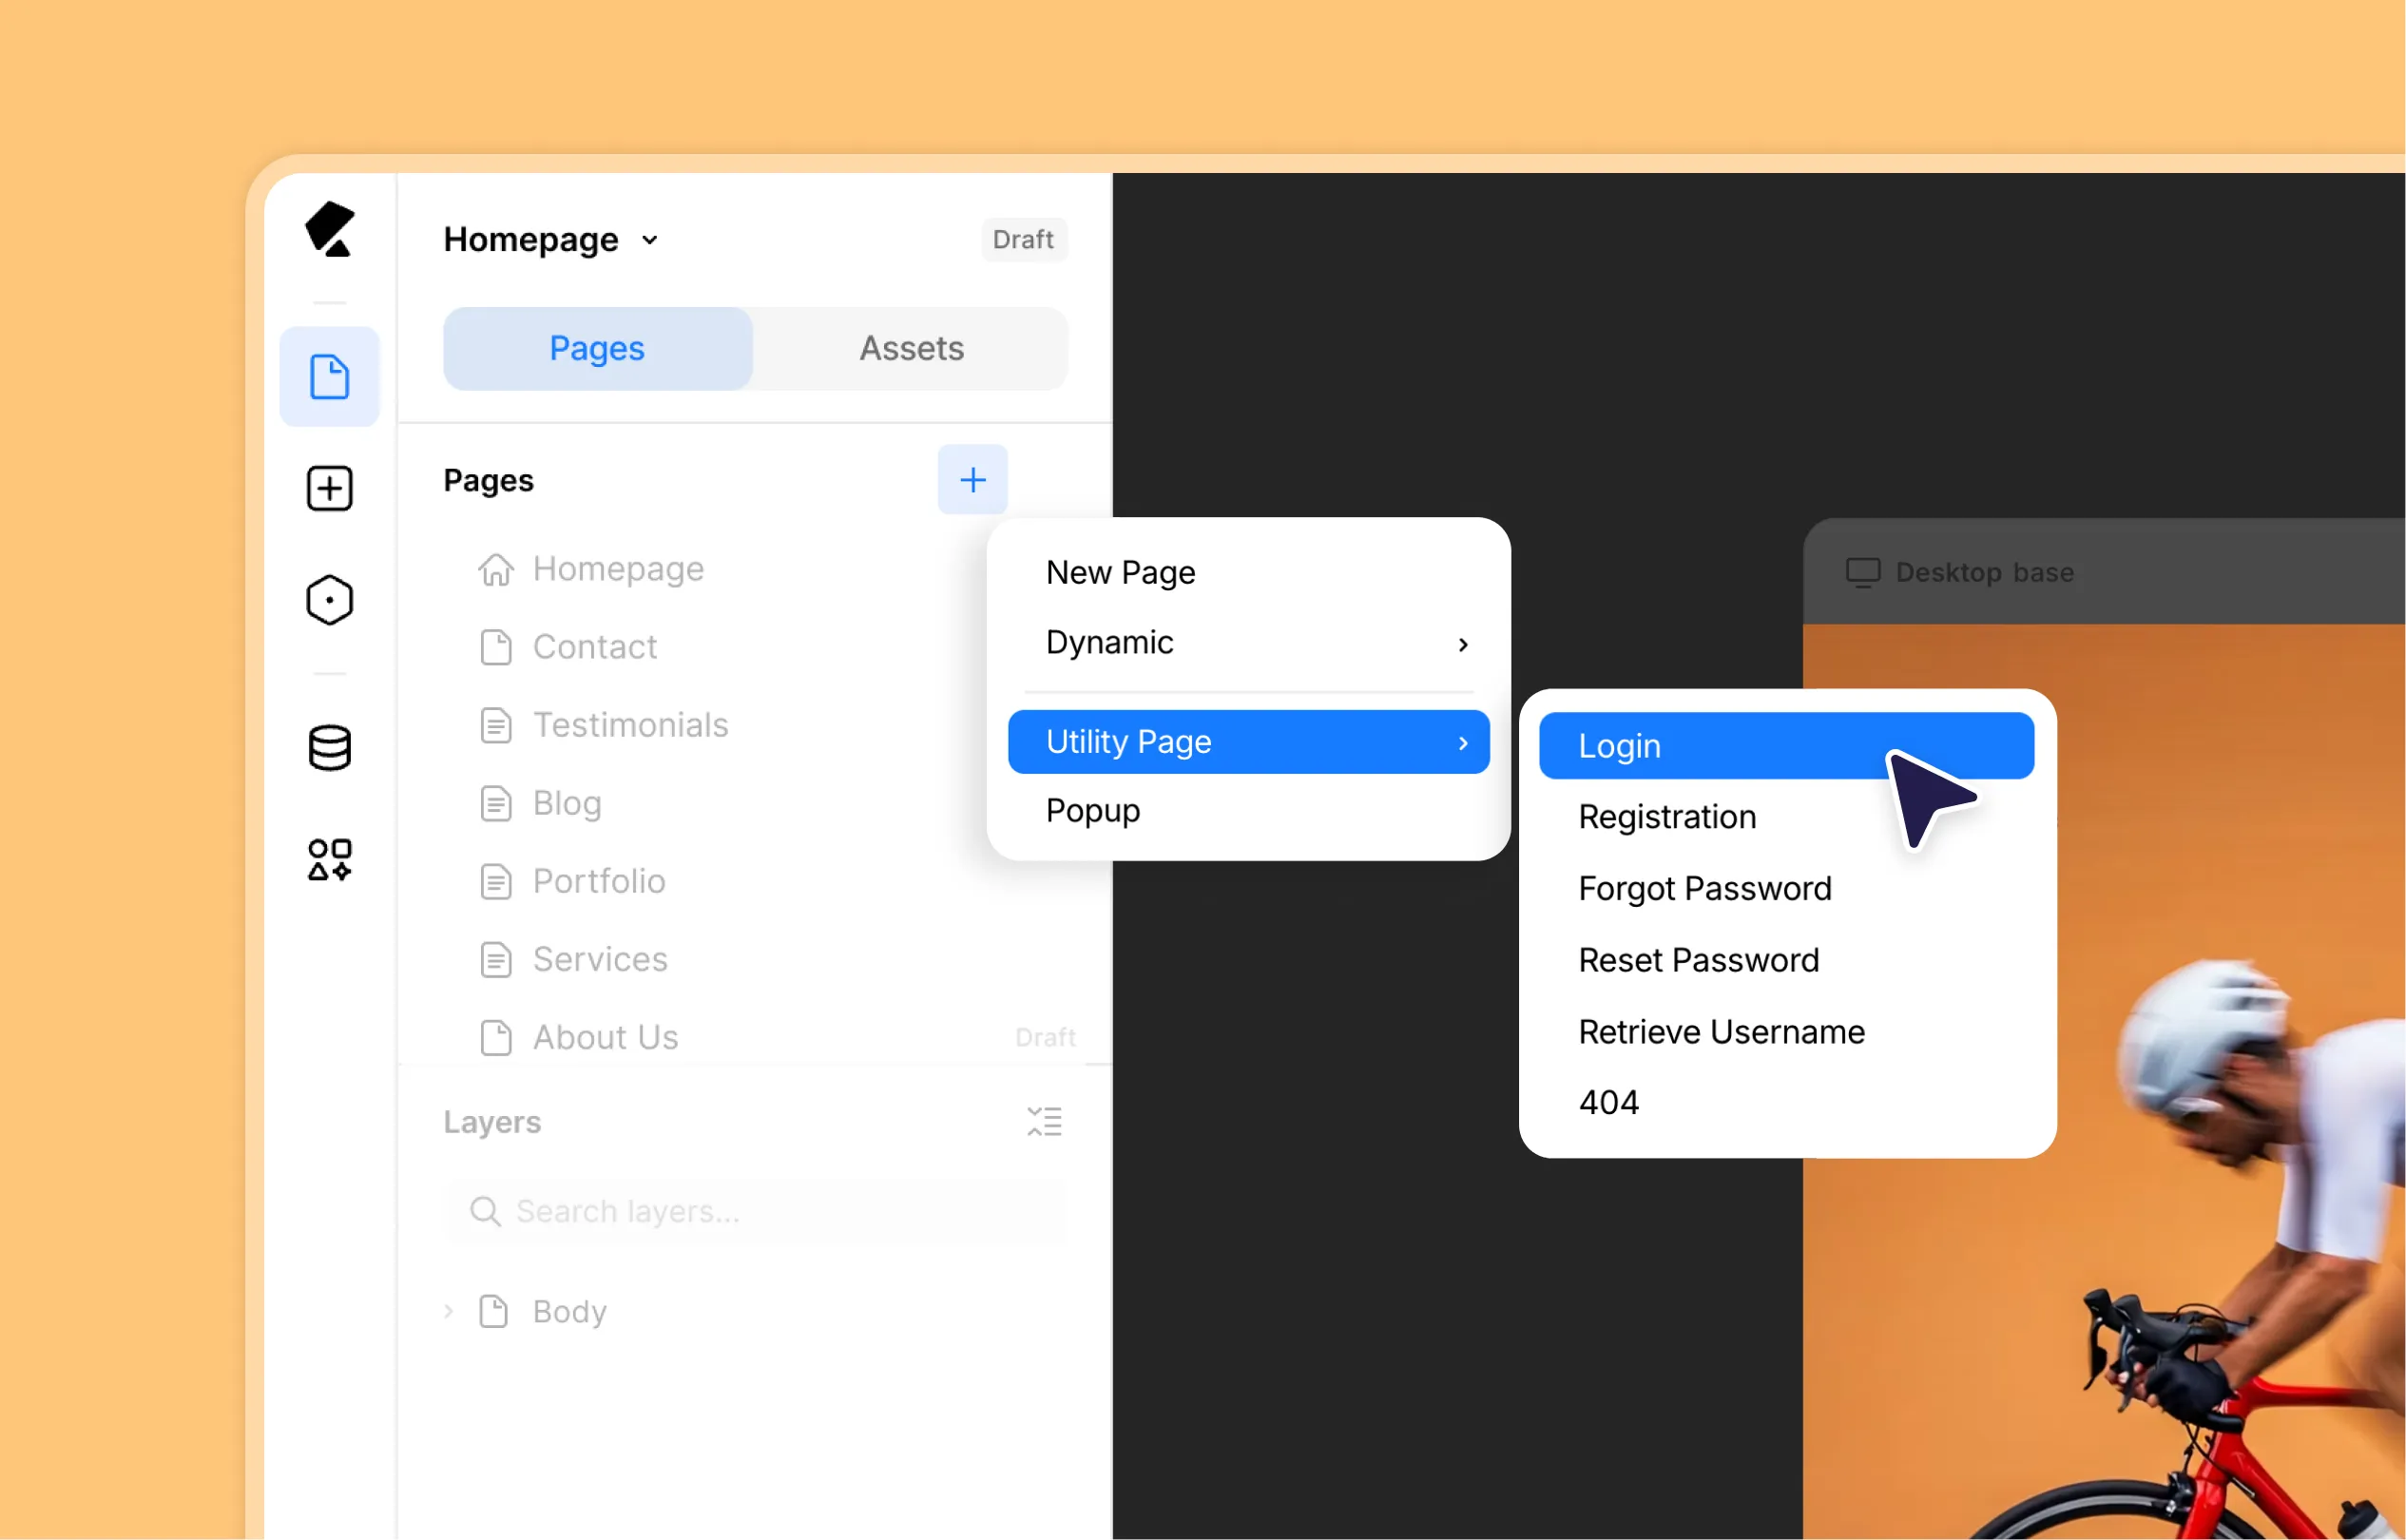
With registration all set up, returning users need a place to sign in. Let’s get to that next.
Just like registration, Kirki includes a ready-made Utility Page for login, so you don’t have to build a sign-in form from scratch. To create a custom login page in WordPress with Kirki:
- Open the Kirki editor.
- From the Pages panel on the left sidebar, click the plus (+) icon at the top.
- Hover over the Utility Page option and select Login.
That’s it. Kirki creates your login page and takes you to it automatically.
Like the registration page, it comes with a working sign-in form: email and password fields, a Sign in button, and a “Forgot Password?” link. You can also add elements around the form.
Learn more about the Login utility page.
How to Customize Your Login & Registration Pages
To customize your login and registration pages in Kirki, change the page slug in the Page Settings, then style the page from the right panel. A clean URL and on-brand styling ensure the pages look professional and keep the visitor experience seamless.
Update the Page URL
A custom URL is easier to remember than the WordPress default. While Kirki’s utility pages already come with a clean default slug, you can change it to something that fits your brand:
- In the Pages panel on the left sidebar, click the ellipsis (…) icon next to your page.
- Select Settings.
- In the General tab, change the Slug.
- Click Save to finish.
While you’re there, you can also update the Page Title and Description. The SEO tab has more options if you want to go further.
Style Page to Match Your Brand
Kirki gives you full control over how each element looks, so you can style the utility pages to match the rest of your site, just like any other page.
- Select the element you want to style. It can be the form, a part of it, or even the page itself.
- In the Design tab of the right panel, adjust Position, Layout, Sizing, Style, and more.
- Want to add motion? Open the Interaction tab and add it from there.
You can also add more elements to the form or the page, like a heading, an image, or a short line of text, using the Insert panel in the left sidebar.
Finally, repeat the styling on your other page so both match. To keep your brand colors and text styles identical across pages, save them as Variables, Kirki’s global styling tool, and reuse them everywhere.
How to Connect Your Login & Registration Pages
Two good pages don’t help visitors if no one can find them. So the next step is to link everything together.
Add a Login Link to Your Navigation
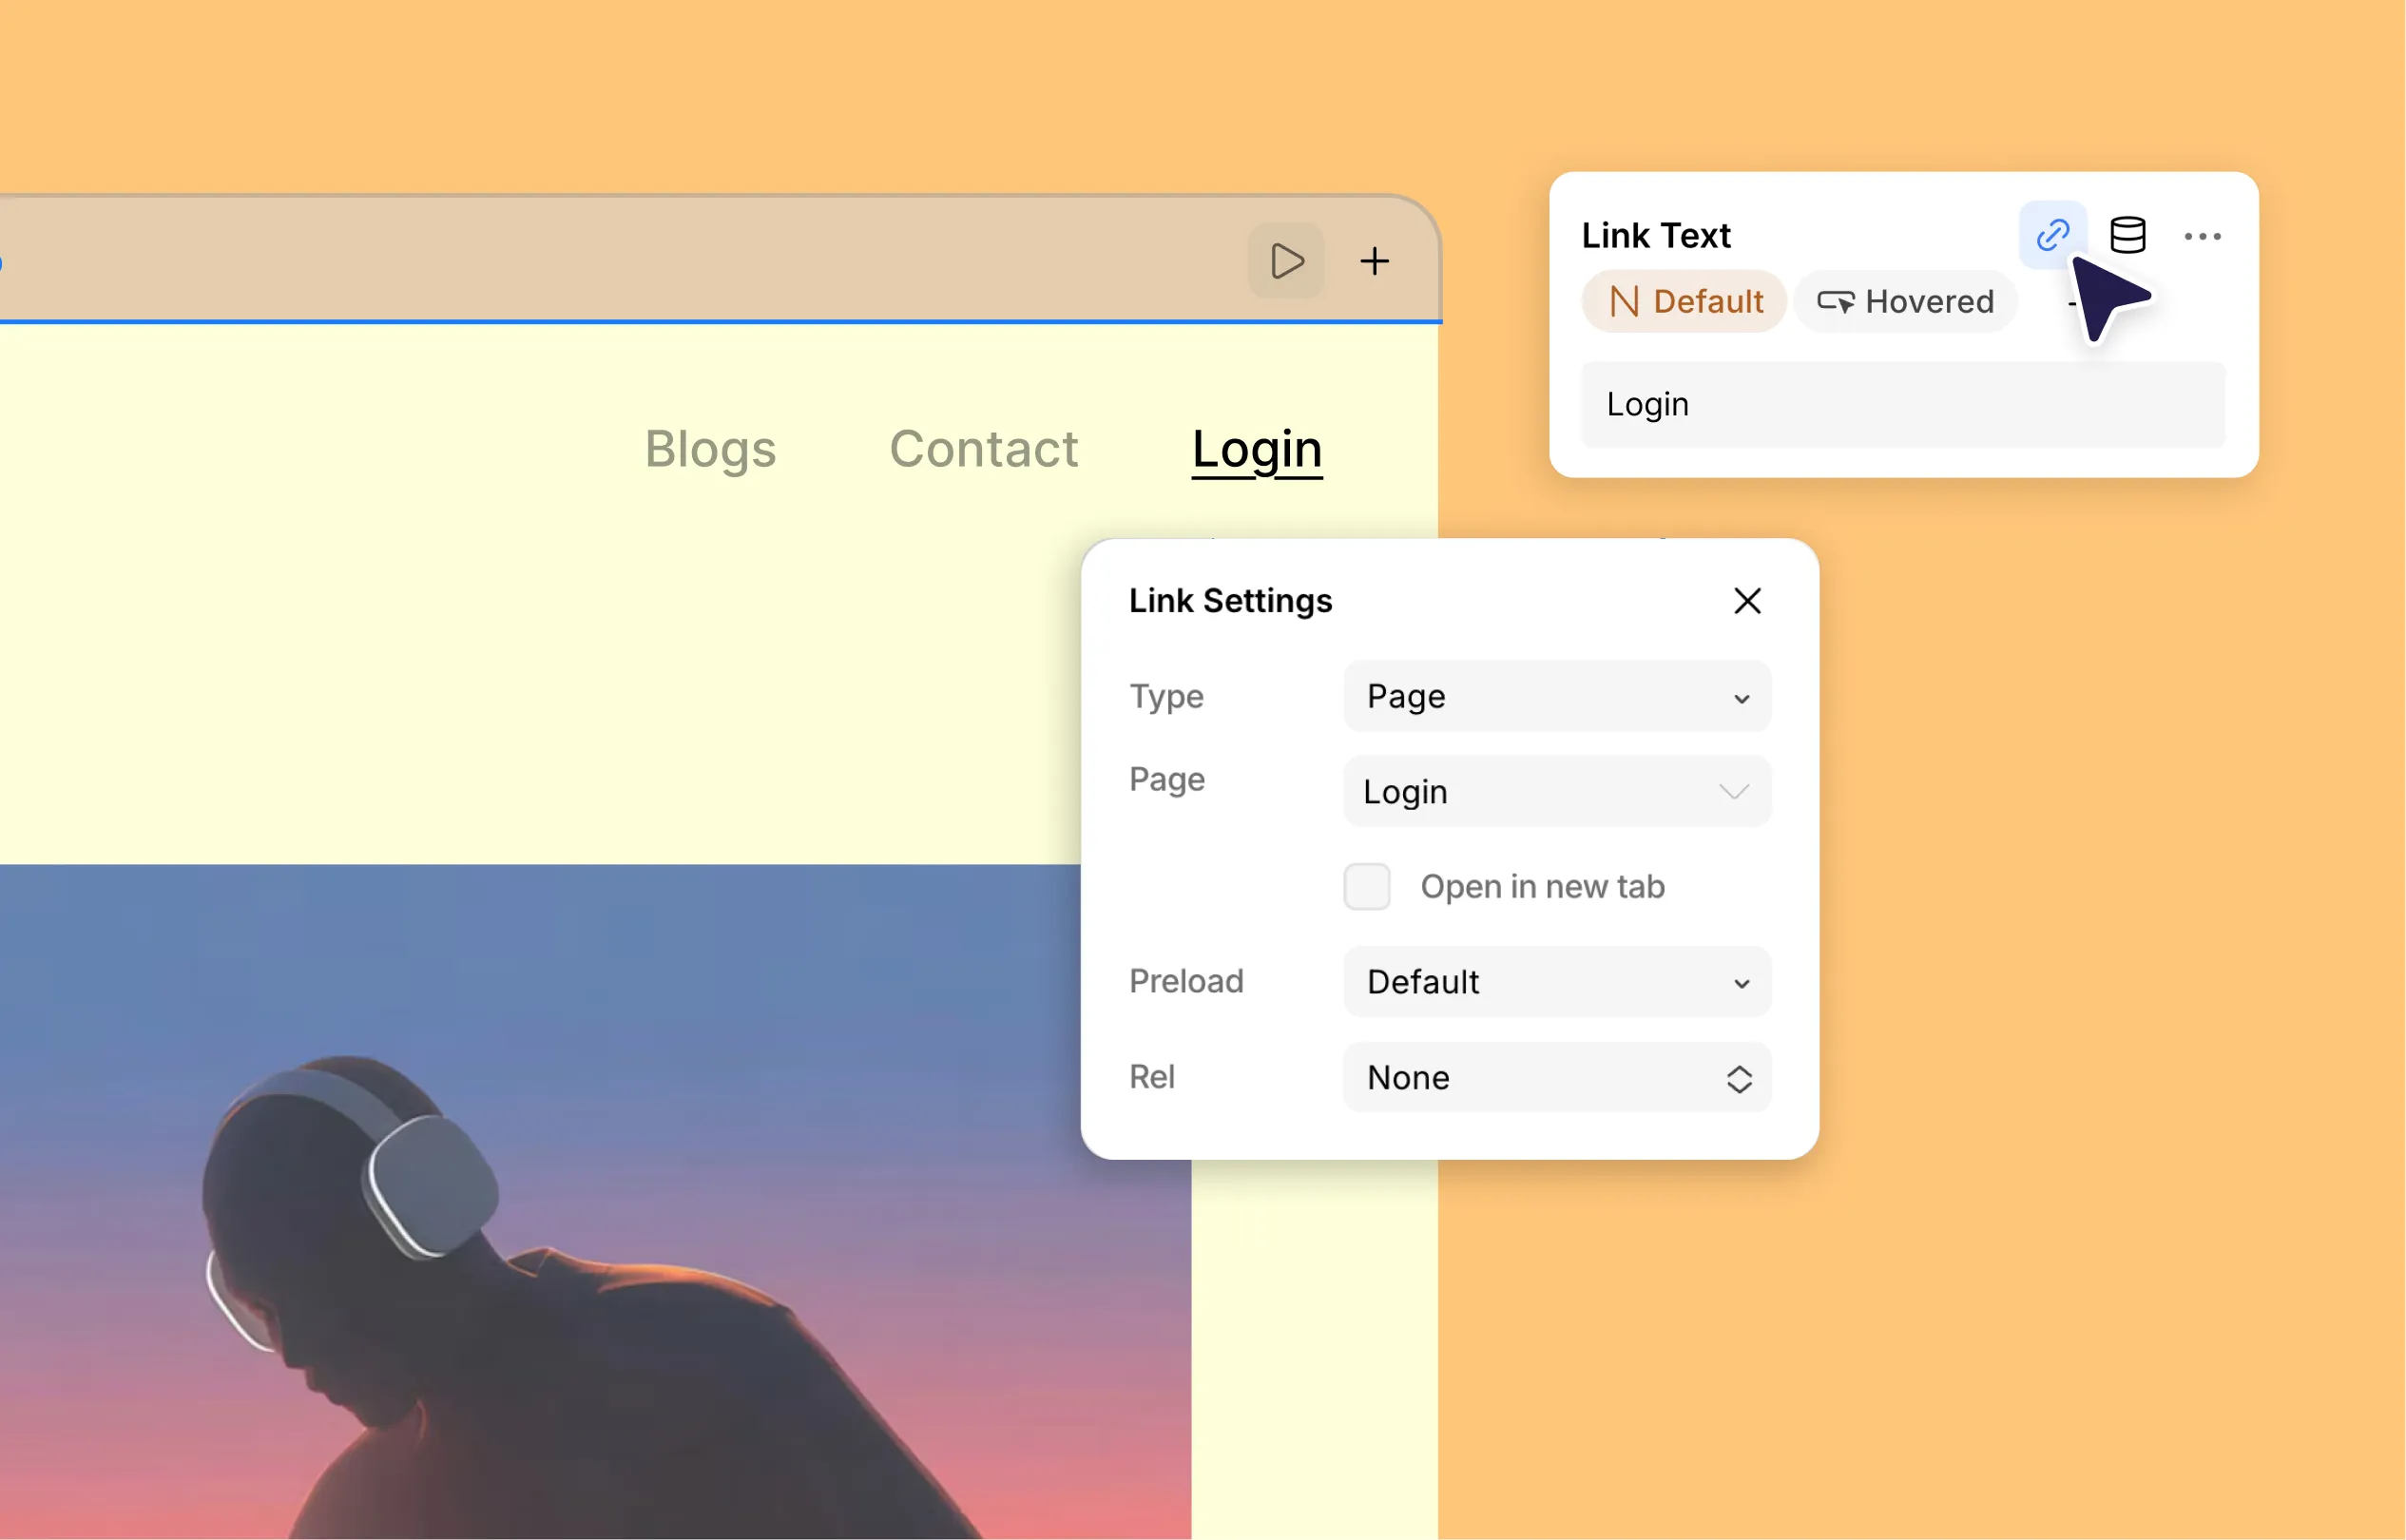
Your navigation is the first place people look for a way to sign in, so that’s where the login link goes:
- Select your Navigation element. If your page doesn’t have one yet, add it from the Insert panel.
- From the Navigation settings in the Design tab, click the plus (+) icon next to Nav items to add a new one.
- Select the new item’s text and change it to Login.
- With the item’s text still selected, click the link icon in the right panel to open Link Settings. Set Type to Page, then set Page to your login page.
Want a Registration link in your navigation too? Repeat these steps and set Page to your Registration page. Or skip it and link to registration from your Login page instead, which keeps the menu uncluttered.
(Optional) Add a Registration Link to Your Login Page
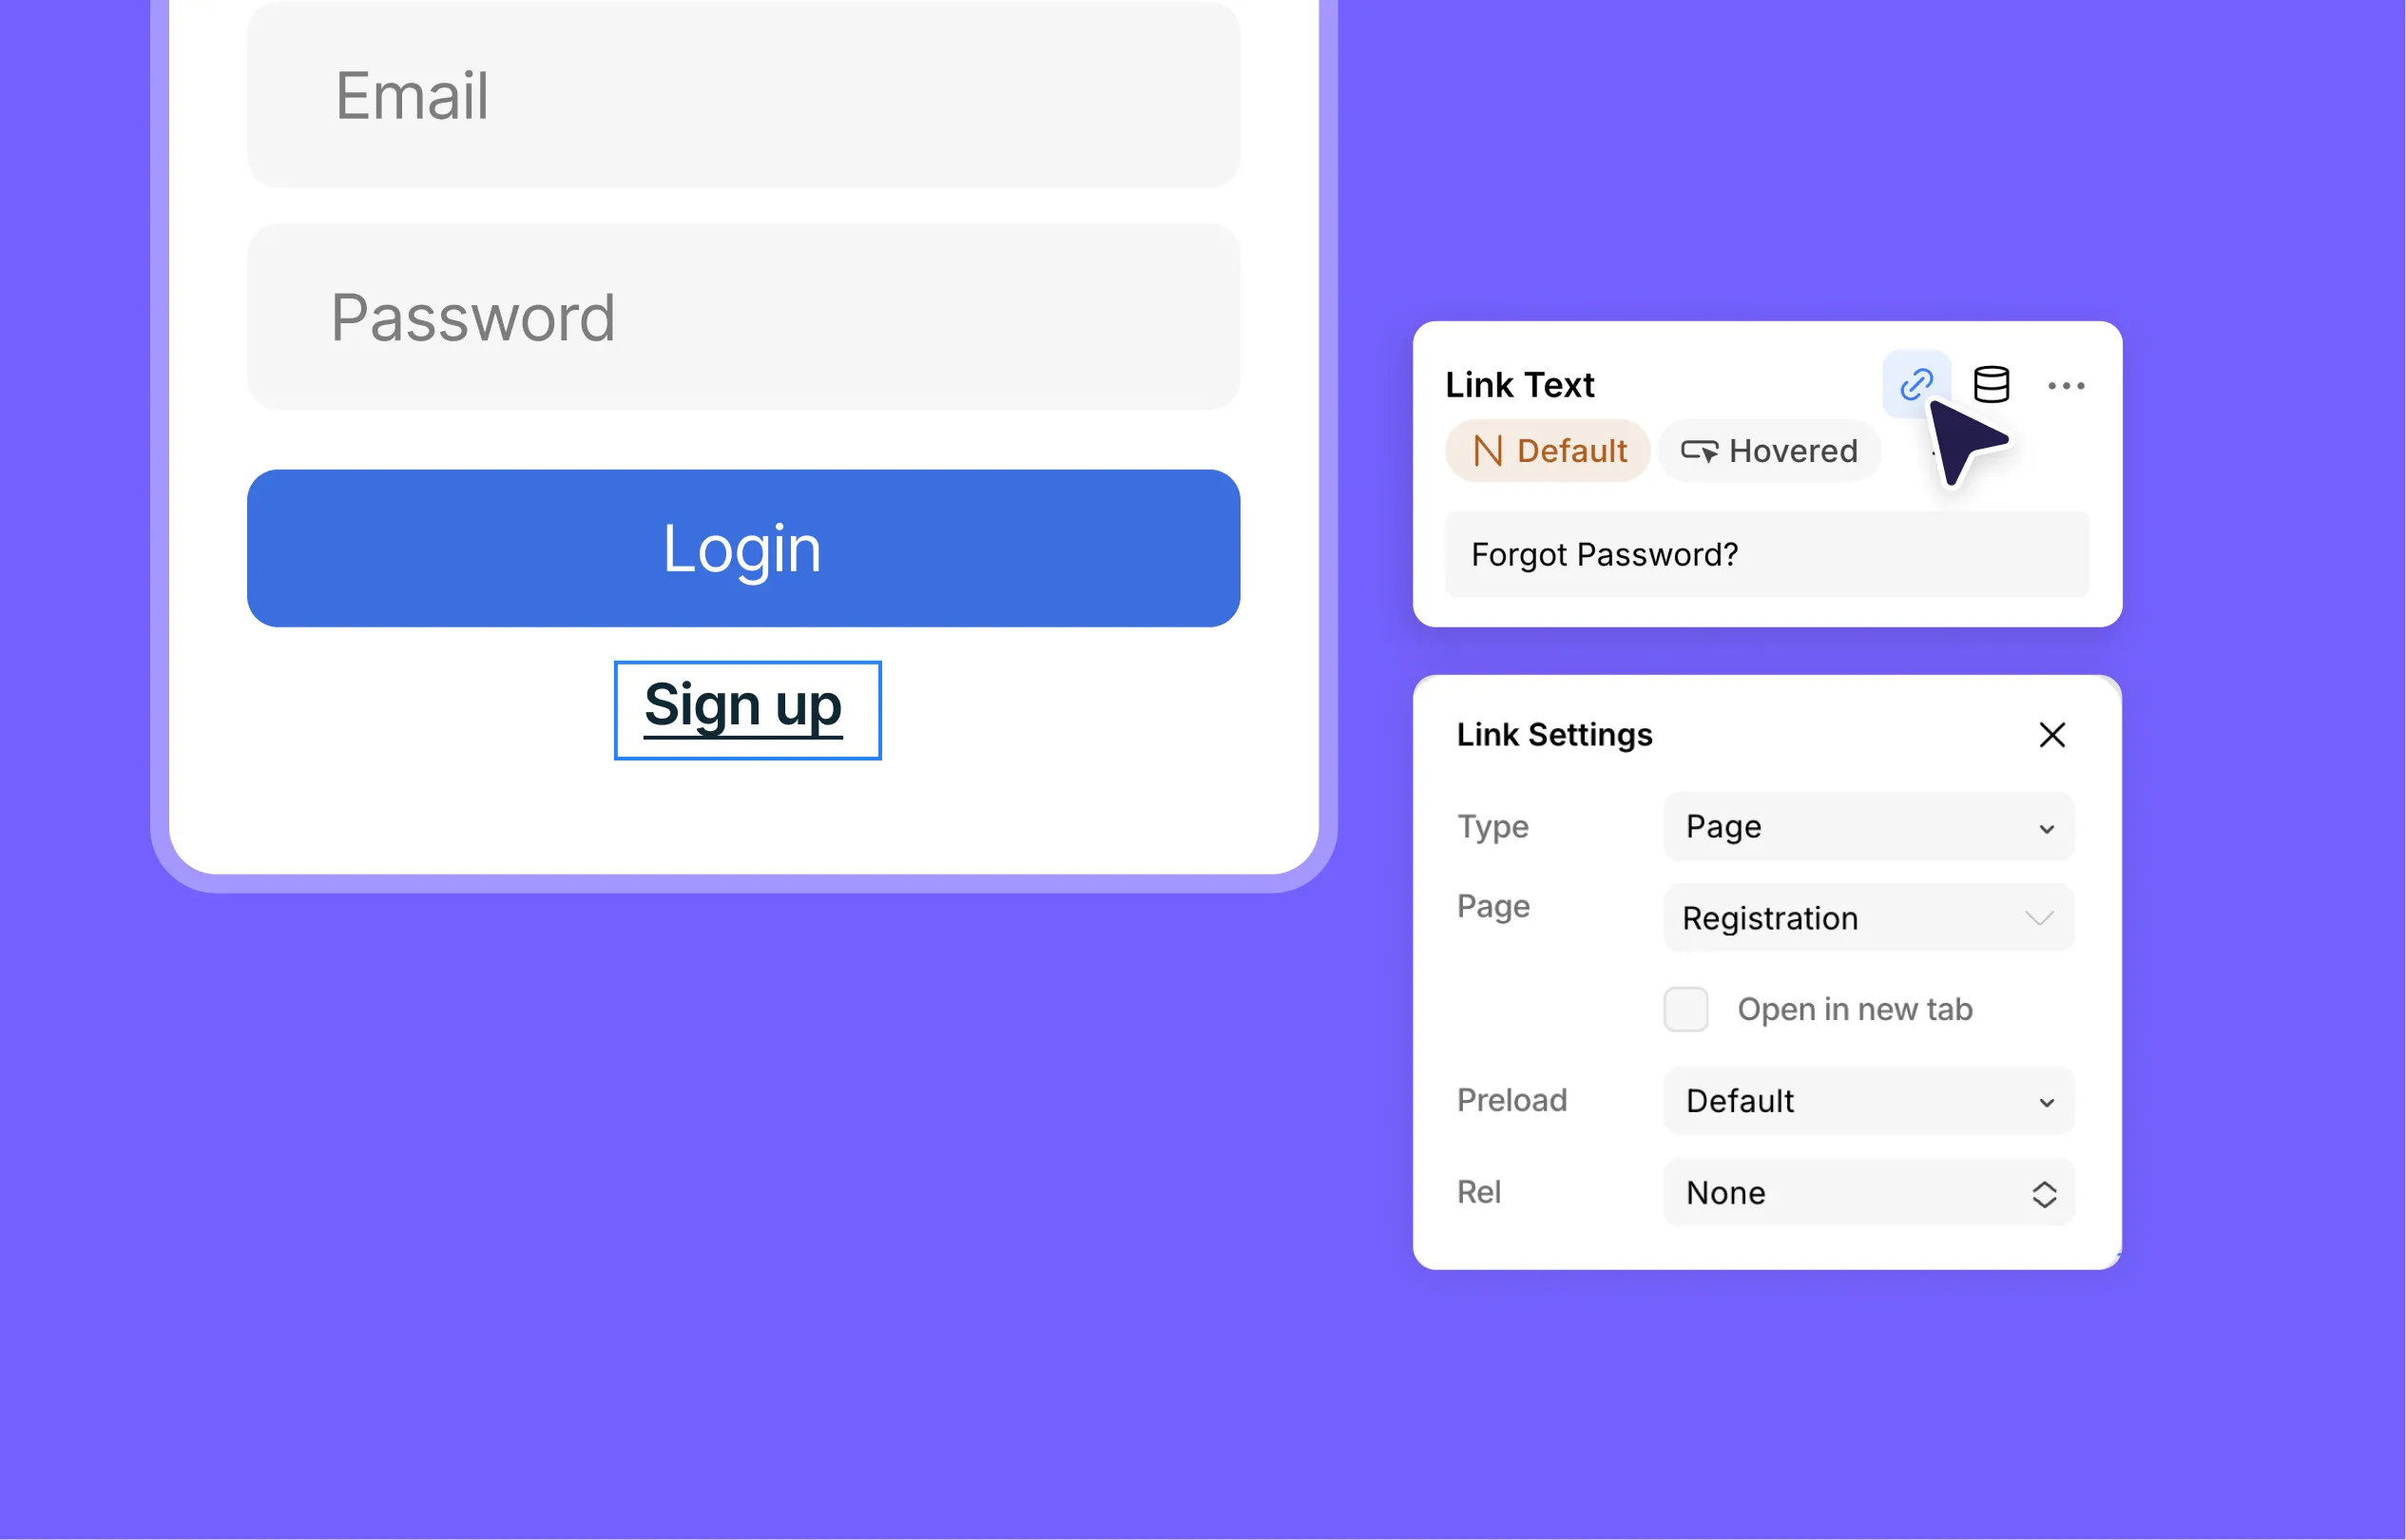
Linking to registration from the login page instead of the nav not only keeps your menu clean but also allows visitors who click Login before realizing they don’t have an account yet.
Here’s how to connect the two pages:
- Open your Login page and select the form.
- Add a Text element from the Island or the Insert panel.
- Replace the text with something like “Don’t have an account? Sign up.”
- Select the text, click the link icon in the right panel to open Link Settings, then set Type to Page and Page to your registration page.
How to Hide the Login Button After Sign-In
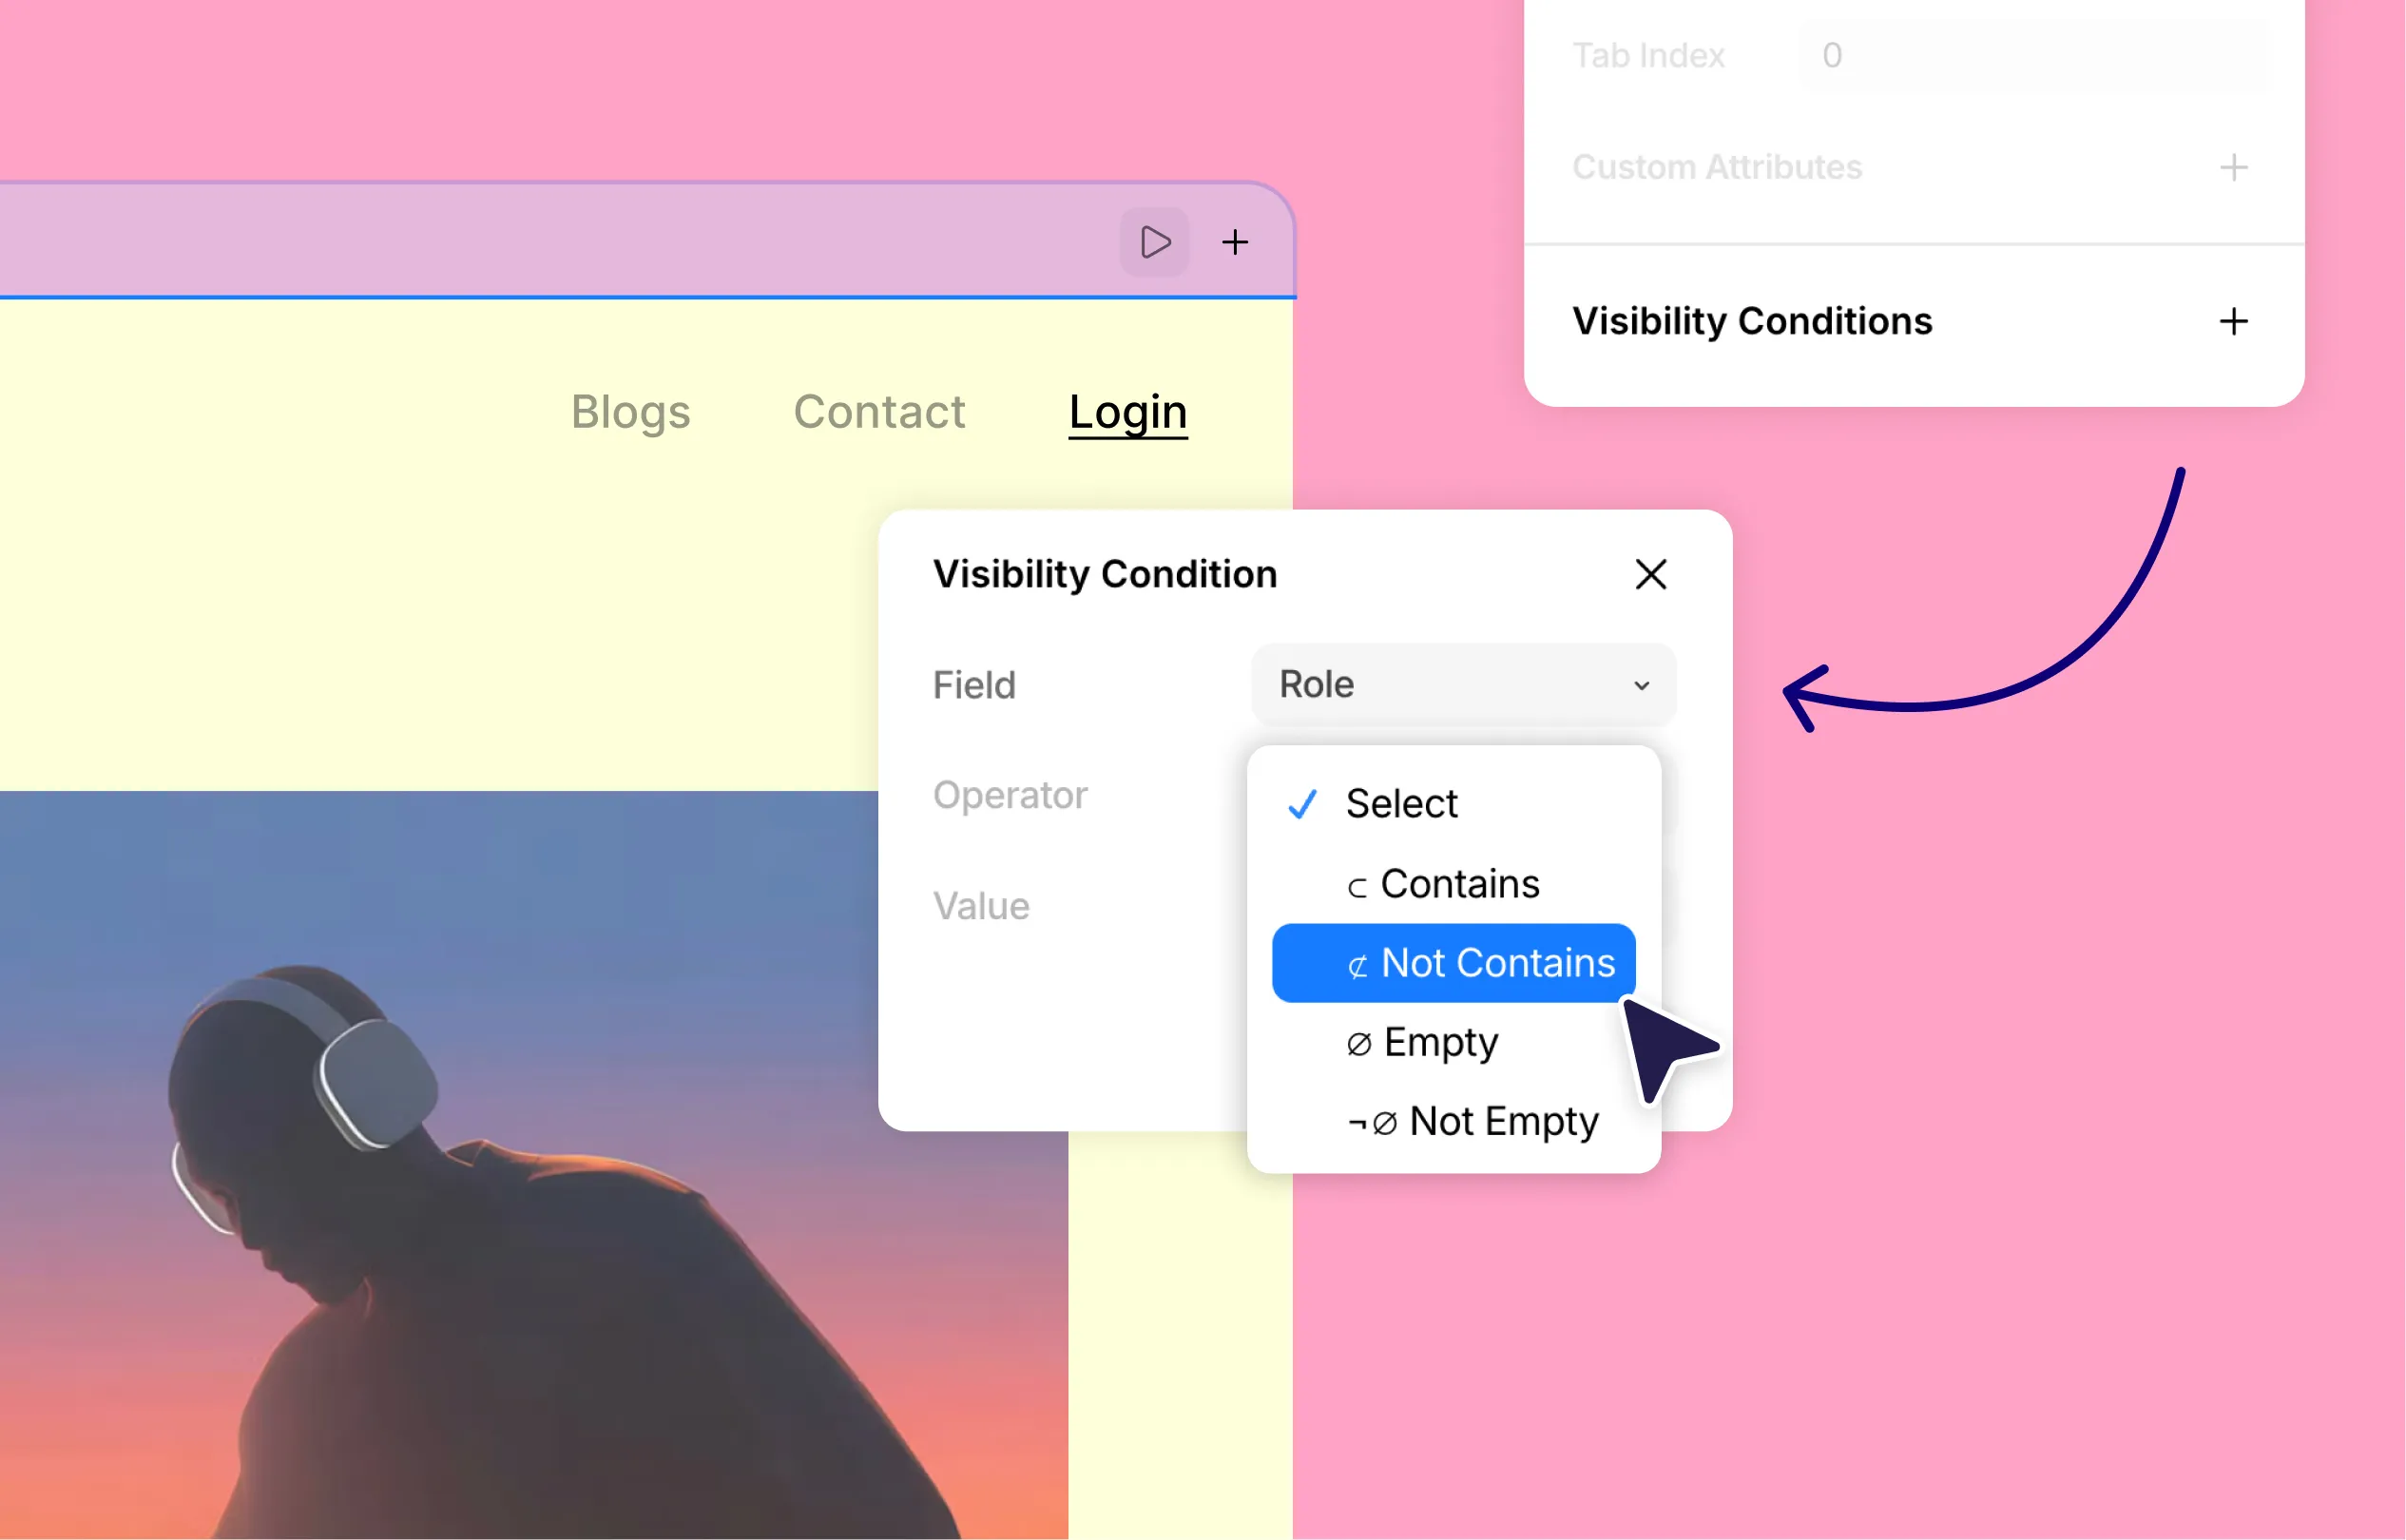
This is purely optional, but once someone is signed in, a Login button on the site is just unnecessary visual clutter. With Visibility Conditions in Kirki, you can show it only to visitors who haven’t signed in.
- Select the Login link or button on your site.
- Switch to the Settings tab in the right panel.
- Click the plus (+) icon next to Visibility Conditions.
- Set Field to User → Role, Operator to Not Contains, and Value to Logged In.
- Click Save.
How to Secure WordPress Forms With reCAPTCHA
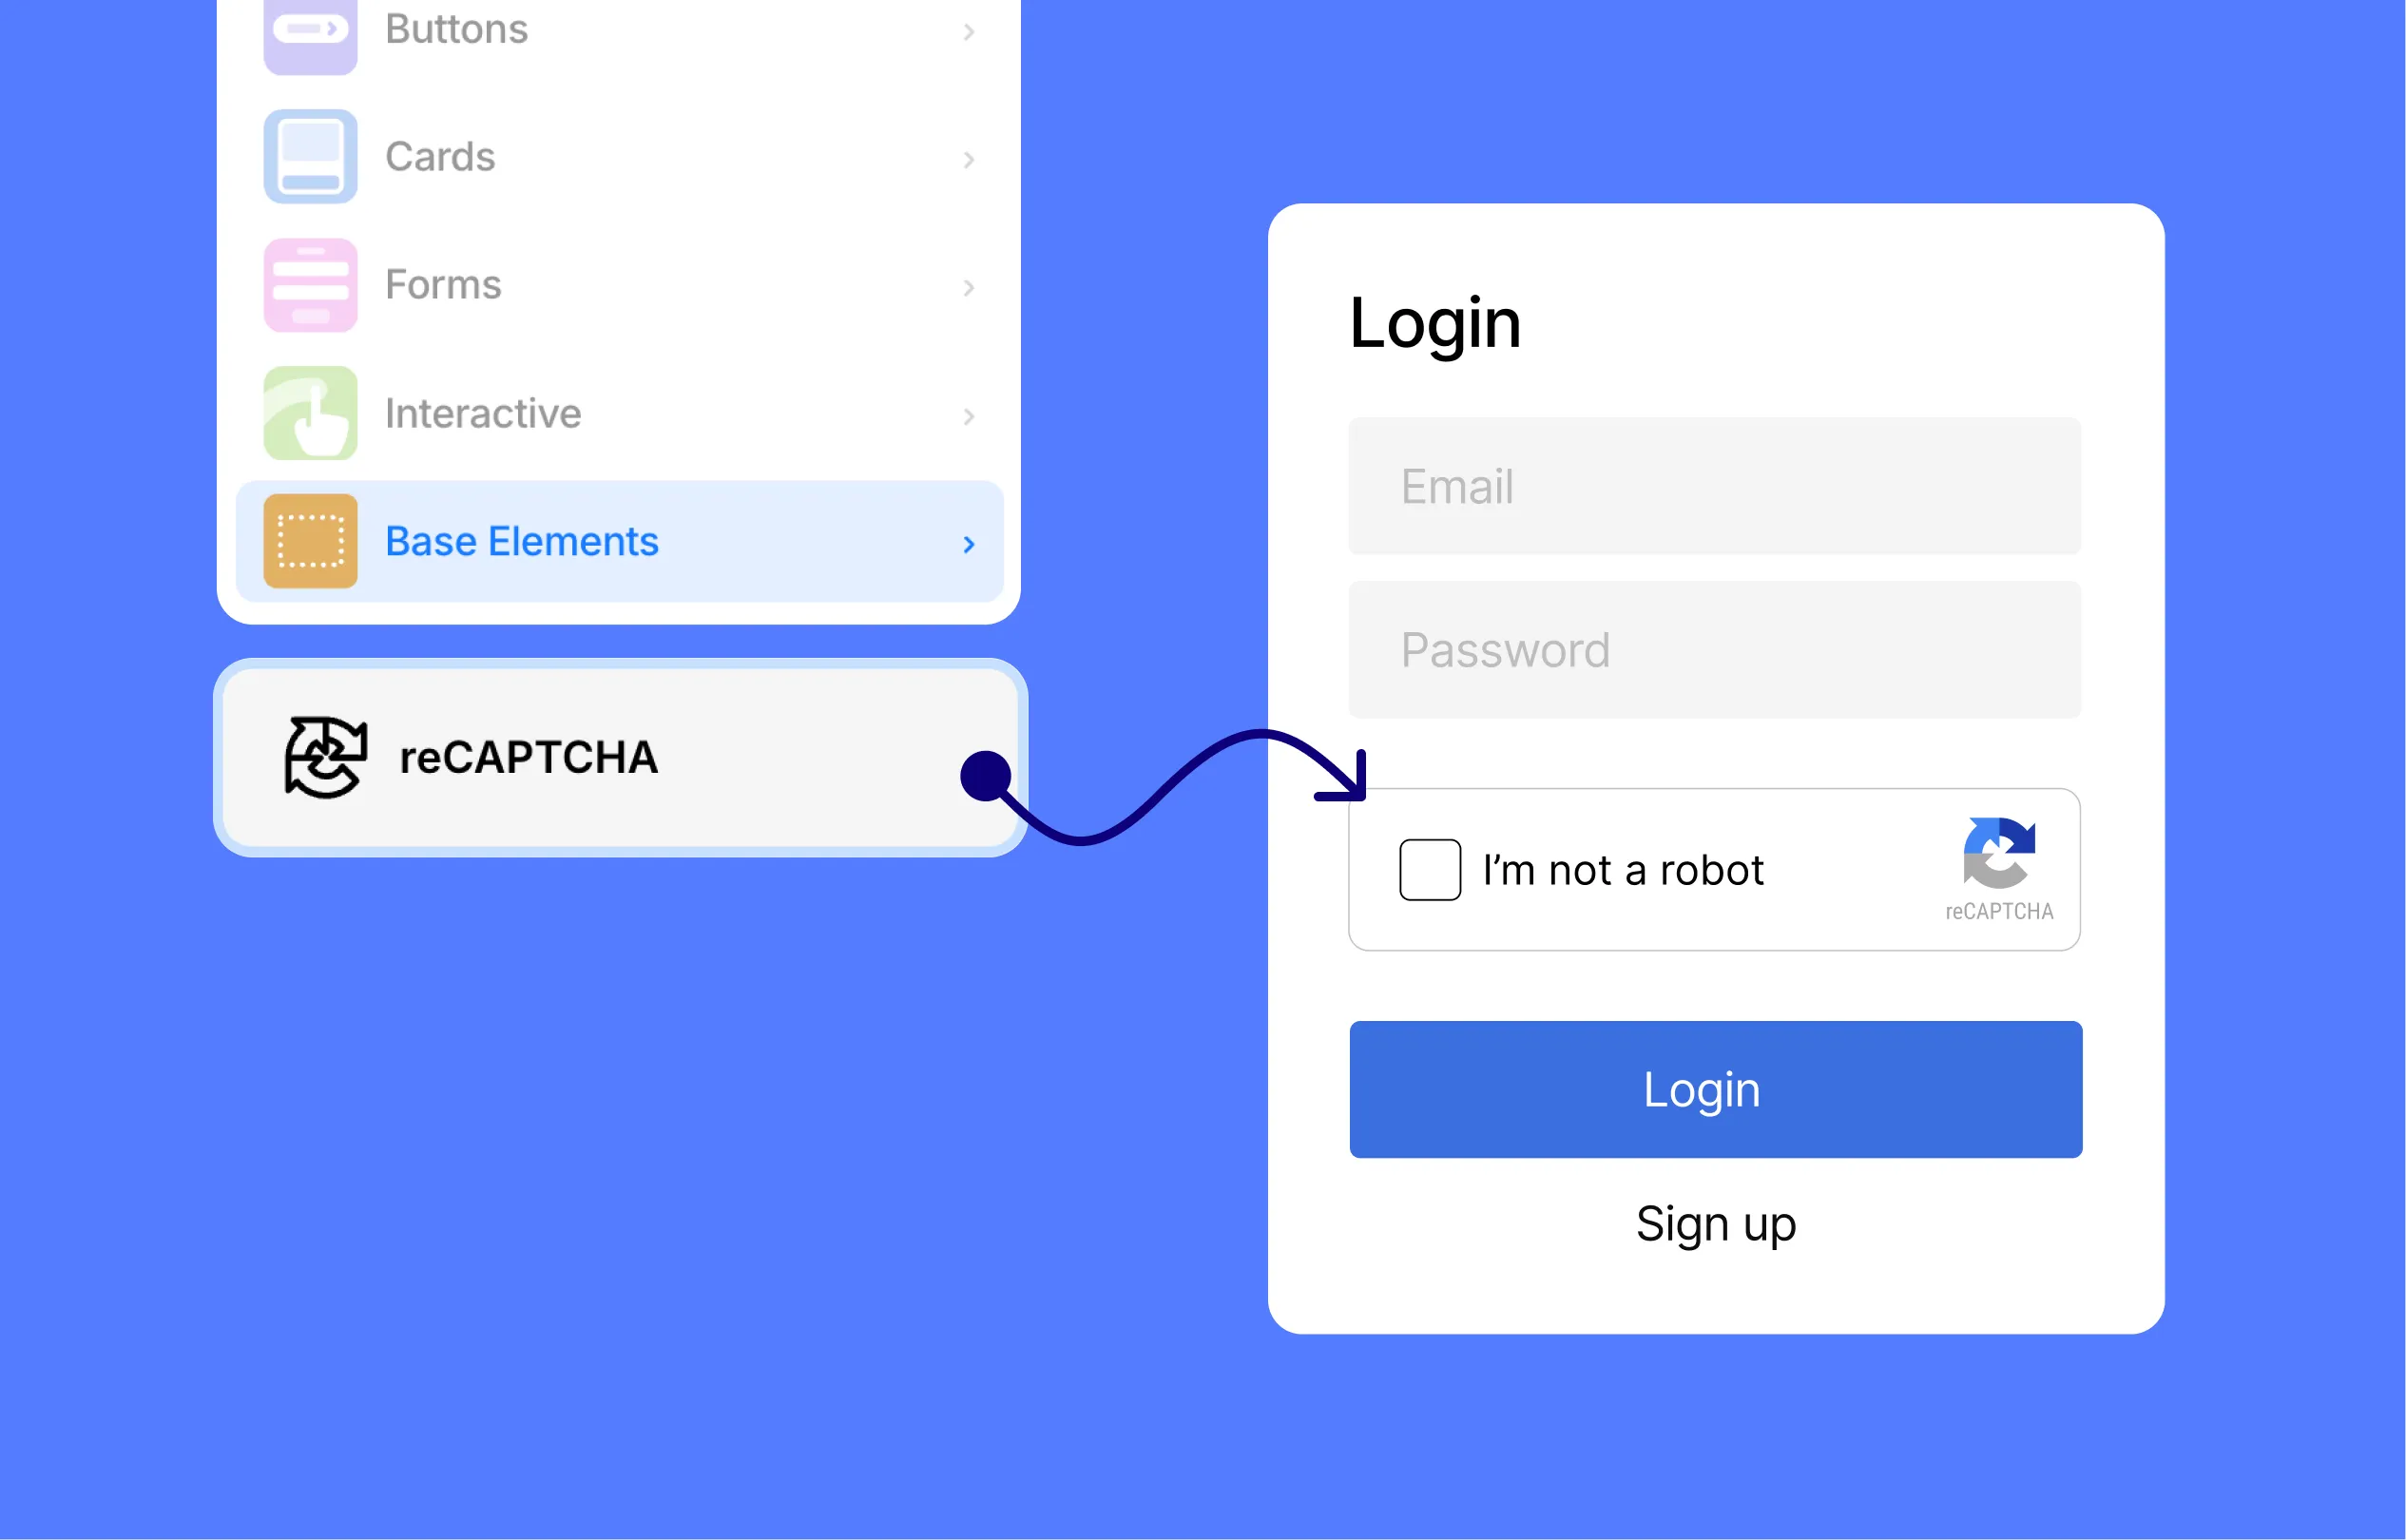
Public login and registration forms attract spam sign-ups and automated login attempts. A reCAPTCHA check is a quick way to filter that traffic out. It’s optional, but highly recommended.
Kirki has a built-in reCAPTCHA element you can drop into any form. Once added, all you need to do is connect it to your reCAPTCHA keys, and it checks each submission before the form goes through.
Here’s how to add reCAPTCHA to your forms:
- Open the page you want to protect: your Login or Registration page.
- From the Insert panel, go to Base Elements and drag reCAPTCHA into your form.
- While the reCAPTCHA element is selected, choose v2 or v3, and paste your site key and secret key in the right panel.
Don’t have your keys yet? Generate them in your Google reCAPTCHA account.
Frequently Asked Questions
Yes. Kirki includes ready-made Utility Pages for login and registration, so you don’t need a separate login page plugin. Create the page from the Pages panel, customize it in the editor, and you’re set.
Two things are needed. First, create a Registration page in Kirki from Utility Pages. Then go to Settings in your WordPress Admin Dashboard, find Membership, and check “Anyone can register”.
Add Google reCAPTCHA to your registration form with Kirki’s reCAPTCHA element. It supports reCAPTCHA v2 and v3. Find it under Base Elements in the Insert panel.
Open the Pages panel in Kirki, click the ellipsis (…) icon next to your login page, and select Settings. In the General tab, change the Slug and click Save.
Use Visibility Conditions on the Login link in your site. You can find it under the Settings tab in the right panel. Set its Field to User → Role, Operator to Not Contains, and Value to Logged In.
Yes. Select the form or the page and use the Design tab in the right panel to adjust its layout, sizing, and style.
Besides Login and Registration, Kirki includes pages for Forgot Password, Reset Password, 404, and more.
Keep Every Page On-Brand With Kirki
You now have a login and registration system that matches your brand and is protected with reCAPTCHA. Visitors can sign up and sign in without a generic WordPress page breaking their flow.
Login and Registration aren’t the only Utility Pages in Kirki. You’ll also find pages for Forgot Password, Reset Password, 404, and more. Add them the same way, and every page a visitor lands on feels like part of one site.

