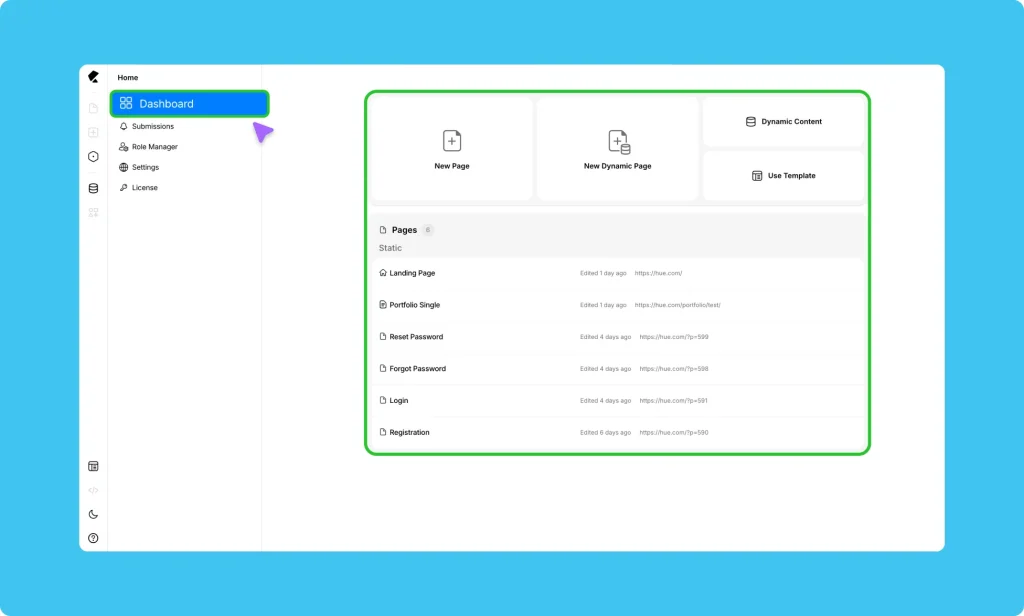
The Kirki Dashboard is your home base – the first thing you see when you open Kirki and the place you return to whenever you need to manage your site outside the editor.
Quick Actions
At the top of the dashboard, you’ll find shortcuts to the most common starting points:
New Page – Create a blank static Page and open it directly in the Kirki editor.
New Dynamic Page – Create a page powered by a dynamic content collection, ideal for blogs, portfolios, directories, and other data-driven layouts.
Dynamic Content – Jump straight to the Dynamic Content Manager to create or manage your custom content collections.
Use Template – Browse the Kirki Template Library and launch a complete site design in seconds.
Pages
Below the quick actions, you’ll find a live list of all your pages organized by type: Static and Dynamic.
Each entry shows the page name and when it was last edited, so you always know where you left off. Click any page to open it in the editor.
Dashboard Navigation
The left sidebar gives you access to everything outside the editor:
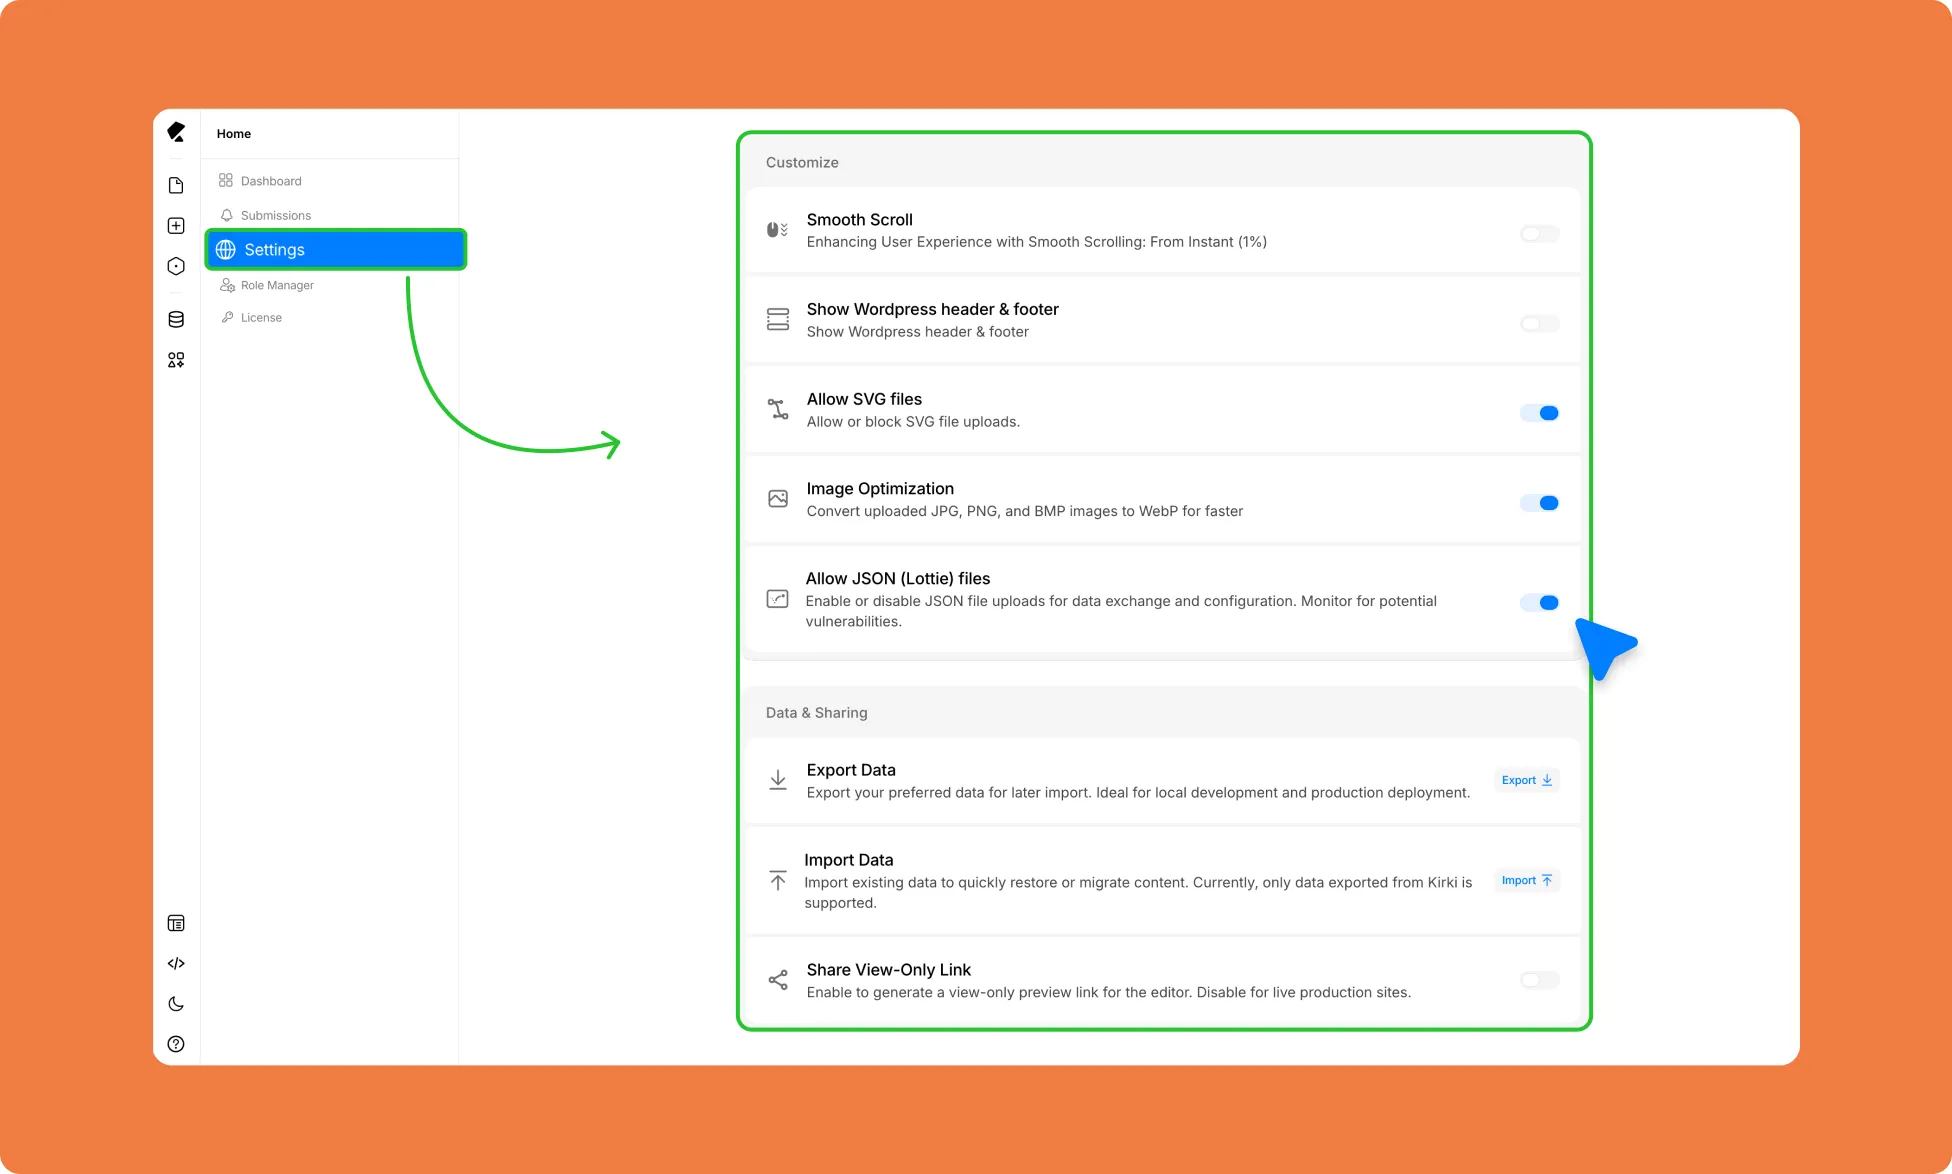
The Settings page gives you control over how Kirki behaves across your entire site, from performance and file uploads to data management and sharing.
Access it anytime from the left sidebar of the Kirki Dashboard.
Customize
These settings affect how your site looks and behaves for visitors.
Enable Smooth Scroll
Turn on Smooth Scroll to give your site a gradual, fluid scrolling experience instead of an instant jump. You can adjust the scroll intensity starting from 1% to match the feel of your design.
Show Your WordPress Header & Footer
Turn this on to display your default WordPress theme’s header and footer on Kirki-built pages. If you’ve designed your own header and footer inside Kirki, leave this off.
Allow SVG File Uploads
Turn this on to enable SVG uploads through the WordPress media library. SVGs are ideal for logos and icons since they scale crisp and clean at any size.
Optimize Your Images Automatically
Turn this on to automatically convert uploaded JPG and PNG images to WebP format on upload. This reduces file size without sacrificing quality, helping your pages load faster.
Allow Lottie (JSON) File Uploads
Turn this on to enable JSON file uploads, which are required to use Lottie animations in your designs.
Data & Sharing
These settings help you move data between environments and share your work.
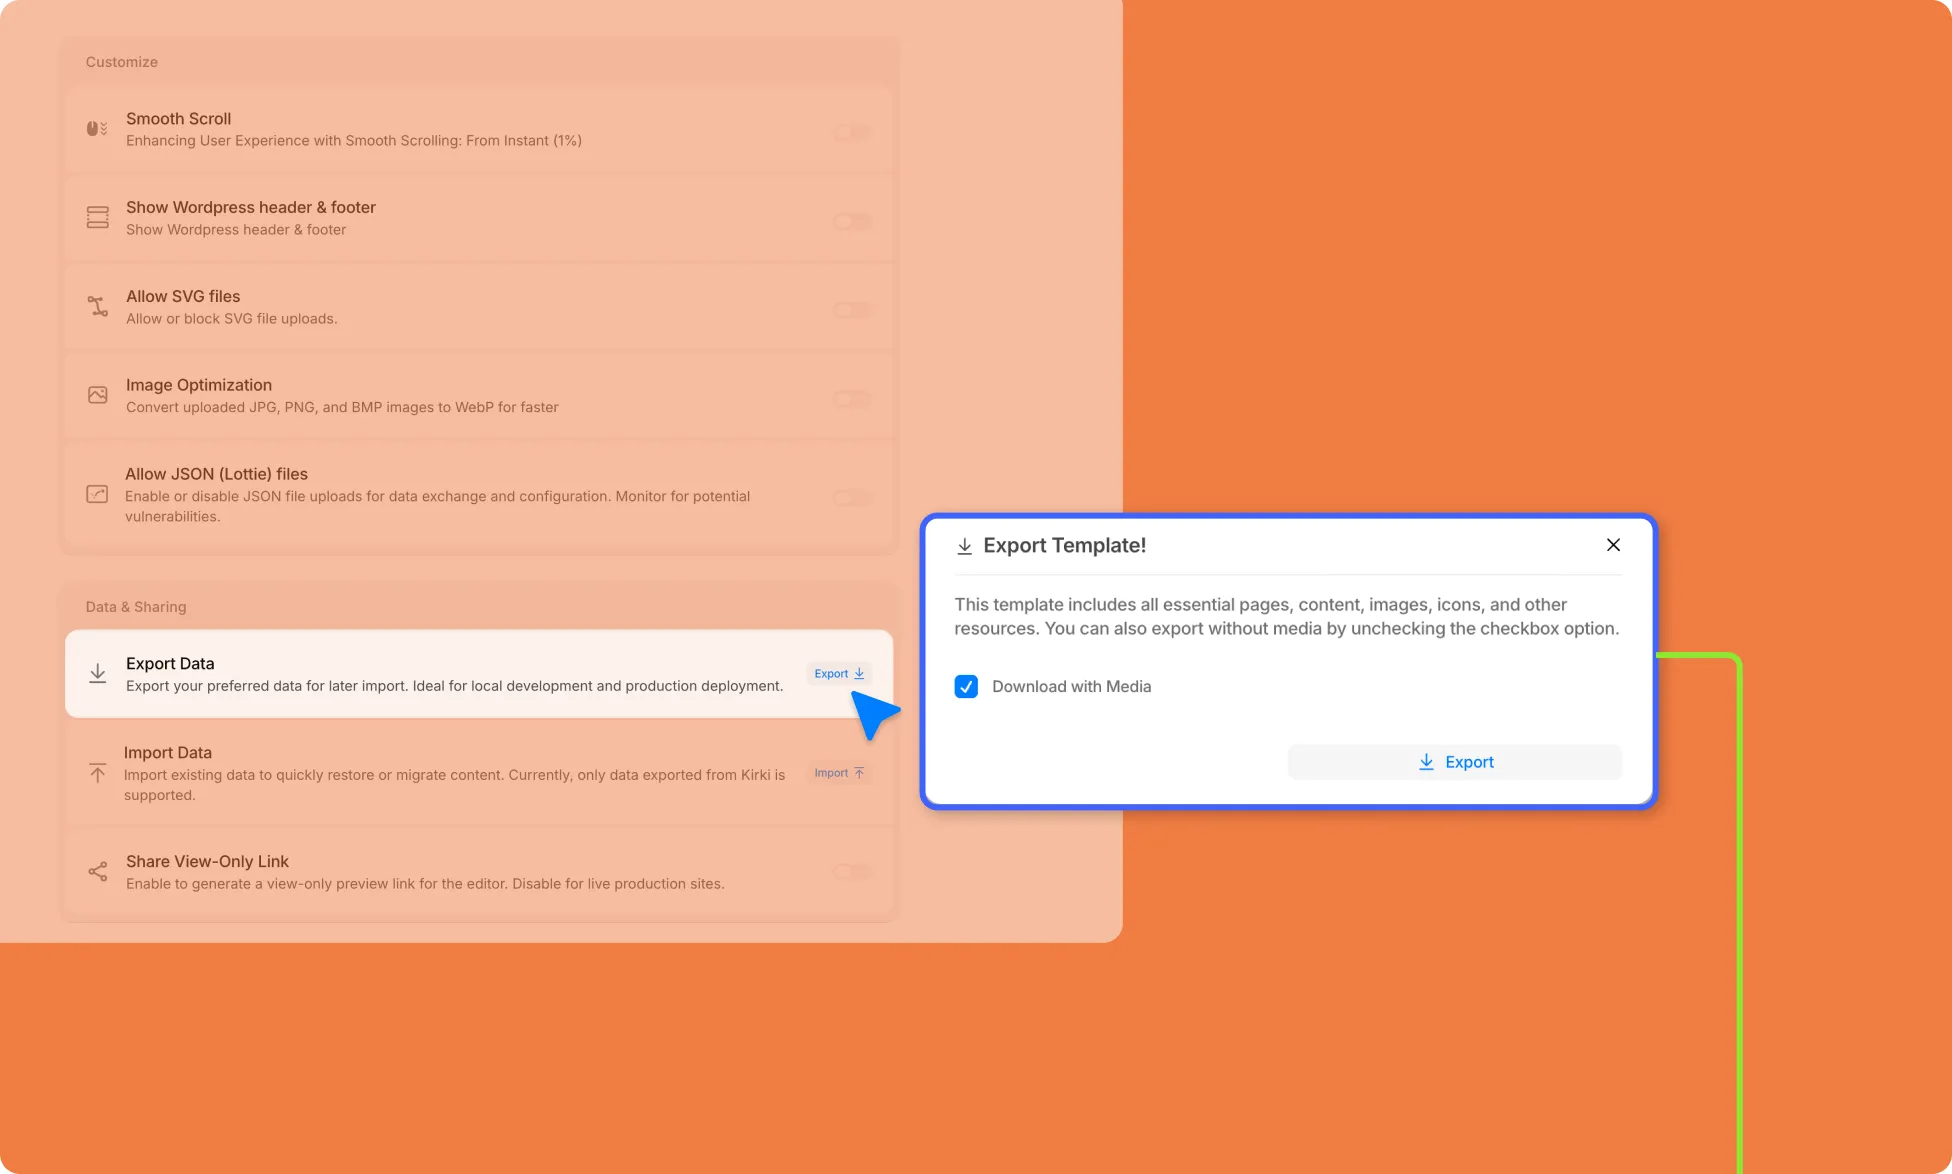
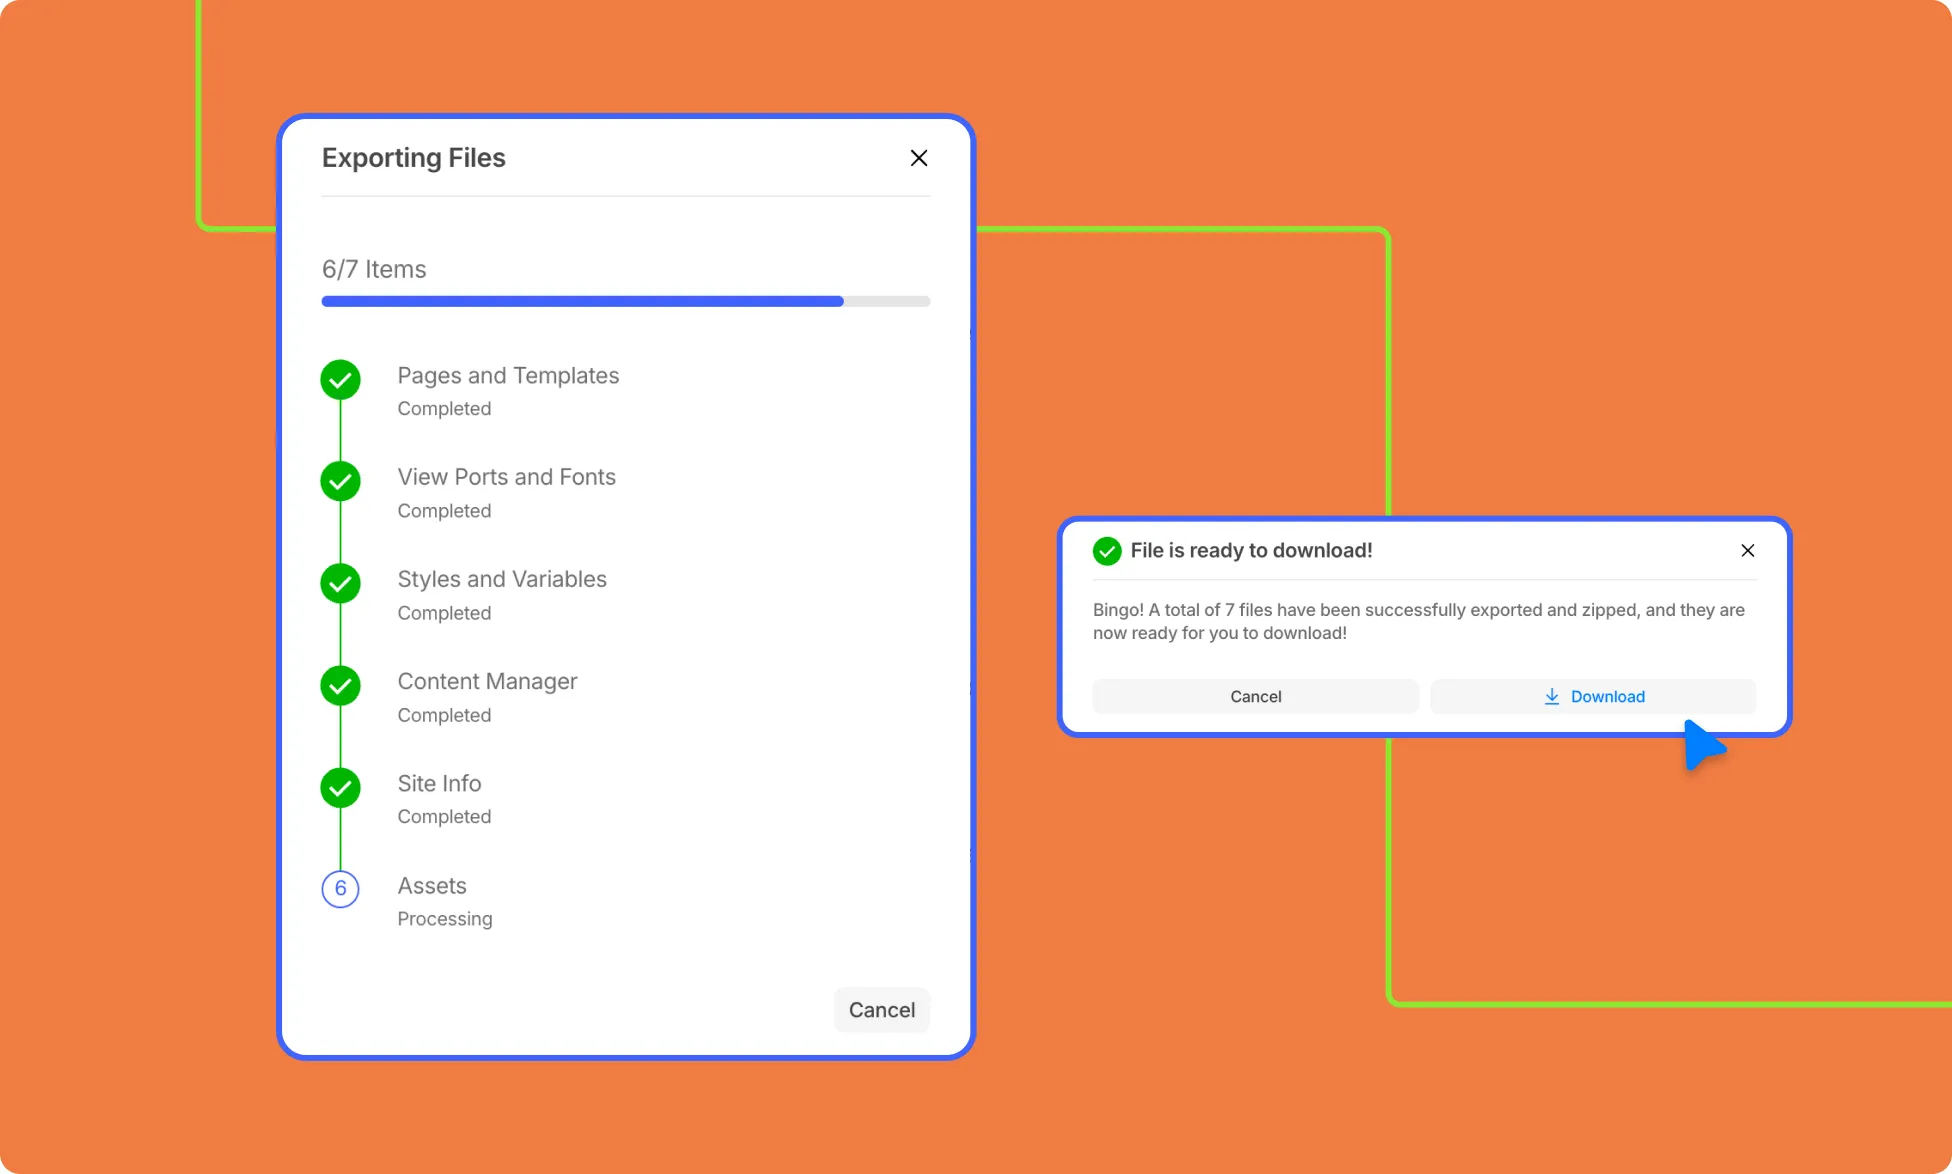
Export Your Kirki Site
To back up your work or move your design from a local development environment to a live production site, do the following:
Go to Dashboard → Settings.
Under Data & Sharing, click Export.
Download the file to your computer.
This will extract all your pages, content, images, and other resources as one file, ready for import.
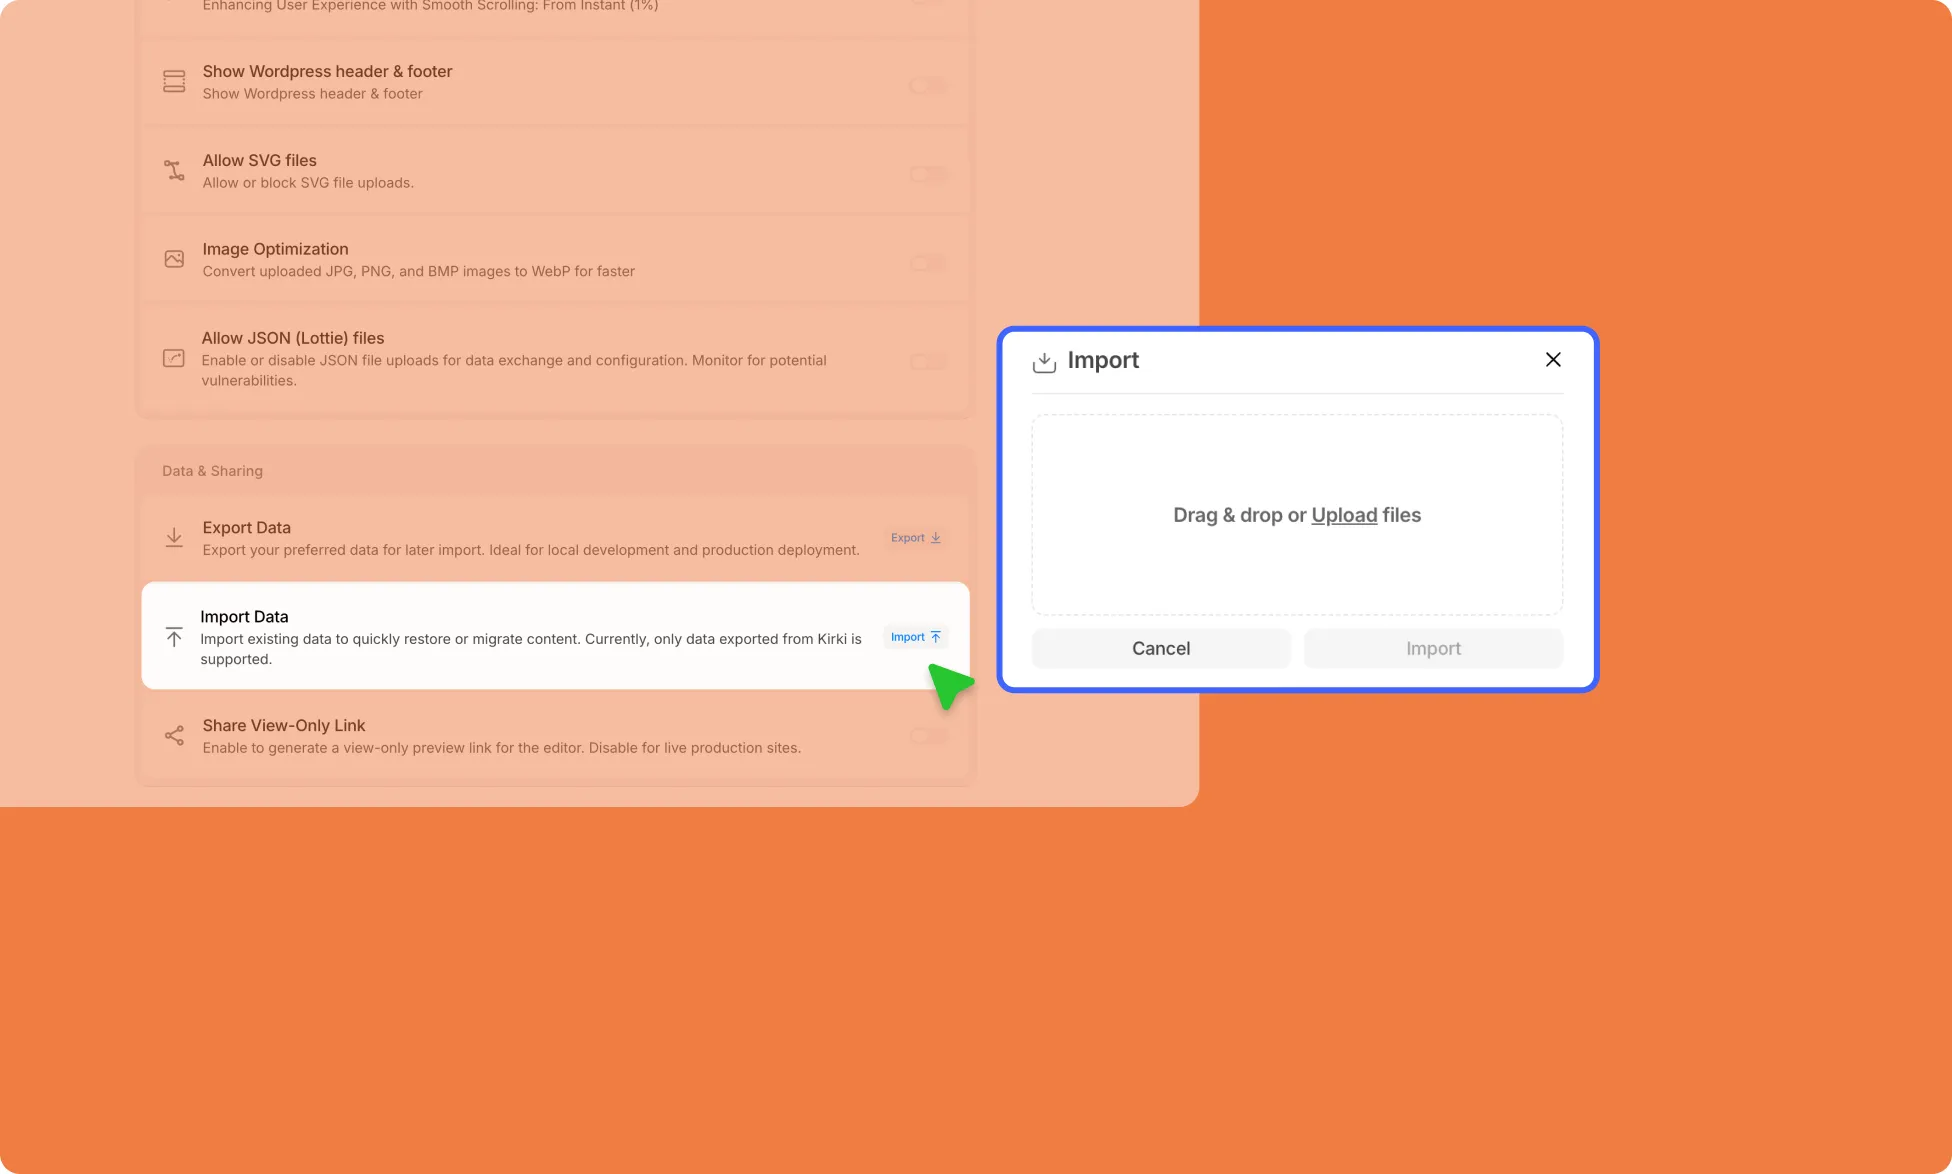
Import Your Kirki Site
Restore or migrate your content by uploading a previously exported Kirki data file. Note that only data exported from Kirki is supported.
Go to Dashboard → Settings.
Under Data & Sharing, click Import.
Select your exported Kirki data file and confirm.
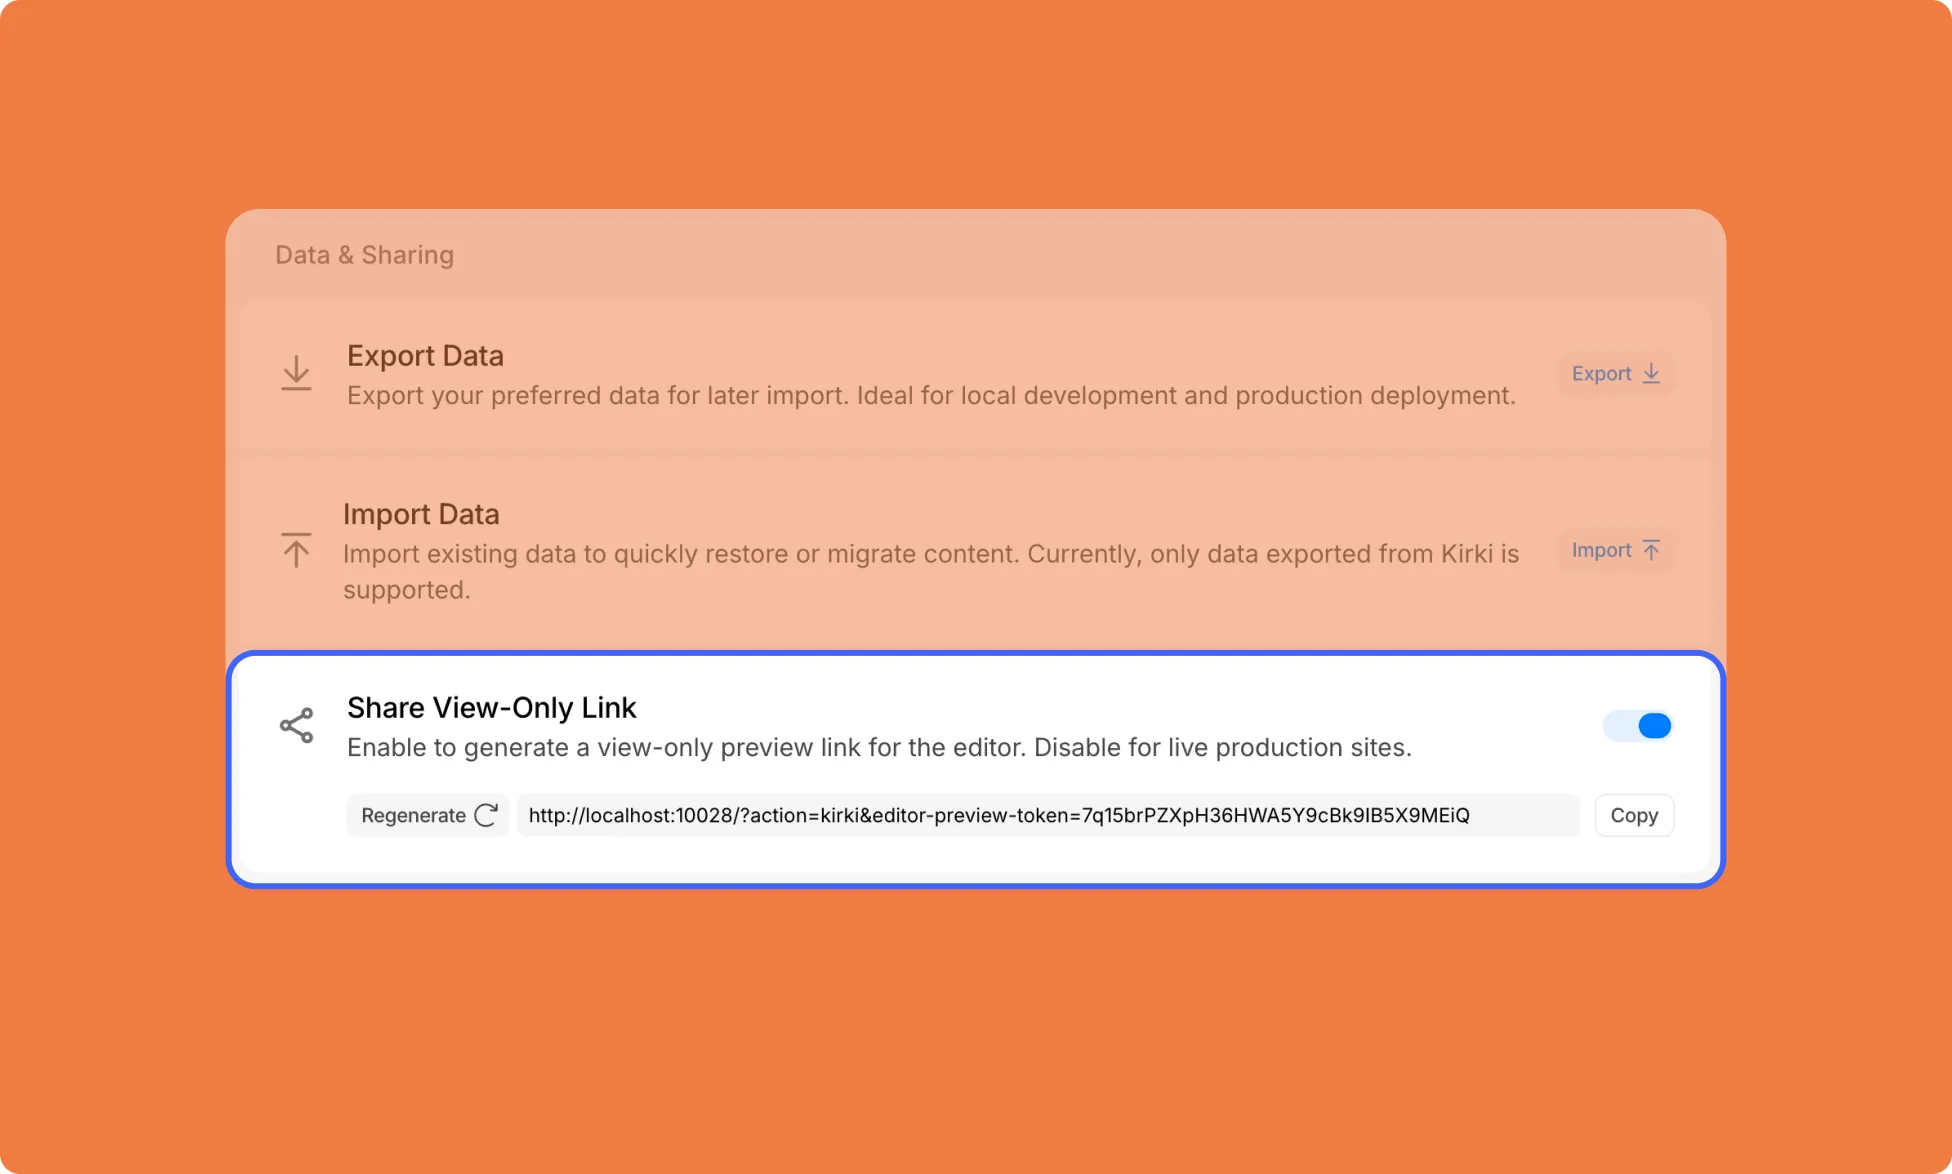
Share a View-Only Preview Link
Generate a link that lets clients or collaborators view your editor and test out changes and feedback without affecting the actual design:
Go to Dashboard → Settings.
Under Data & Sharing, toggle on Share View-Only Link.
Copy the generated link and share it with your intended viewer.
In this document, you’ll find a step-by-step guideline on installing Kirki as well as activating its license.
Installing Kirki Free
Go to your WordPress dashboard, navigate to Plugins > Add Plugin, search for Kirki, and install and activate it.
Installing Kirki Pro
Visit the Kirki Website and create an account. Then, from the Pricing Page, choose the plan best suited for you and make your purchase.
Once your purchase is complete, you’ll find it listed on your Subscriptions page. To save the plugin to your local device, head to Downloads and click on the Download button.
Then, to install it, do the following:
Visit your WordPress Site’s Backend Dashboard.
Then go to Plugins > Add New and click on the Upload Plugin button.
Once on this page, click on the Choose File button, and select your plugin zip file.
Finally, once the file is uploaded, click on Install Now.
After it’s successfully installed, Activate your plugin.
License Activation
Once you’ve installed and activated the Kirki Pro plugin, it’s time to activate your license:
First, log in to your Kirki account and go to Subscriptions > Licenses.
Click on Add Website, enter your site URL, and hit Submit to generate a license key.
Finally, copy your license key and paste it into WP Admin > Kirki Dashboard > License, then click Activate.
And that’s it! Now you’re all set to start designing beautiful, interactive websites with Kirki.
If you run into any issues during the installation or license activation, contact us at [email protected].
How to Update Kirki
To update your Kirki Free and Pro Versions, visit the WordPress Admin > Plugins and locate the plugins. If an update is available, it’ll be listed here. Click on the Update Now button to start updating.
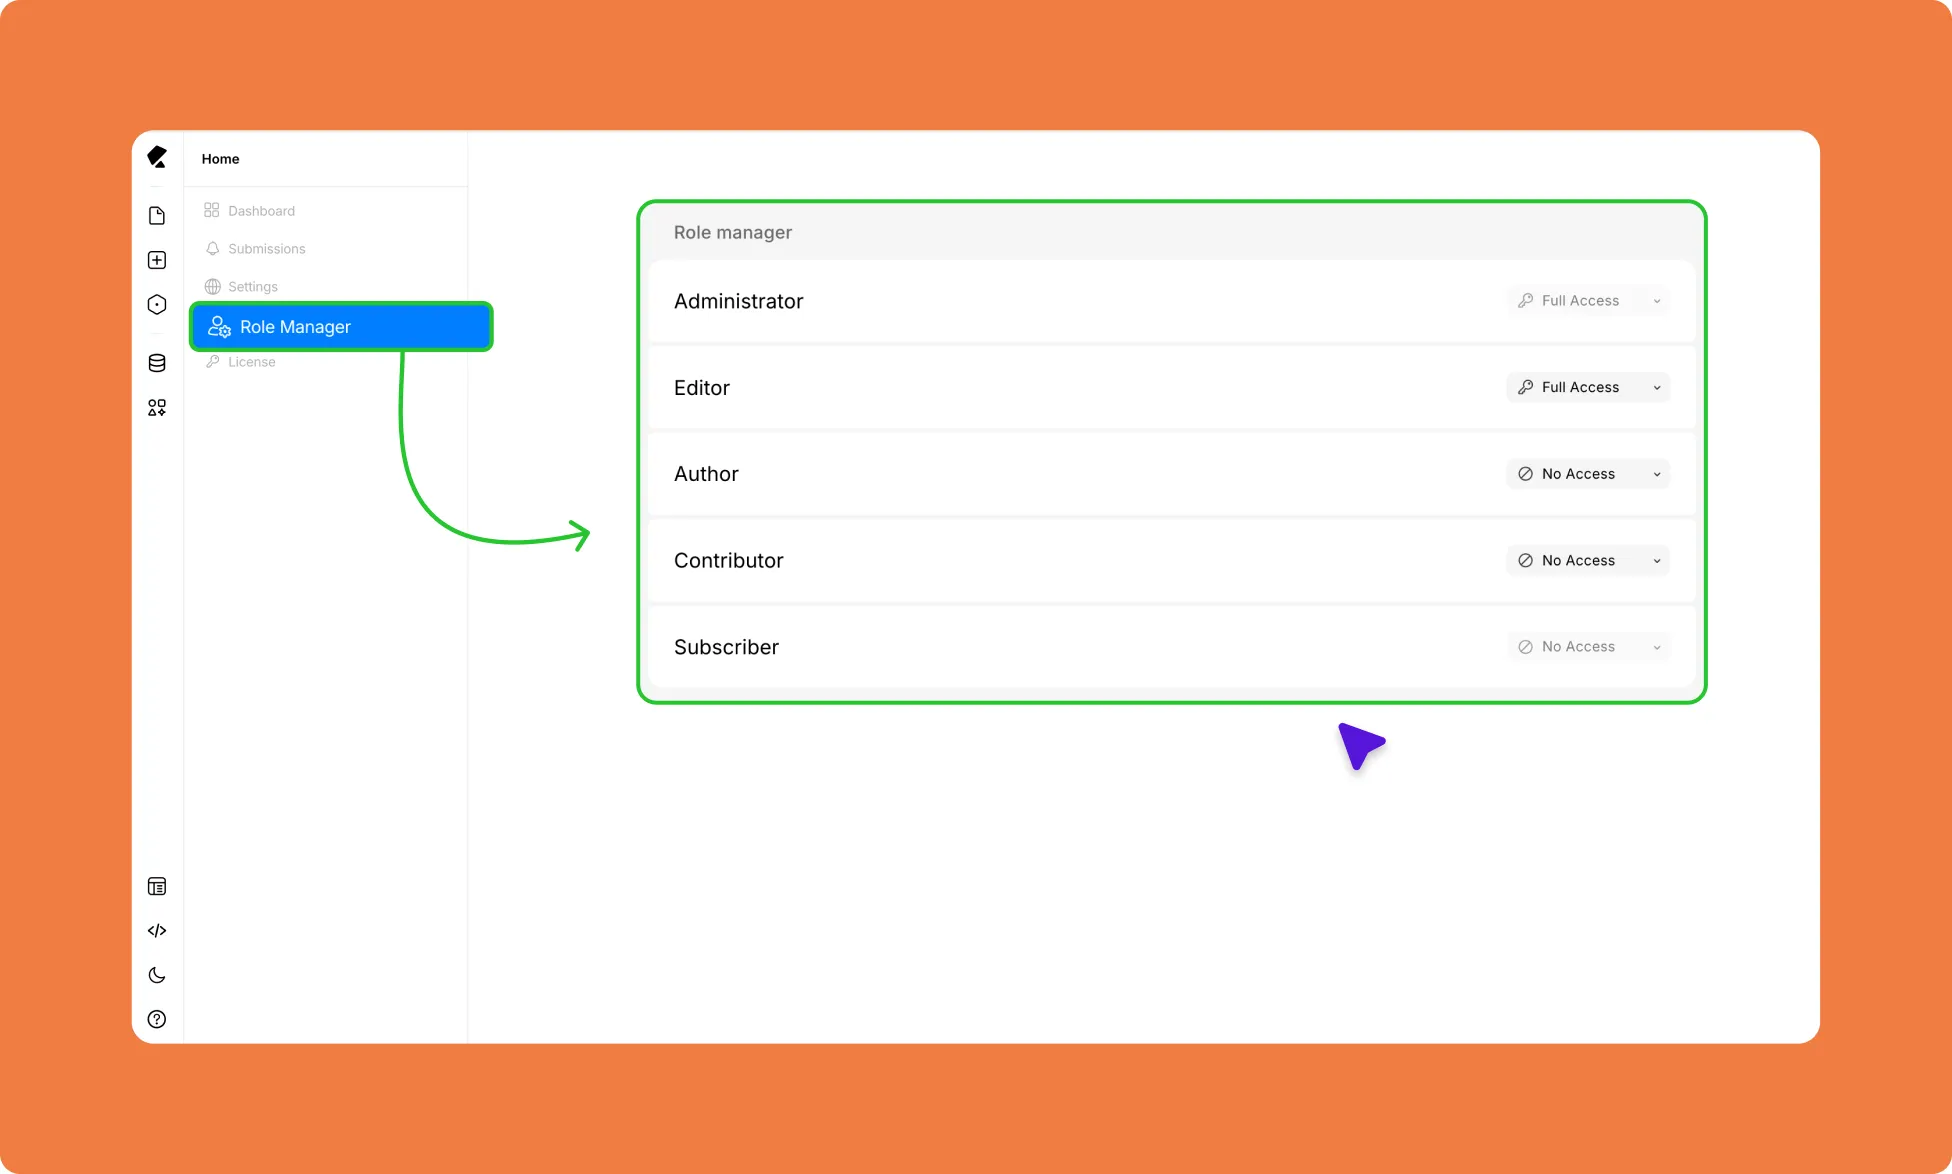
The Role Manager lets you control which WordPress user roles can use the Kirki editor and to what extent. Open it from the left sidebar of the Kirki Dashboard.
By default, Administrators and Editors have full permissions, while Authors, Contributors, and Subscribers are restricted entirely.
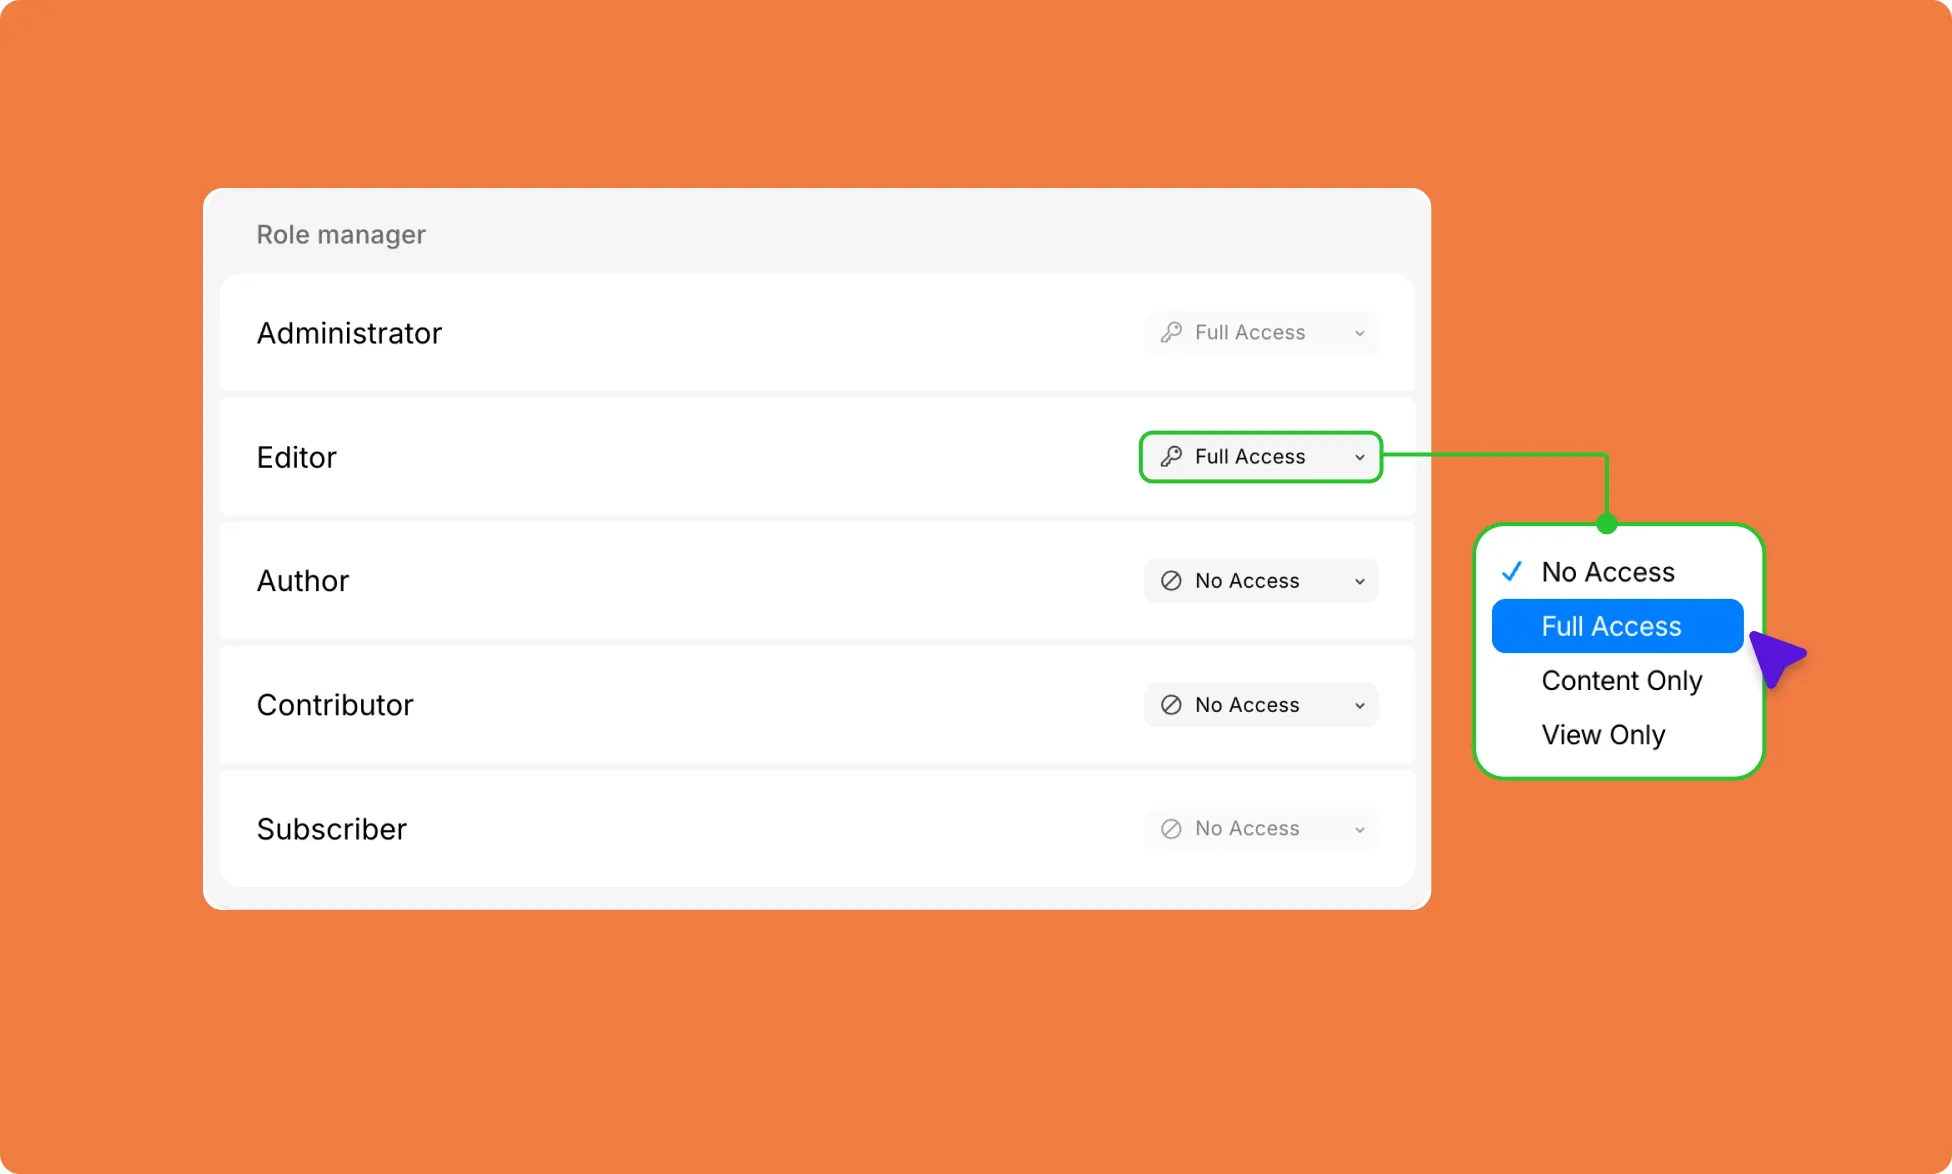
Access Levels
No Access: Users with this level of access cannot use Kirki or its content.
View Only: Users with this level of access can only view the site’s pages, but they cannot edit them.
Content Only: Users with this level of access can only access and edit the content on the site.
Full Access: Users with this level of access have complete access to all aspects of Kirki, including content.
User Roles
Kirki mirrors WordPress’s default user role structure:
Administrator – Person with the highest level of access. Administrators can manage all aspects of the website, including adding and deleting users, installing and configuring plugins and themes, and creating and editing content. By default, they have full access to the Kirki editor.
Editor – Can create and edit content, as well as publish content created by other users. You can manually adjust their access level in the Role Manager.
Author – Can create and edit their own content, but cannot publish without approval from a higher-level user. You can manually adjust their access level in the Role Manager.
Contributor – Can create and edit their own content but cannot publish without approval from a higher-level user. You can manually adjust their access level in the Role Manager.
Subscriber – Has the lowest level of access and can only view content on the website. By default, they have no access to the Kirki editor.
Change a Role’s Access Level
Go to Dashboard → Role Manager.
Find the role you want to update.
Click the dropdown next to the role.
Select the desired access level.
Save your changes.
A license key is a unique string of numbers and characters that verifies authorized WordPress plugins and theme access.
To use Kirki and get all the benefits of the premium plugin in your future endeavors, you need to activate the license of the Kirki plugin. Please note that license activation is required to:
Future Updates, Security Patches, and Bug Fixes: Stay up-to-date with the latest features, enhancements, and security measures.
Compatibility with the Latest WordPress Update: Ensure seamless integration and optimal performance with the newest WordPress versions.
After purchasing a plan and installing the Kirki Pro plugin, you’ll be prompted to add and activate your license key within the Kirki dashboard.
📝 Note: Activating your Kirki License Key is crucial for receiving automatic updates.
Access & Add Your License Key
To access your license key, follow these steps:
Go to the Kirki website and sign in using the email address used for the plan purchase.
Navigate to Account > Subscriptions > Licenses.
Click on Add Website and input your domain name to generate a license.
Copy the license key from the dashboard.
In the WordPress Admin Panel, go to Kirki Dashboard > License, paste the copied key, and click Activate.
By activating your Kirki License Key, you can benefit from regular updates and guarantee optimal performance.
For any further assistance or inquiries, feel free to contact our support team at [email protected].
WordPress: 5.0 or higher.
PHP: 7.4 or higher.
PHP Extension: GD | GD Library, Zip library for custom font upload.
Database – MariaDB – 10.1 or later / MySQL – 5.7 or later
Browser – Chrome, Firefox, Safari. Internet Explorer is not supported.
Server Modules – mod_rewrite, cURL, fsockopen.
PHP Configuration:allow_url_fopen = On (required for demo import and remote file access)
Our website uses cookies to improve your browsing experience on our website. By continuing to use this website, you
agree to
their use. For details, please check our Privacy Policy.