Forms in Kirki let visitors send information to your site, such as contact requests, feedback, sign-ins, and mailing list sign-ups. Kirki automatically stores every form submission in Form Manager, and you can also route these submissions via email or webhook and export them as CSV. No third-party plugin is required.
How to Add a Form in Kirki
You can add a form to a page in two ways: insert a prebuilt form or build a custom form with the Form Block,
Add a Prebuilt Form
Prebuilt forms are ready-made forms in the Insert panel:
- Contact Form
- Comment Form
- Authentication Forms
- Sign-in
- Sign-up
- Reset Password
- Change Password
- Retrieve Username
- User Profile.
To add one, follow these steps:
- In the Kirki editor, open the Insert panel in the left sidebar.
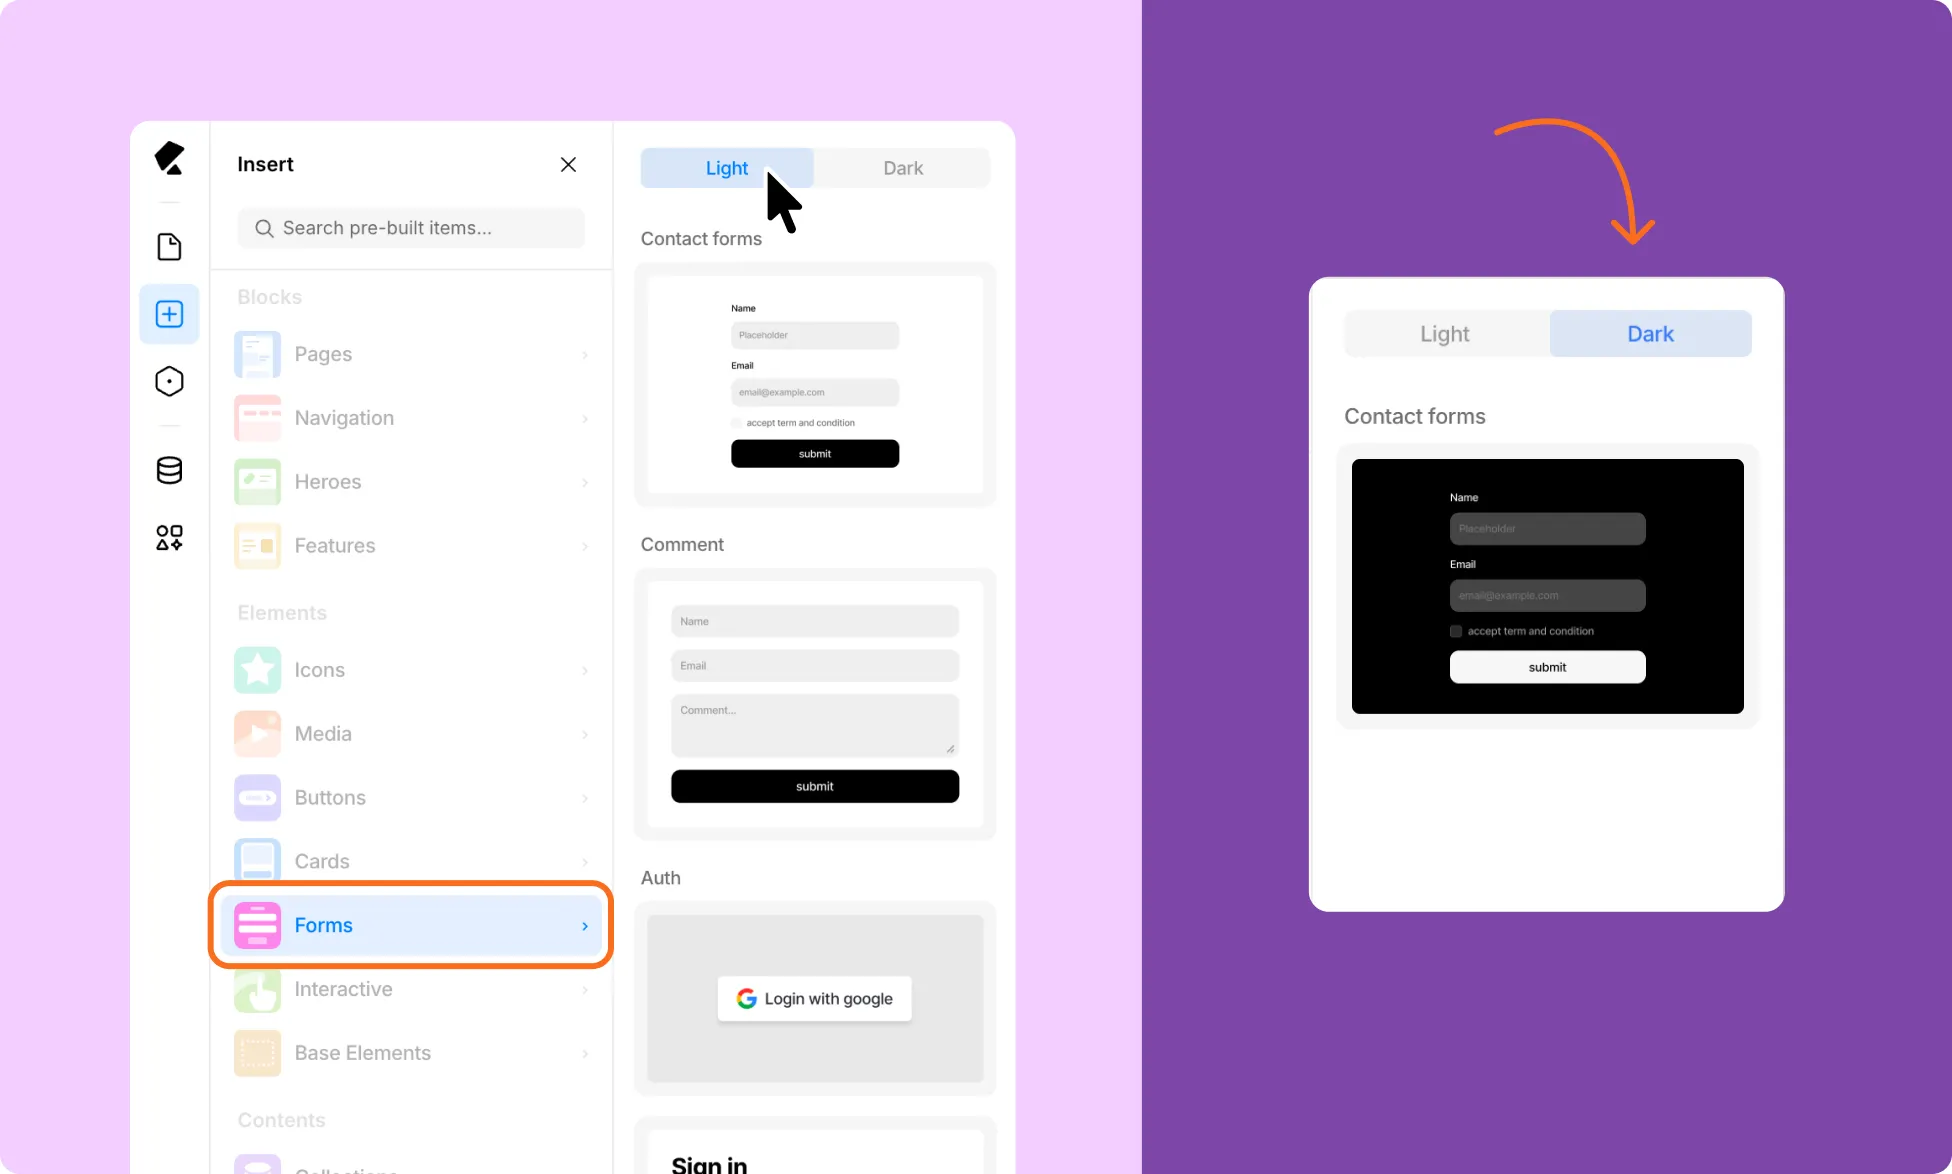
- Under Elements, select Forms.
- Browse the prebuilt form options. Use the Light or Dark toggle at the top of the panel to preview the style that suits your site.
- Drag the form you want onto the page.
- Style the form to match your site.
Add a Custom Form Using the Form Block
The Form Block is the container for every custom form. Form elements such as Input, Textarea, Select, Radio, Checkbox, Submit, and reCAPTCHA work only inside a Form Block.
The Form Block comes with the submission flow ready to go, including the states for successful and unsuccessful submissions. It’s also where you set up everything your form needs, such as actions, after-submit behavior, and submission limits. To build a form, start with the Form Block and add or delete your elements inside it.
- Open the Insert panel.
- Select Base Elements.
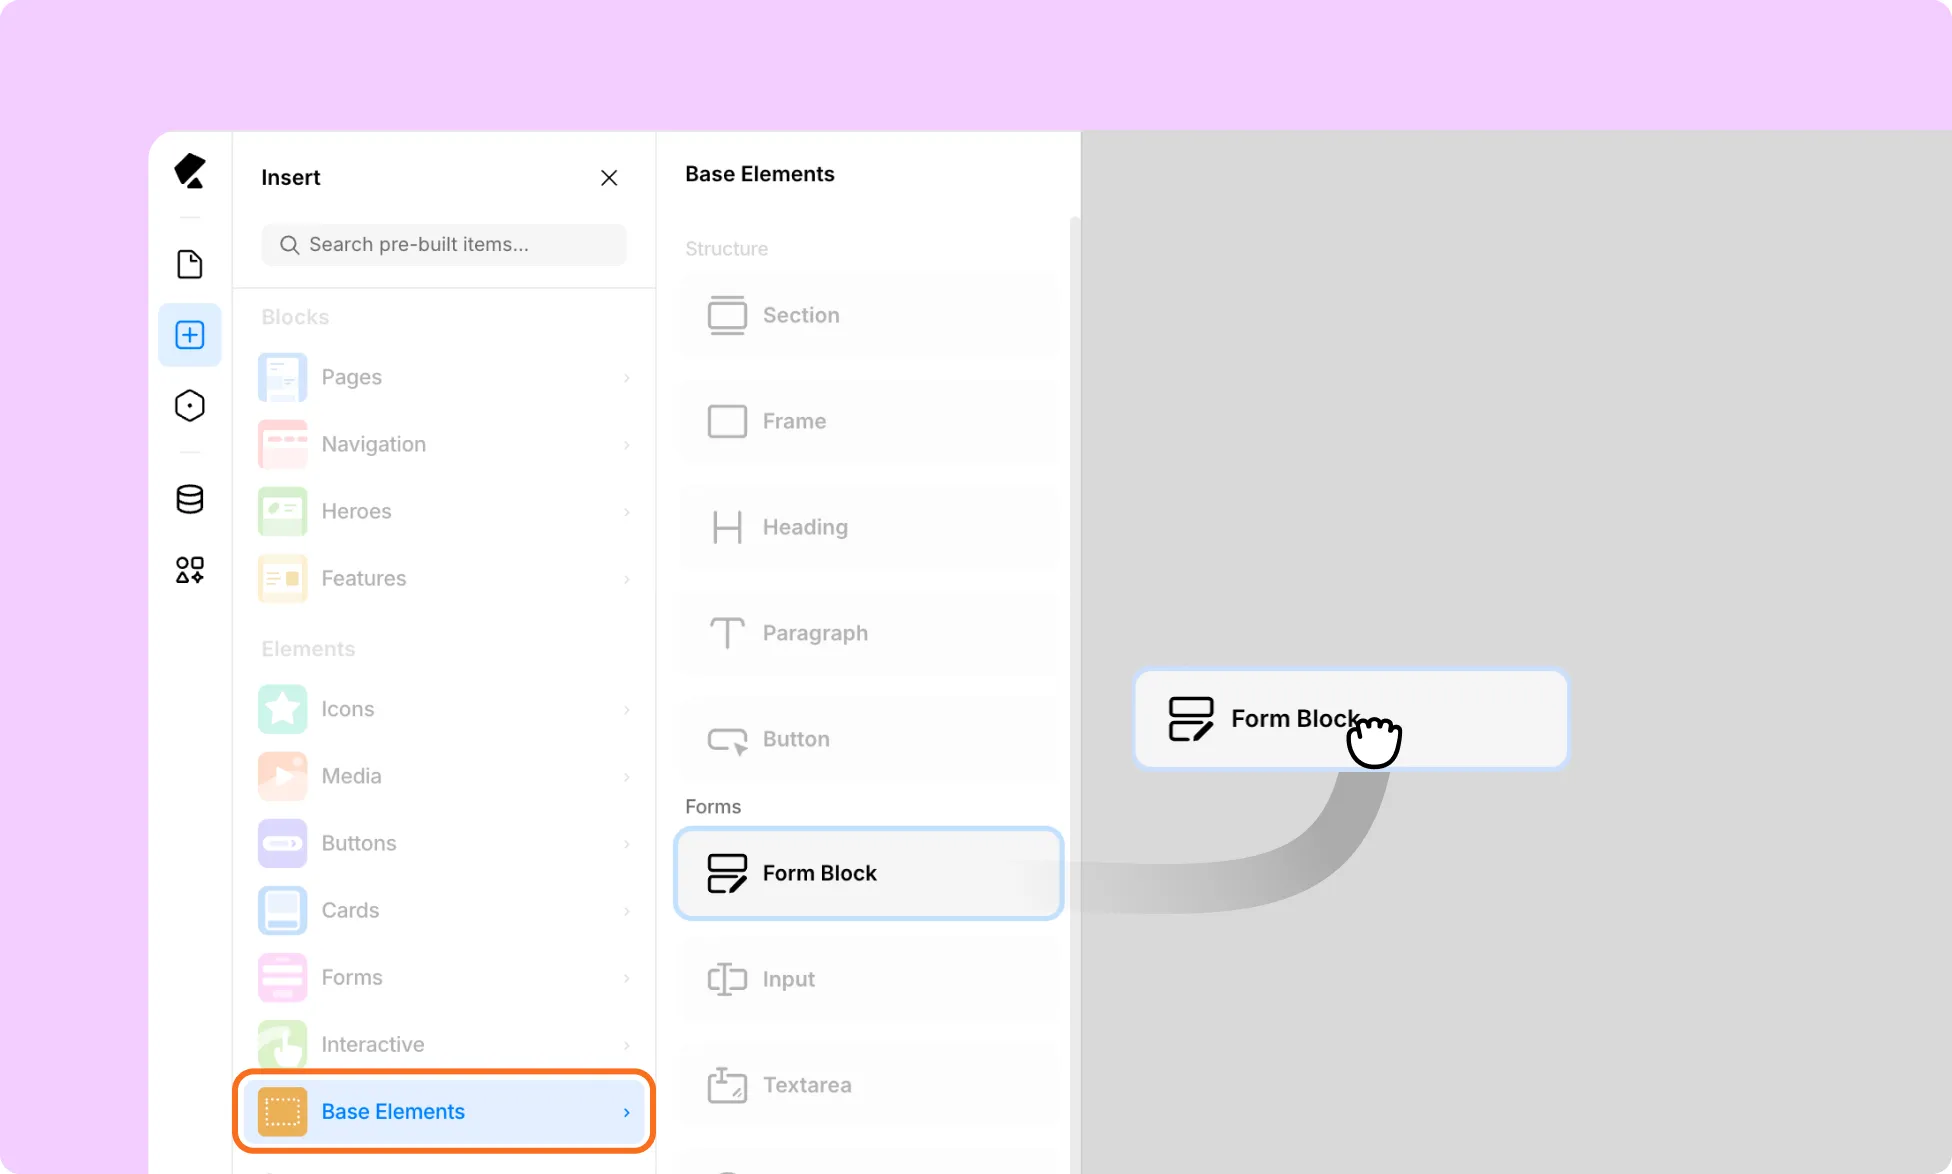
- Drag the Form Block onto the page.
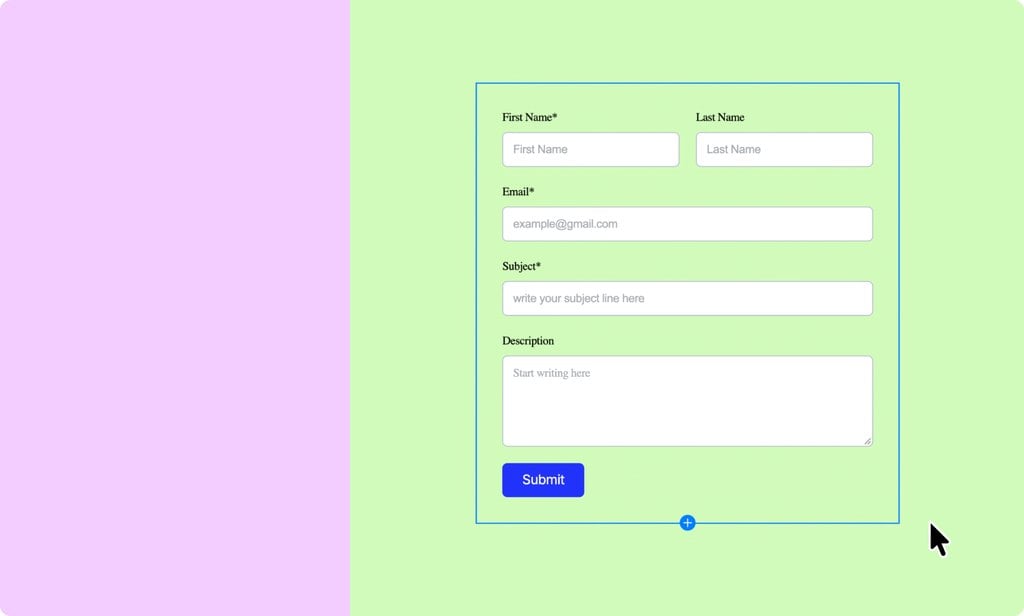
4. Review the default fields and the Submit button that come with the block. Keep the fields you need and delete the rest.
Note: You can also add the Form Block without opening the Insert panel.
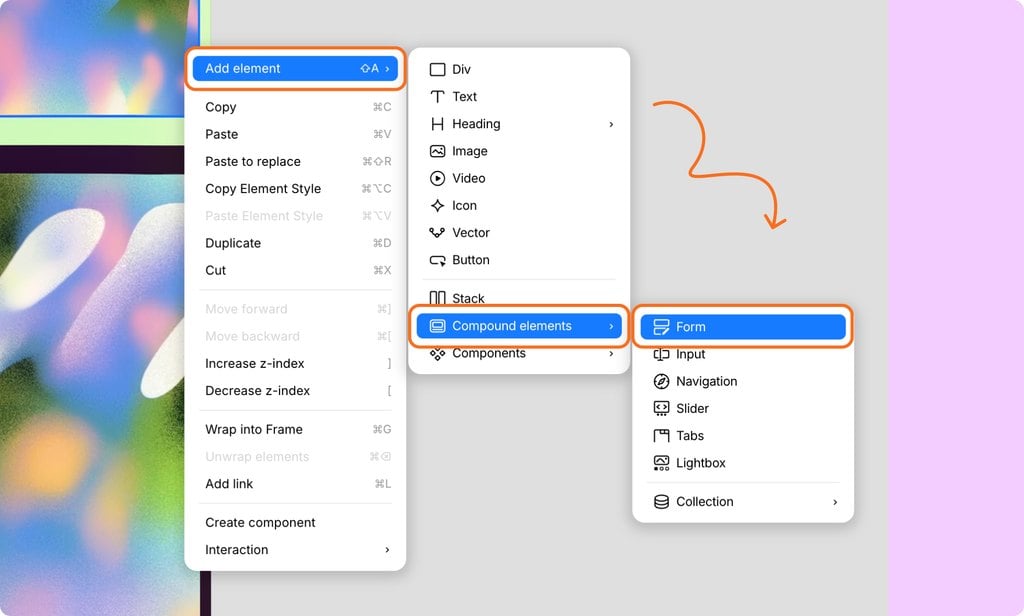
- Right-click the spot on the canvas where you want the form. You can also select the parent element and press Shift+A to open the same menu.
- Select Add element >Compound elements >Form.
How to Add Form Elements to a Form Block
Add form elements inside a Form Block so that their values are submitted with the form. The Form Block’s default fields cover the basics. Add other elements when you need more input types.
- Open the Insert panel and select Base Elements.
- Drag the element you need into the Form Block.
- Select the element and configure it in the settings panel.
Types of Form Elements Available in Kirki
A Form Block can hold form elements: Input, Textarea, Select, Checkbox, Radio, Submit, and reCAPTCHA. Select an element on the canvas to open its options in the settings panel.
Input
Use it for collecting user information within your form block. Read How to Configure and Style Input Fields below for details.
Textarea
Use it for longer, multi-line responses such as messages or comments.
Give the field a name so it’s easy to identify, and add placeholder text that shows visitors what to enter.
You could also mark it as required for moments when you do not want users to leave without giving feedback.
Select
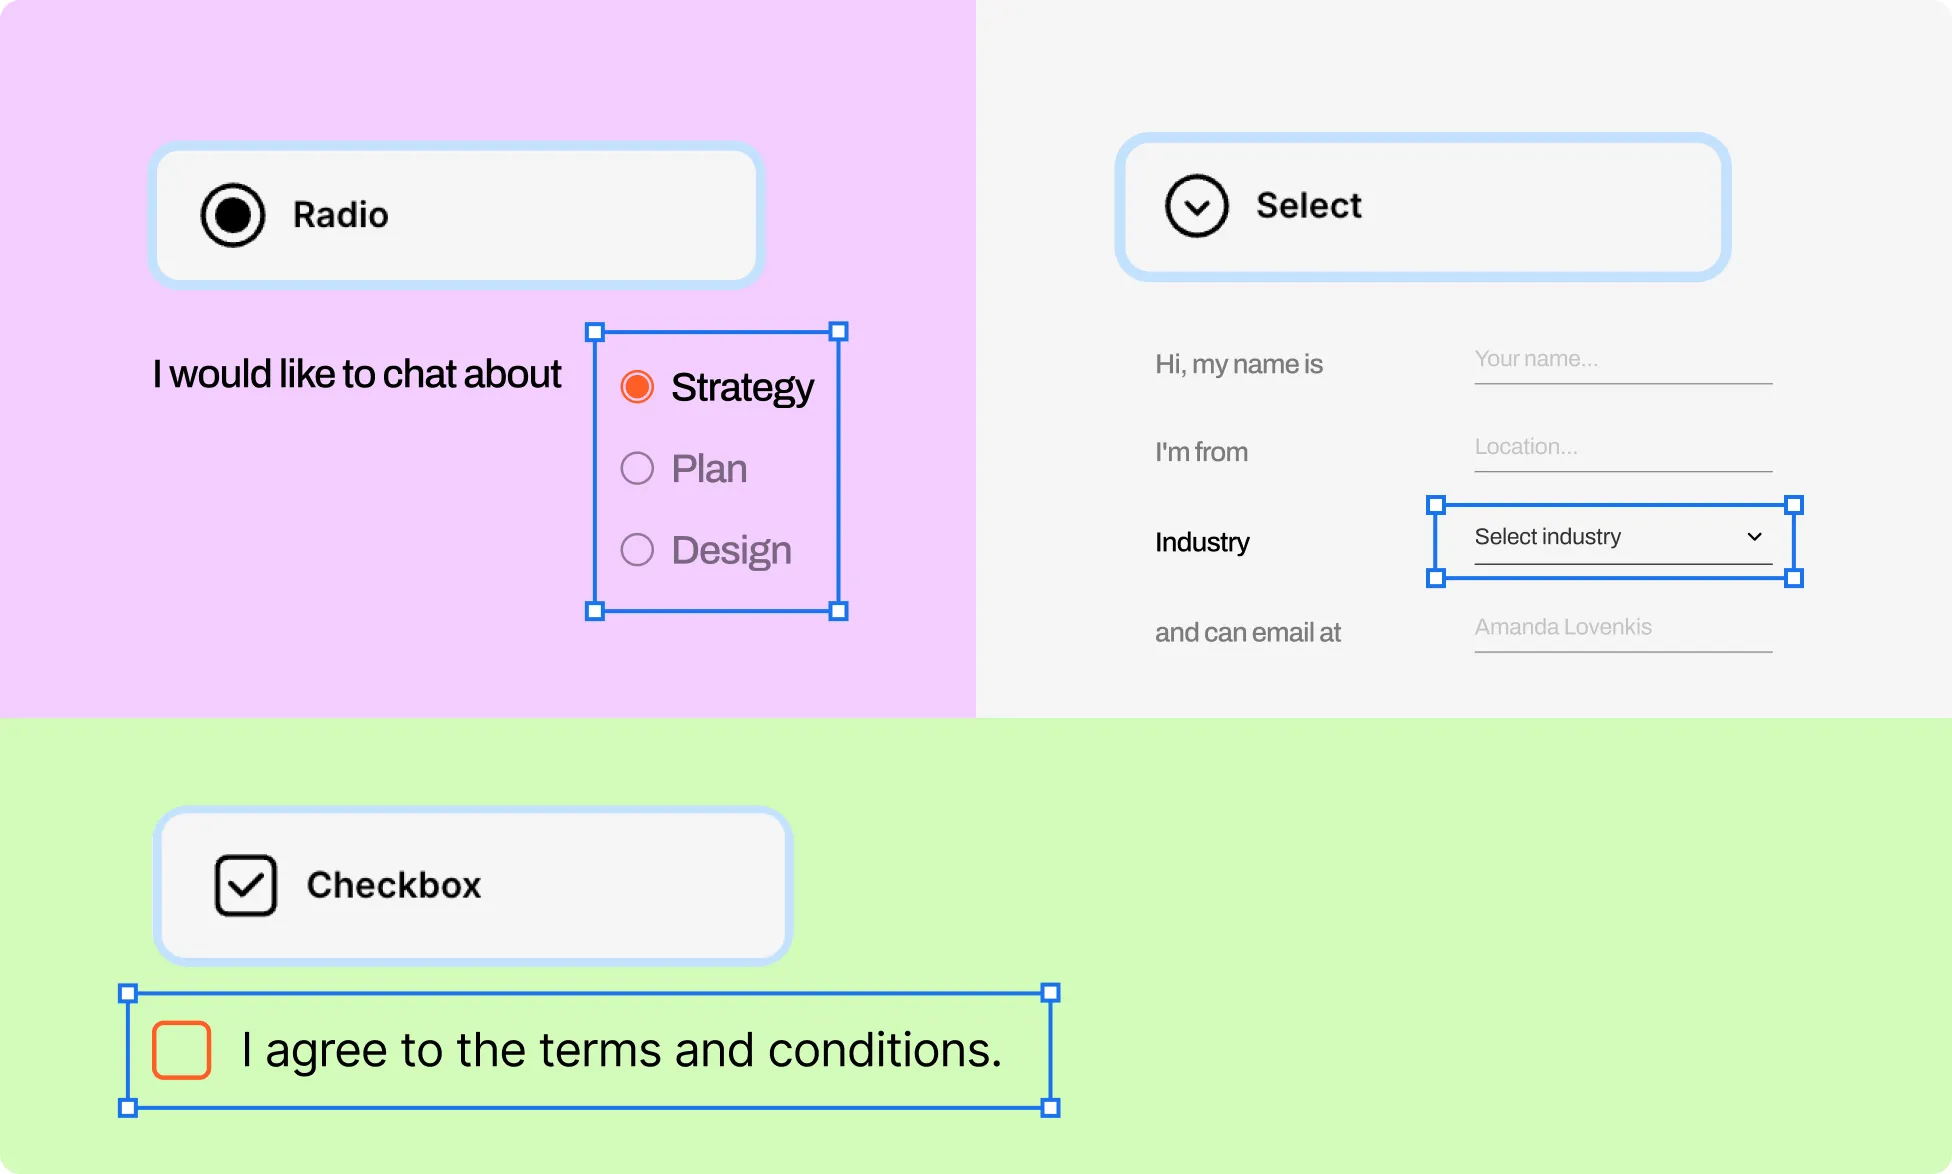
Select is a dropdown field that keeps its options hidden until opened, so it works well for long lists such as countries or industries.
Give it a Name to label its answers in submissions, then add the options. Each option has a label visitors see and a value saved with the submission.
Turn on Required to make a choice mandatory, or Multiple select to allow more than one.
Checkbox
A Checkbox is a single on/off option. Each checkbox works on its own, so add one per choice, and visitors can check as many as they like.
Every Checkbox element has two parts: the checkbox input and a text element for its label. Edit the label text on the canvas, then select the checkbox input to set a Name and the Value saved when it’s checked.
Turn on Required when visitors must check the box before submitting. Use Checked by default to pre-select an option, but leave it off when visitors need to agree to something actively.
Radio
Radio shows a group of options all at once and lets visitors pick one, so it suits short lists of two to five choices. Give the group a Name, then add its options. As with Select, each option has a label and a value.
Turn on Required to make a choice mandatory. Multiple select allows more than one choice, but checkboxes are usually clearer for that.
Submit
The button that sends the form. It is already connected to the Form Block and needs no setup.
To choose what happens after submission, use After Action in Form Settings (see How to Configure Form Behavior).
To change its look, style it like any other element.
reCAPTCHA
An optional element that blocks spam bots. It needs Google reCAPTCHA keys, so see How to Add reCAPTCHA to a Form for setup.
How to Configure and Style Input Fields
Configure Input Field Options
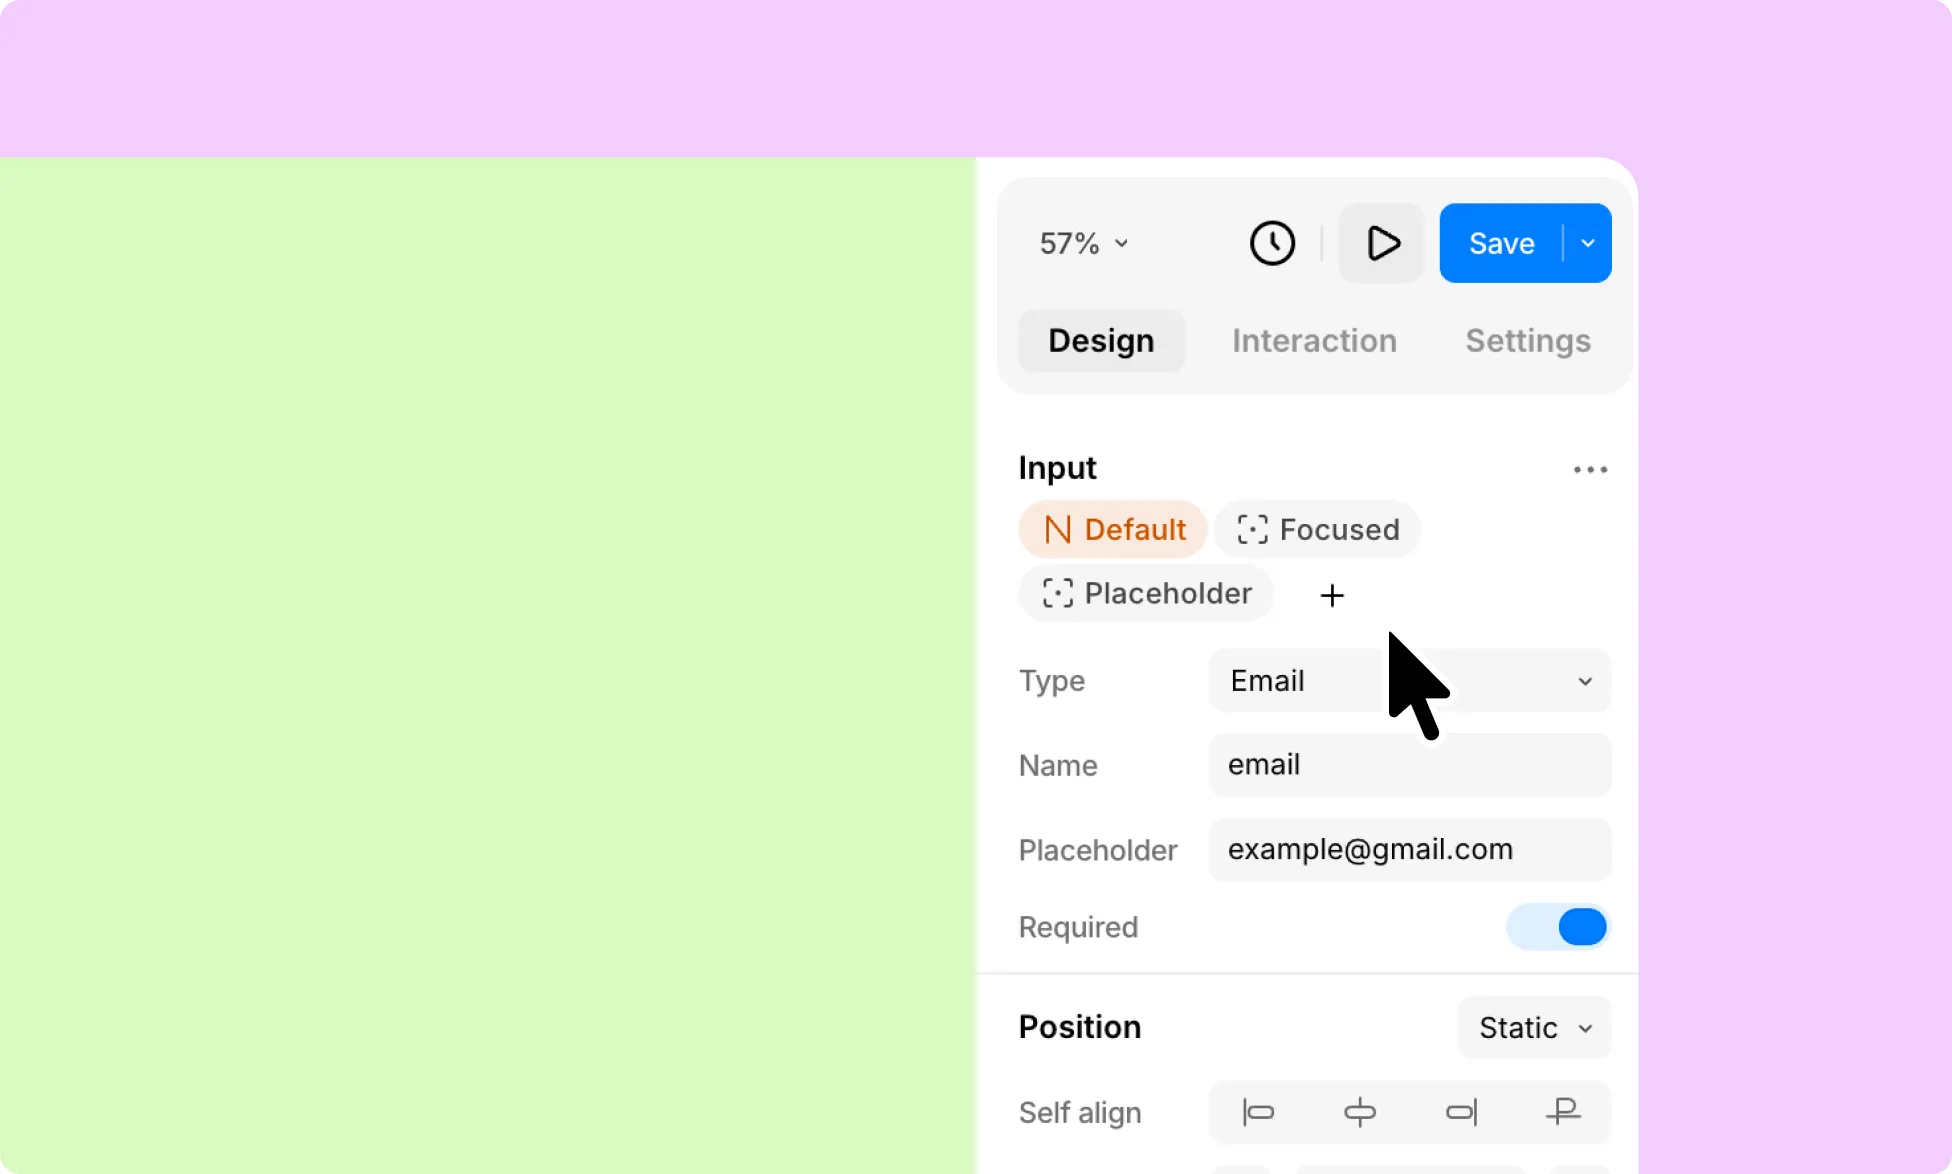
To configure an Input Field, select one within the Form Block to open its Input Field Options. Each input has four main options:
- Type: Set the type of data the field accepts, such as text, email, password, date, date-time, number, and search.
- Name: Define the field’s identifier. Kirki uses it to reference submitted values and dynamic field tags in the submissions panel.
- Placeholder: Add a preview text shown inside an empty Input Field to guide visitors on what to enter.
- Required: Set whether the field must be filled in before the form can be submitted.
Style Input Field States
To style a field, select it and use the Style panel in the Design tab. Each state controls how the field looks in that situation. Kirki supports these input states:
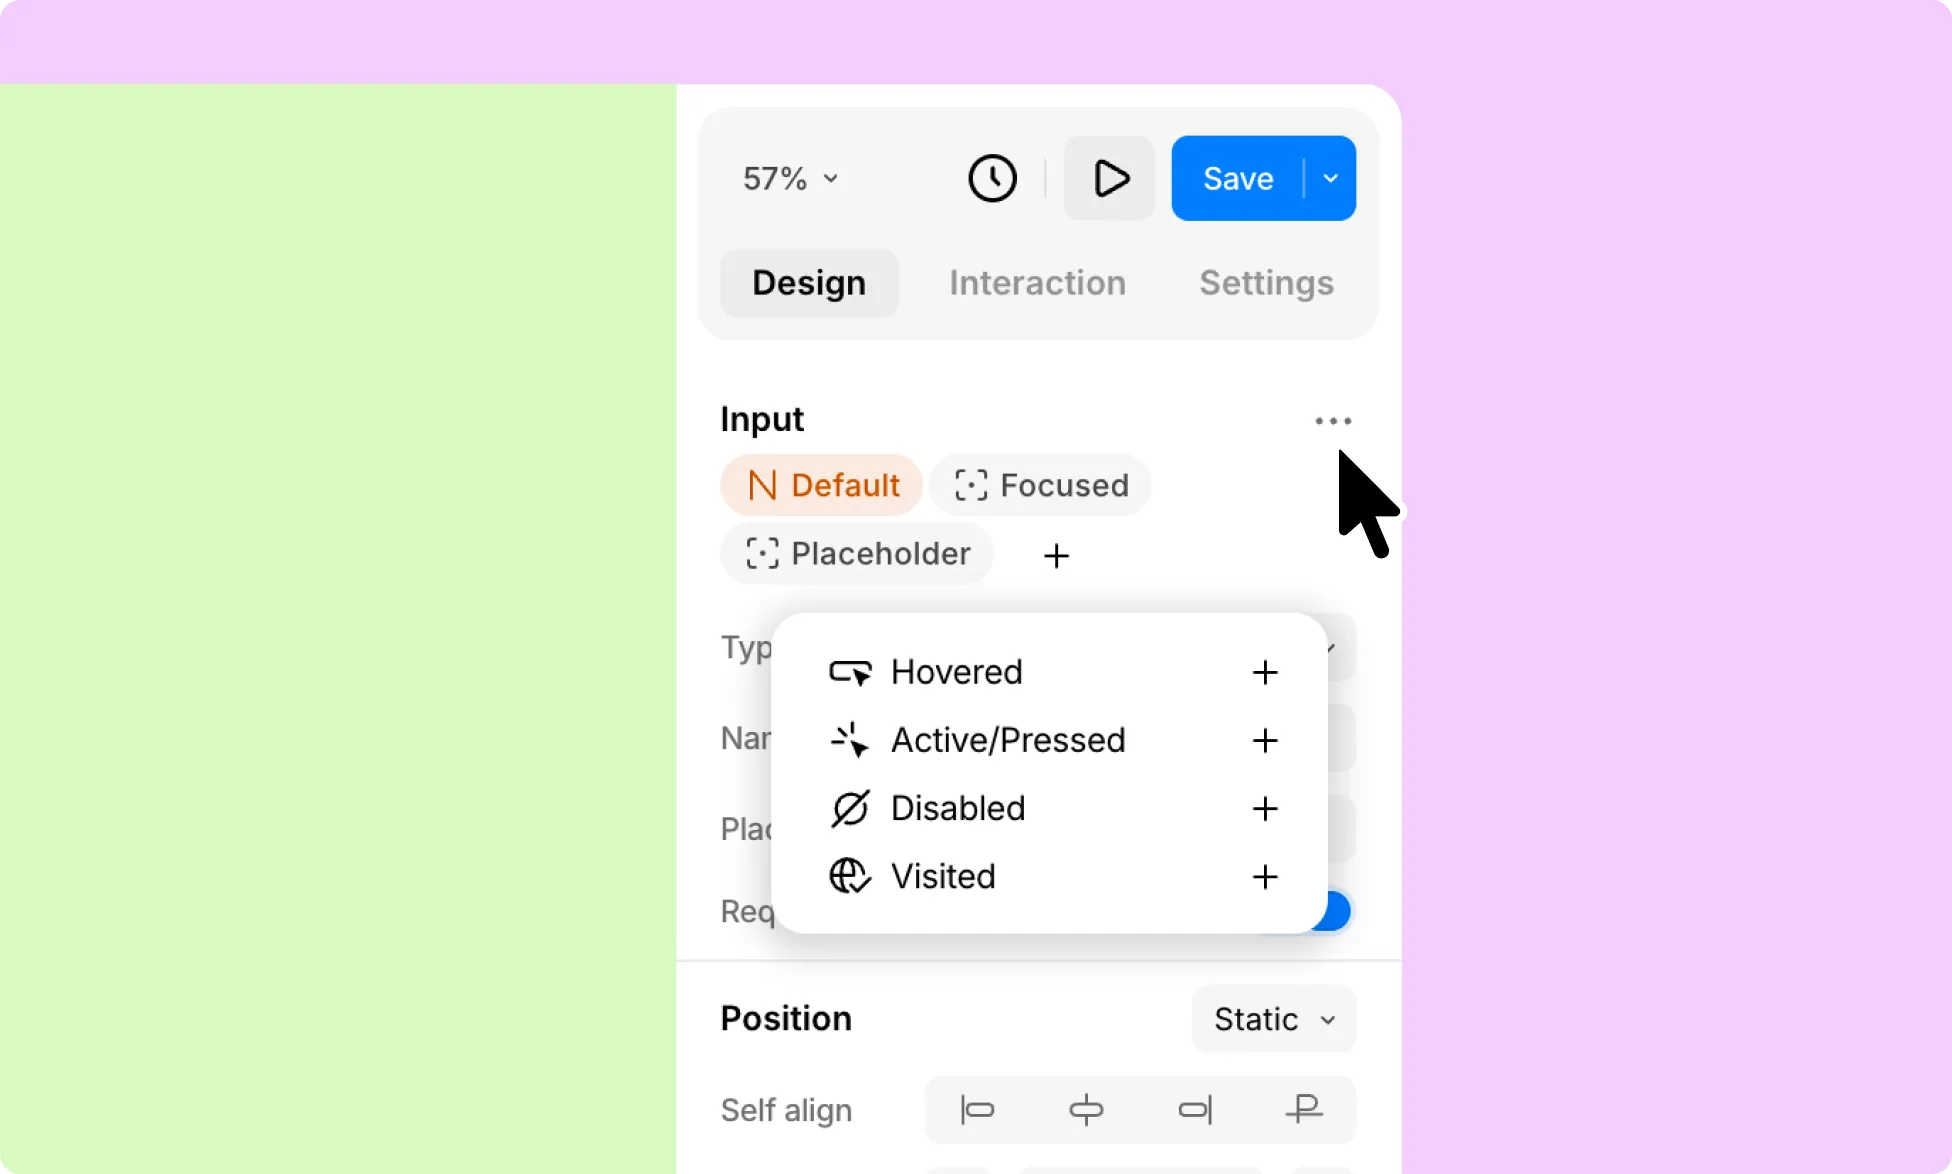
- Default: How the field looks when idle, before a visitor interacts with it.
- Focused: How the field looks while the visitor is selecting or typing in it.
- Placeholder: How the hint text looks inside an empty field.
- Hovered: How the field looks while the cursor is over it.
- Active/Pressed: How the field looks at the moment it is clicked or pressed.
- Disabled: How the field looks when it is turned off and can’t be edited.
- Visited: How the field looks after the visitor has already interacted with it or moved past it.
Add or remove states as needed.
Copy Styles Between Fields
After styling one field, copy its style and apply it to the other fields to keep the form consistent.
- Select the styled field.
- Press Cmd+Option+C / Ctrl+Alt+C to copy its style.
- Select another field.
- Press Cmd+Option+V / Ctrl+Alt+V to paste the style.
Optional: How to Make Your Form Accessible
Screen readers need to know which label belongs to which field. Kirki’s built-in audit finds fields and labels that aren’t connected yet, and you can link them with an ID and a custom attribute.
You can follow these steps to link each label to its field:
- Step 1: Select the input field and open the Settings tab.
- Step 2: Under Custom Properties, enter a short, descriptive ID, such as ‘first_name’ or ‘description’. Each ID must be unique on the page.
- Step 3: Select the label for that field.
- Step 4: Under Custom Attributes, add a new attribute:
- Name: for
- Value: the field’s ID from Step 2.
- Step 5: Save, then repeat for each field in the form.
Additionally, to find any fields still missing a label, check the Audit panel for Form label missing and Orphaned form label flags. Click a flag to jump to the field and link it.
How to Configure Form Behavior
Form behavior is set in the Form Settings panel. The Submit button is already connected to the form and needs no configuration. To change its appearance, style it like any other element.
- Select the Form Block and open Form Settings.
- Enter a Name that identifies the form, such as Contact Form. This is the name shown in the Submissions panel in the Form Manager.
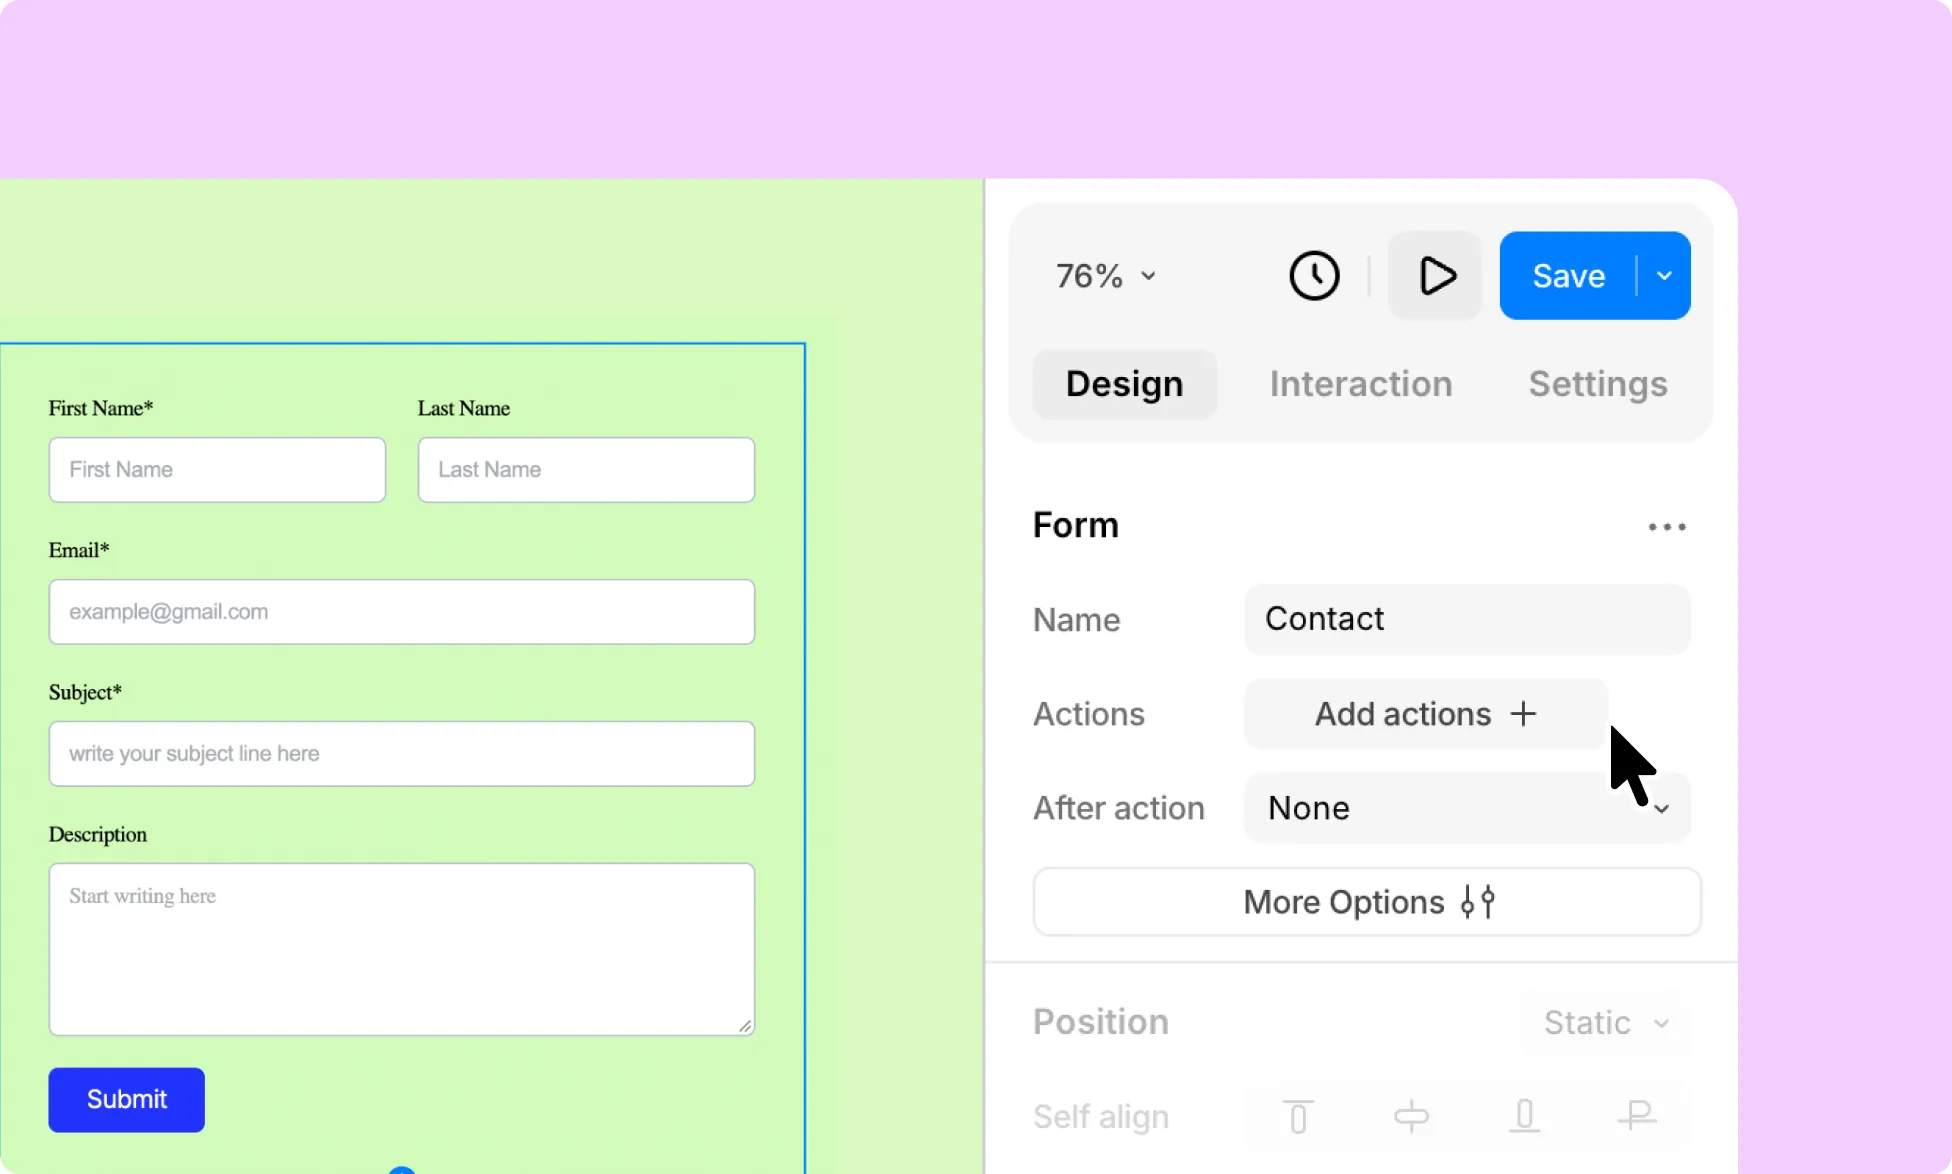
- Under Actions, choose what happens to the submission data:
- Email: sends entries to an email address.
- Webhook: sends data to an endpoint, for integrations such as Zapier or a CRM.
- Under After Action, choose what the visitor sees after submitting:
- None: no extra action.
- Show Notification: displays a success or failure message on the same page.
- Popup: opens a popup. You can set different popups for success and failure.
- Page: redirects to another page on your site.
- External URL: redirects to an external website.
- Select More options to manage volume and storage:
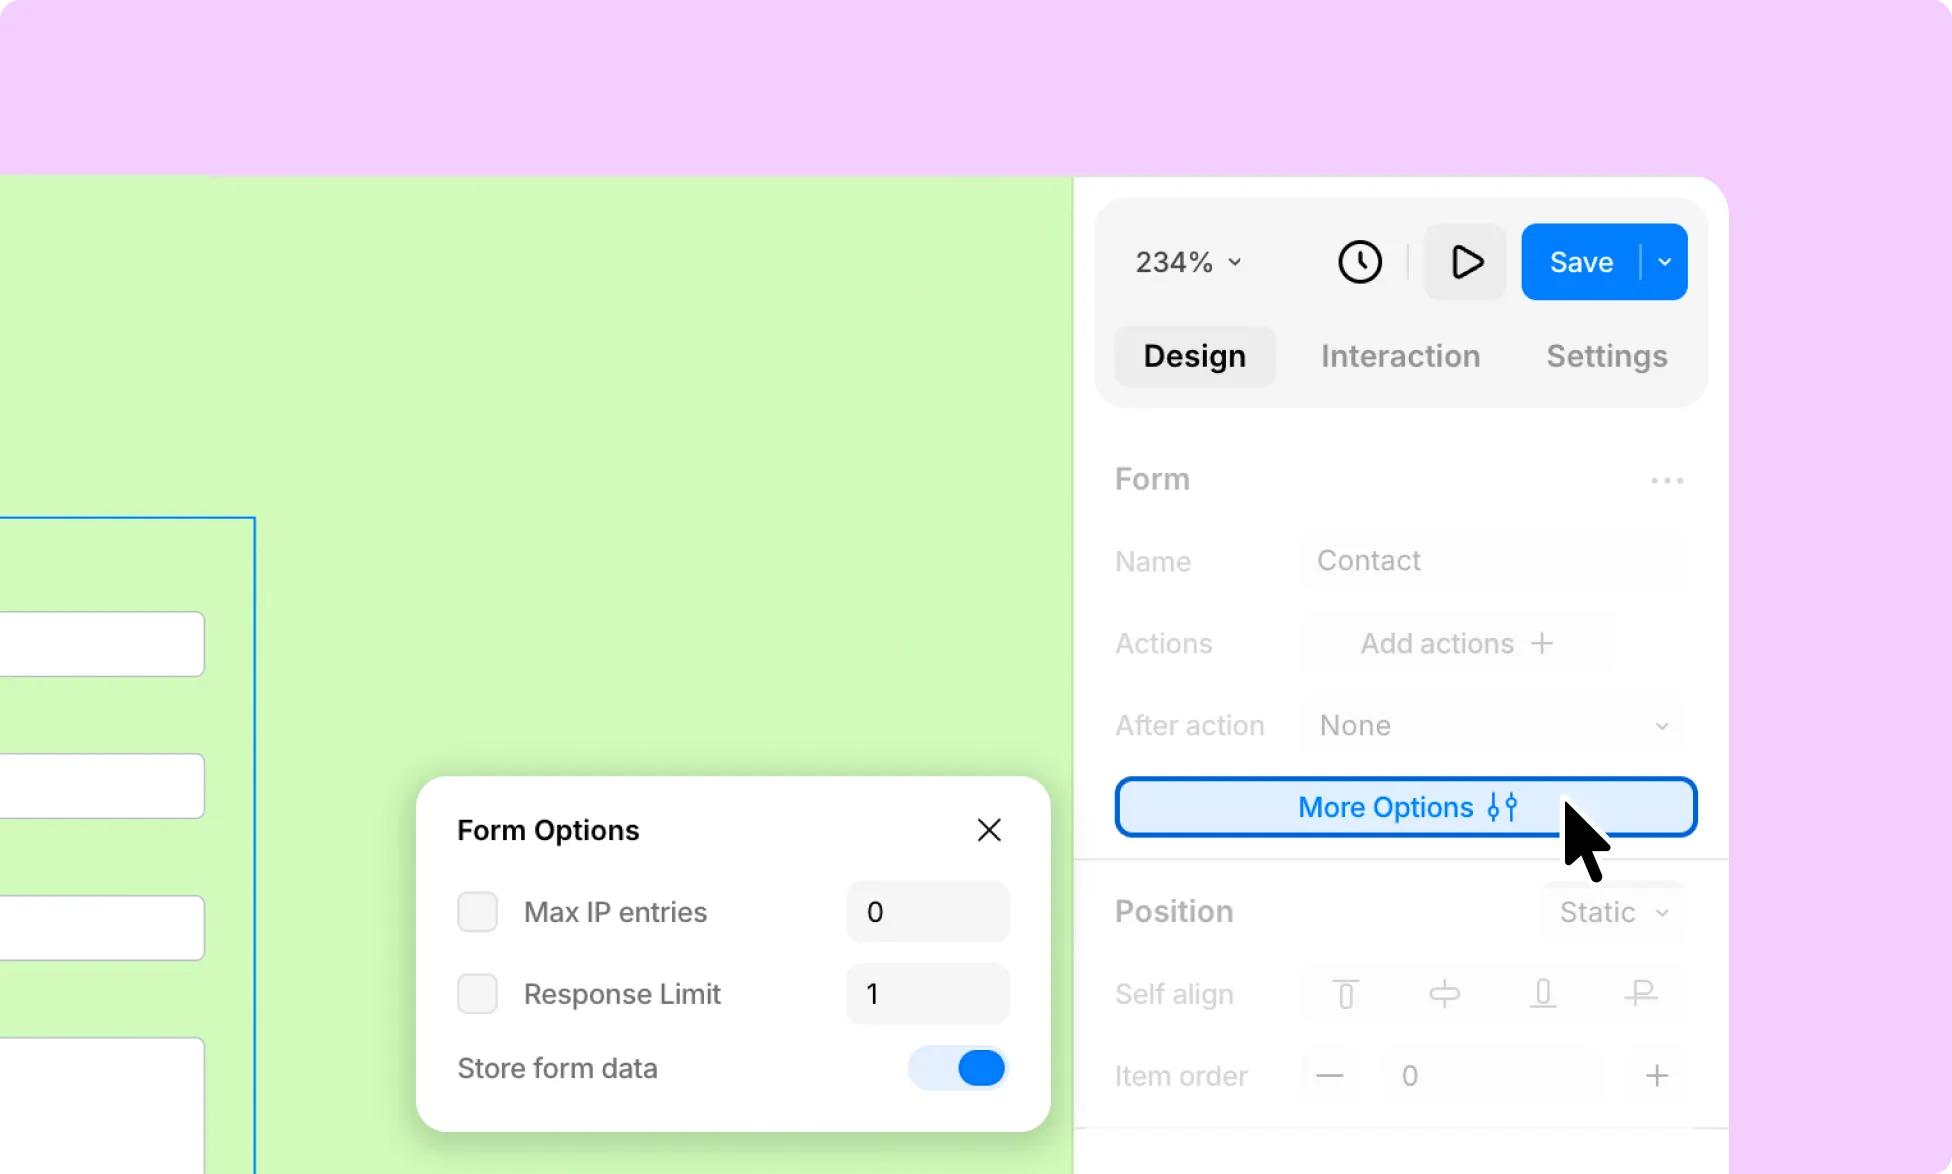
- Max IP entries: limits how many submissions a single IP address can make, so one person can’t flood the form.
- Response Limit: caps the total number of responses. Use it for cases such as limited event registrations.
- Store form data: on by default. Every entry is saved in Kirki Form Data Manager, which makes testing easy before you configure any routing.
How to Set Up Email and Webhook Actions
Email and webhook actions send submission data somewhere in addition to storing it in Kirki.
Set Up an Email Action
An email action can send you a copy of every submission and send the visitor a confirmation. SMTP must be configured first. Kirki works with any SMTP-compatible provider, and SMTP helps your emails reach the inbox instead of being flagged as spam.
- Open Form Settings > Actions.
- Select + Add and choose Email.
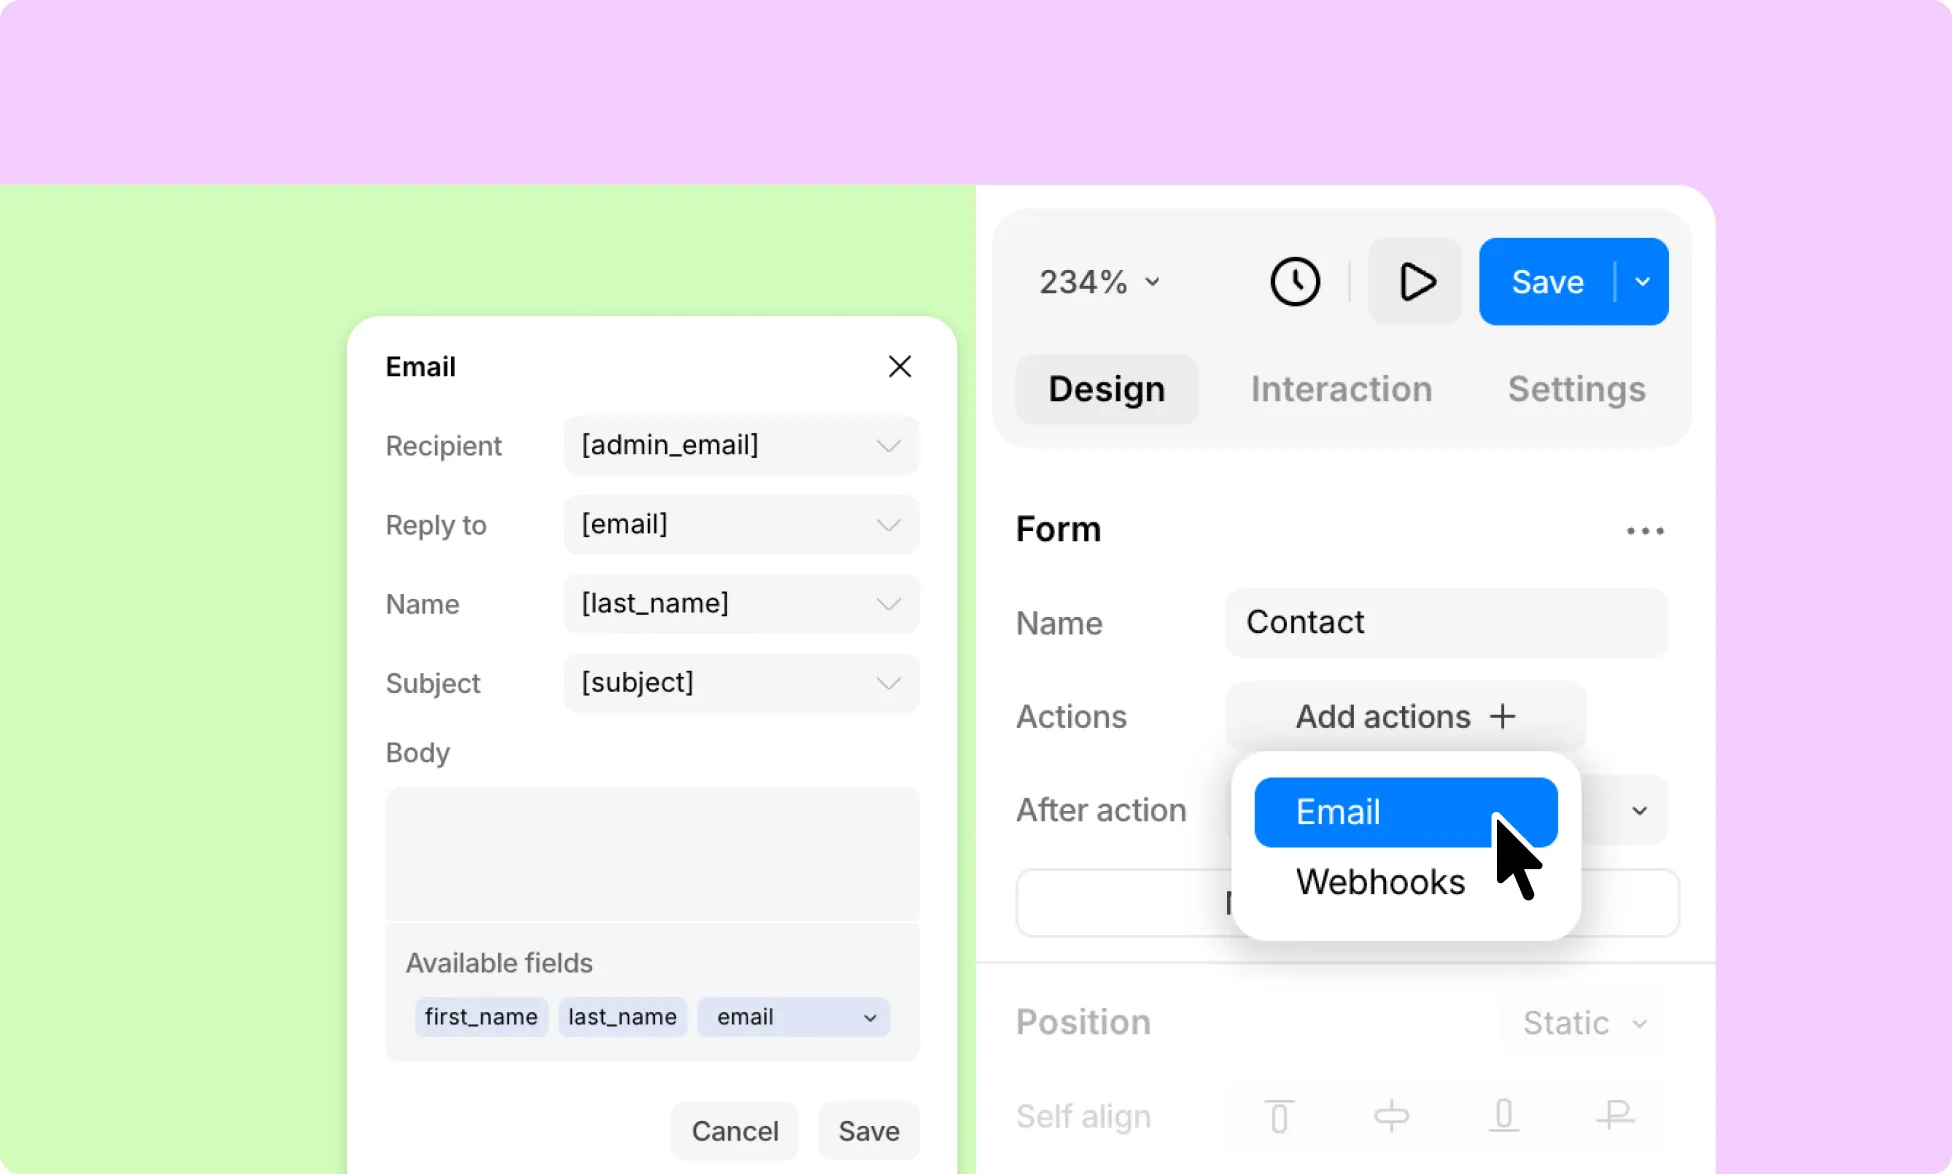
- Set the Recipient email address. Enter the admin email address for internal notifications, or select the form’s email field to send a confirmation to the visitor. A referenced form field must exist in the form field elements.
- Set the Reply-To address. This is where replies to the email go. Kirki sets the addresses automatically, so you don’t need to look up the emails manually.
- For Admin notifications: select admin_email.
- To send to visitors: Select the visitor’s email field so that you can reply to the visitor straight from your inbox.
- Optionally, set the Name. This is the sender name shown in the recipient’s inbox.
- Write the Subject and Body for the email. Both support dynamic form field tags, which fetch the data from the submission for the Form.
Example Email Body:
Hi [first_name],
Thank you for reaching out! We have received your message:
[message]
Our team will get back to you shortly.
To test the action, submit the form and check that the email arrives. If it doesn’t, check the spam folder. Then reply to the email and confirm the reply reaches the correct address. If emails still don’t arrive, confirm that SMTP is configured and that every field tag in the recipient, subject, and body matches a field in the form.
Set Up a Webhook Action
A webhook sends submission data to another service the moment it arrives. Use it to send entries to a CRM, start an automation in Zapier, or reach a tool such as Slack.
- Open Form Settings > Actions.
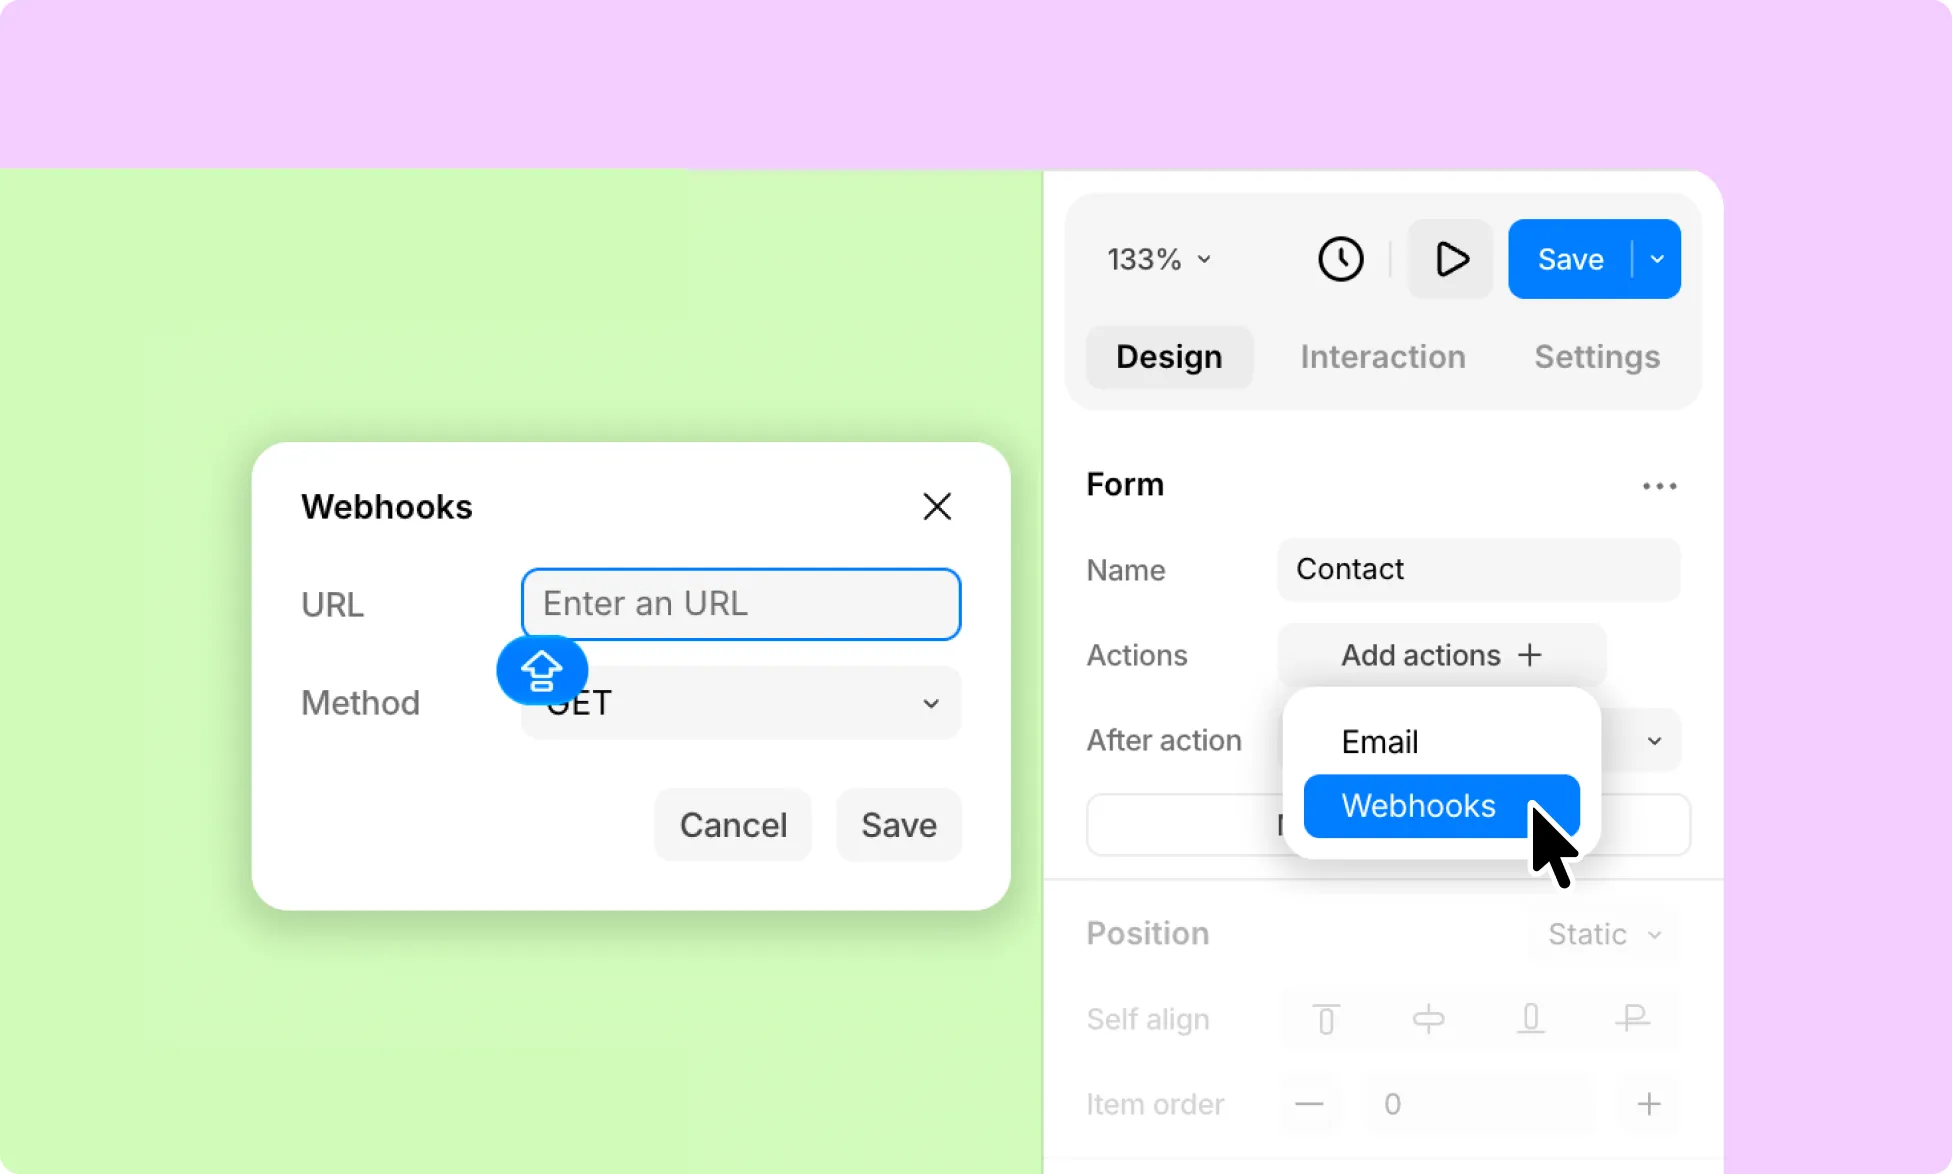
- Select + Add and choose Webhook.
- Enter the URL of the service or endpoint that should receive the data.
- Select the HTTP Method:
- POST: sends data in the request body. Recommended for most integrations.
- GET: sends data as query parameters in the URL.
- Save the webhook.
How to Add a Mailing List Signup Form
Kirki includes seven apps with dedicated email input elements for collecting email addresses: Mailchimp, ActiveCampaign, Drip, GetResponse, Kit, MailerLite, and Moosend. Each element works as a standalone signup form that passes the visitor’s email address to your mailing list platform.
- Open the Apps panel.
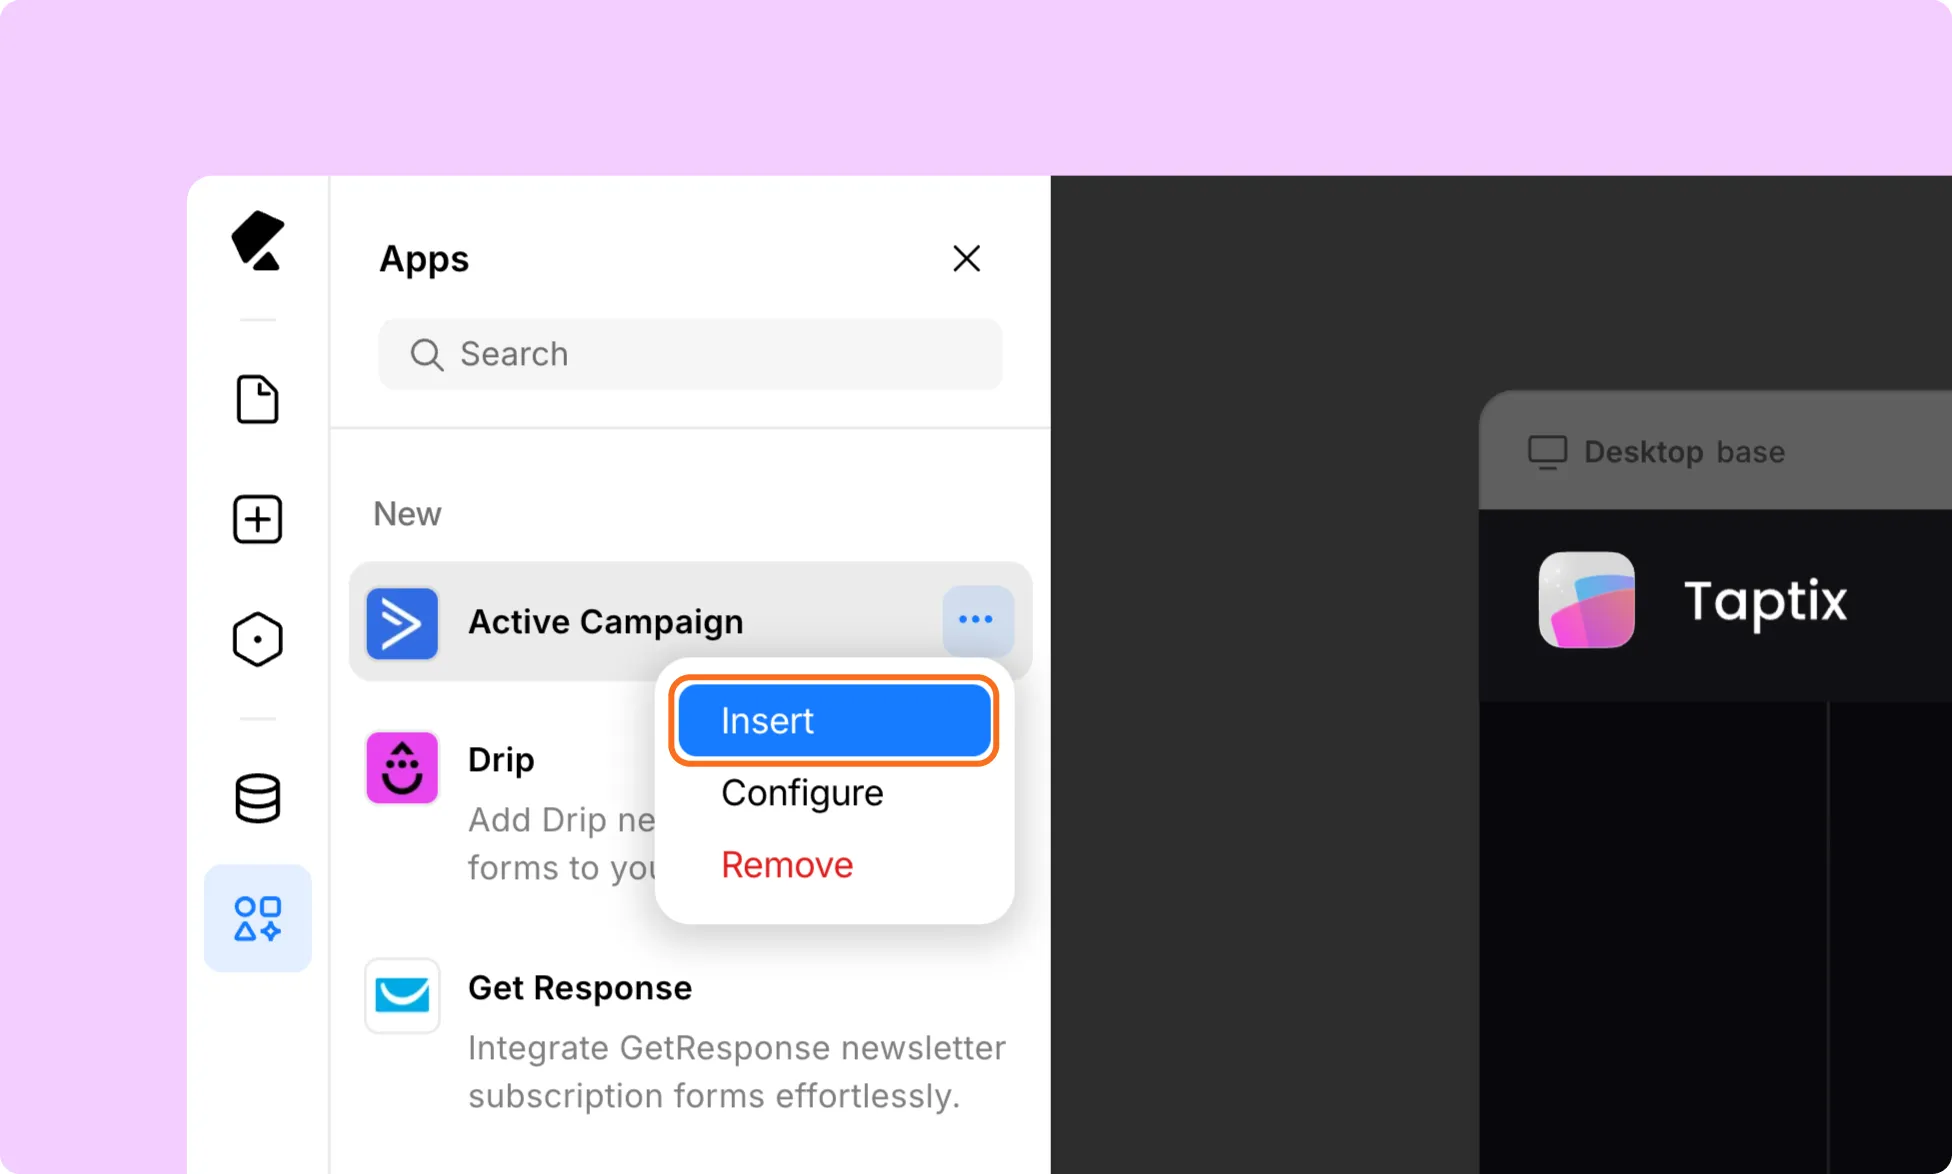
- Find the app you use and select Insert from the three-dot menu.
- Drag the element onto the page.
- Follow the app’s integration guide from Kirki documentation to connect your mailing list platform.
Note: Add the mailing list element on its own. If you place it inside an existing Form Block, the Submit button will not work as expected.
Best Practices and Troubleshooting
Best Practices
- Start with the Form Block so the submission flow and states are in place.
- Mark key fields as required so you don’t collect empty entries.
- Use reCAPTCHA on public forms.
- Set per-IP and total limits to reduce abuse.
- After setting up an email or webhook action, send a test submission.
Troubleshooting
Why are emails not arriving?
Confirm that SMTP is configured and check your spam folder. Also make sure every field referenced in the recipient, subject, or body exists in the form.
Why are submissions not working?
Check that the form was built inside the Form Block, so its success and error states exist and every field sits inside it. Also check that field names use underscores between words.
Why is the webhook not firing?
Double-check the endpoint URL. Confirm the HTTP method matches what the receiving service expects (usually POST), and check the integration’s own configuration.